Knowledge gained from Projects
CATcher:
MarkBind:
RepoSense:
TEAMMATES:
CATcher
ISAAC NG JUN JIE
Angular
Angular components are split into three parts, *.component.ts, *.component.html and *.component.css
*.component.ts
@Component({
  selector: 'app-auth',
  templateUrl: './auth.component.html',
  styleUrls: ['./auth.component.css']
})
This segment is found at the top of the *.component.ts files.
selectorindicates the keyword that will be used in*.component.htmlfiles to identify this component. For example,<app-auth> </app-auth>templateUrlindicates the filepath to the*.component.htmlfile.styleUrlsindicates the filepath(s) to the*.component.cssfile(s).
*.component.html
This is the template file. Template files use mostly HTML syntax, with a bit of angular specific syntax included. This includes the structural directives such as *ngIf, *ngFor, etc. The documentation is quite sufficient for understanding the angular syntax.
*.component.css
This is a stylesheet, using normal css. There is a ::ng-deep selector available, which promotes a component style to global style.
Arcsecond
Arcsecond is a string parsing library for javascript. An example arcsecond parser is as follows:
export const TutorModerationTodoParser = coroutine(function* () {
  yield str(TODO_HEADER);
  yield whitespace;

  const tutorResponses = yield many1(ModerationSectionParser);

  const result: TutorModerationTodoParseResult = {
    disputesToResolve: tutorResponses
  };
  return result;
});
str(TODO_HEADER)matches the starting of the string withTODO_HEADER.whitespacematches the next part of the string with one or more whitespaces.many1(ModerationSectionParser)applies theModerationSectionParserone or more times.
GraphQL
GraphQL is a architecture for building APIs like REST. Unlike REST where the server defines the structure of the response, in GraphQL, the client and request the exact data they need.
Node 14.x support on macos
Apple laptops changed to using ARM64 architecture back in 2020. This meant that Node versions released before then were not directly supported by the ARM64 architecture. This caused issues with the github actions. There is a workaround for this by running arch -x86_64 and manually installing node instead of using the setup-node Github action, but the simpler solution was to upgrade the test to use Node version 16.x.
Playwright testing
Tests the application by hosting it on a browser then interacting with html components and checking for expected behaviour. You can use the Playwright extension for chrome and the extension for visual studio code to generate tests and selectors. ...
KOO YU CONG
NPM (Node Package Manager)
Managing packages
Issue faced: I faced an issue when setting up the project locally that was related to a default NPM package used by Node to build and compile native modules written in C++. I had to dig deep into how packages were being installed and managed by NPM to resolve the issue and have documented my findings as follows:
Knowledge gained:
- NPM is the default package manager for
Node.js, helping developers to install and manage packages (i.e. libraries/dependencies) viapackage.json - NPM hosts a collection of open-source packages at their online registry, where we can then install these packages to be used in our project
- Packages can be installed globally (i.e. system wide) or locally (i.e. per project, under the
node_modules/folder) - Installation of packages is essentially pulling the source code of the package from NPM online registry, and will be ran locally when required. Hence it is possible (but certainly not recommended) to modify the pulled source code locally, as mentioned in one of the workarounds to this issue
Reference: https://docs.npmjs.com/packages-and-modules
Custom script definitions
Issue faced:
I realised that we were using a npm command that I was very unfamiliar with, that is npm run ng:serve:web, and I wondered what this command meant
Knowledge gained:
- When running commands in the form of
npm run <command>, e.g.npm run ng:serve:web, these commands are actually self-defined scripts under thepackage.jsonfile. - These are different from built-in npm commands, e.g.
npm build
Reference: https://docs.npmjs.com/cli/v9/commands/npm-run-script
NVM (Node Version Manager)
Issue faced: CATcher uses Node 16 while WATcher uses Node 14 to build, it was hard to switch between node versions quickly when working on both projects
Knowledge gained: We can use NVM to easily manage and switch between different node versions locally
Angular
Components and Modules
A typical component in Angular consists of 3 files:
- A html file that defines the layout of the component
- A css file that provides styling to the UI
- A typescript file that controls the logic and behaviour of the application, typically handles the data of the application too
Each component can have a module file where we can state the components or modules that this component is dependent on (i.e. the imports array) and the components that is provided by this module (i.e. the declarations array). This helps increasing the modularity and scalability of the whole application.
As a developer coming from React, here are some clear differences I have observed:
- There is no concept of states in Angular and the data passing is 2-ways, when the user updates from the UI, the value is automatically updated in the component and vice versa, whereas in React we would have to use states and explicitly update the states via setState or similar functions.
- Instead of defining the layout of componenet and logic in the same file, Angular split them into 2 seperate files (i.e. the html and typescript file), personally I felt that this split helps enforce the MVC architecture more strictly, but also imposes more restrictions when it comes to components that have tightly coupled logic
Reference: Angular Component Overview
Component Lifecycle
Angular components has a lifecycle that goes from Initialization --> Change detection --> Destruction. Our application can use lifecycle hooks methods to tap in on the key events of the lifecycle of a component, this is crucial for the fact that we do not have states like we do in React, and we would often want to perform certain operations during key changes to the component.
This knowledge was crucial to understanding and fixing an existing CATcher bug (PR), where the bug could be fixed by tapping on key changes to the issue model used in the component.
Reference: Angular Component Lifecycle
CATcher
IssueTablesComponent and how issues are being shown in tables
While working on issue #1309, I had to delve deep into how the the IssueTablesComponent is implemented in order to create new tables. A few meaningful observations learnt is summarised as follows:
- The issues displayed in the table is mainly dependent on 2 things,
- The base issues data provided by
IssueService, which is initialized based onIssuesFilter, and will periodically pull the issues from github - The
filterswe inject when creating theIssueTablesComponent, where the base issues can be filtered down to the issues that we are concerned of - The action buttons and its respective functionalities are pre-defined in the
IssueTableComponentitself, we only specify the action buttons that we want when creating theIssuesTablesComponentthrough theactionsinput.
- The base issues data provided by
Github Workflows/Actions
How github workflows/actions are being triggered
Issue faced:
While working on the new phase (i.e. bug-trimming phase) for CATcher, the team decided to
use a feature-bug-trimming branch as the target branch we all merge into. However, I noticed that when we created PRs / merged PRs to that feature branch (see this issue for more details), there are no github workflows/actions being run. This puts us at the risk of failing tests without knowing, I spent some time to learn how github workflows/actions are being triggered.
Knowledge gained:
- The potential trigger points for workflows are defined under the
on:section within the workflow file (i.e..ymlfile) - We can automatically trigger the workflows when we
pushorpull-requestto certain branches that are included:
on:
  # Automatically triggers this workflow when there is a push (i.e. new commit) on any of the included branches
  push:
    branches: [sample-branch1, sample-branch2]

  # Similar to push:, but for PRs towards the included branches
  pull_request:
    branches: [sample-branch1]
- We can also define an manual trigger point using the
workflow_dispatchkeyword:
on:
  # Allows you to run this workflow manually from the Actions tab
  workflow_dispatch:
Github APIs
REST vs GraphQL
Issue faced: As both CATcher and WATcher involves heavy interaction with the GitHub API(i.e. GitHub acts like our database), I often ran into issues related to the models that we retrieve from the Github API:
- Problematic RestGithubIssueState value #1310
- Redundant fetching of GitHub issues: Duplicated REST & GraphQL API Calls #1313
Knowledge gained:
- REST API
- Designed for standard HTTP requests and has fixed endpoints, hence
- responses usually have more data than needed by the users, and
- we might need multiple requests and aggregate data in the application logic to form the final results
- GraphQL API
- Designed as a query language, and can specify exactly what we need in a single request, hence
- we can prevent over-fetching or under-fetching
- GitHub adopted both API standards and provides endpoints to both these standards, allowing clients the flexibility to decide on their own what standard they want to use
- We started off the project with REST APIs, and later on decided to move towards GraphQL APIs as the customized queries fit our use case more (since GitHub is like a database to us). However, in order to prevent making breaking changes to the existing API calls, we decided to not change most of the existing REST API calls that were already implemented.
Reference:
Project management
Branch management strategies
Issue faced:
While working on WATcher features, there were team members working on bug fixes that are supposed to be deployed
in the next version, as well as team members working on new features that are supposed to be deployed in future versions. The work being done for future versions could not be merged to main branch as they are not supposed
to be deployed in the next version.
Knowledge gained:
We explored multiple possible strategies (discussed in this issue thread)
- We agreed that such scenarios where different team members are working on different future versions are very unlikely, and it wouldn't really make sense to have a branching workflow specifically for such scenarios
- Hence, we are proceeding with the original workflow, where each new feature will have a feature branch and will be merged to the
mainbranch once completed
Release management strategies
Issue faced:
We noticed that CATcher and WATcher were using different release management/deployment strategies, the differences are stated in this issue.
Knowledge gained:
We explored multiple possible release management and deployment strategies, and concluded that the automated workflow used in WATcher is not necessary more streamlined, as it would require additional PR to a deploy branch in order to trigger the deployment. In cases where we need to have hotfixes / cherry-pick certain releases, it would be even more troublesome, as we would need to create a seperate branch to include the hotfixes, then PR that branch to the deploy branch to trigger the deployment.
Hence, we standardized the deployment workflow to be manually triggered from github actions, and it would target a specific branch to be deployed. This strategy is more convenient as we would be able to directly deploy from main when we decide to create a new release, and when there are further changes/hotfixes required, we could simply branch out from that specific commit that were deployed (we use tagging so that these commits can be easily found) and apply the hotfixes, then deploying from that branch directly. Notice that this strategy is actually similar to the release branching workflow, but in the sense where we don't create a branch for the first release (we simply tag the commit on main), but if hotfixes are needed, we would then be in the same workflow as release branching
LOH ZE QING, NORBERT
ngx-markdown
I learned about the ngx-markdown library while I was working on a fix to preserve whitespace when converting Markdown to HTML. ngx-markdown combines multiple different language parsers and renders them in one library. ngx-markdown supports Marked, Prism.js, Emoji-Toolkit, KaTeX, Mermaid, and Clipboard.js. I learned about configuring the options for the Markdown HTML element.
Marked
Marked is the main parser we use for our comment editor in creating/editing issues and responses. I learned that any text that we write in Markdown syntax is converted into HTML elements using Marked. I found out that we can actually override how Marked generates the HTML elements, and we can add more attributes like classes, styles, and even modify the text before rendering it.
nvm-windows
WATcher requires node 14 in order to npm install some of its dependencies. However, instead of having to install and reinstall a different node version between different projects, I can use nvm-windows to install multiple node versions and switch between them. However, the latest version of nvm-windows has some issues if youwant to install node 14. After some debugging, I found out that nvm-windows v1.1.11 can install node 14 with no issues.
CATcher phase management
While working on creating a new phase, I learnt a lot about how phases are managed in CATcher. Every phase has its own phase permissions and phase routing. Phase permissions controls certain tasks. For example, creating a new issue, deleting an issue, editing an issue is only allowed at certain phases. Every phase also has its own routing which is used to load the different pages ranging from, viewing to editing. I also learnt that the repos to hold the issues are generated only at the bug reporting phase.
Git commit hooks
While I was working on a PR, I was wondering why certain parts of the code are modified after pushing a commit. I then found out that there are commit hooks in place to fix and format and lint issues. Source tree actually allows users to bypass the commit hooks if the changes are irrelevant to the PR that the user is working on.
Github search query
While working on implementing the feature 'View on github' for WATcher where a user will be able to see the current dashboard in github, I learnt that github searches can actually be done using URL queries.
URL encoding
While working with URL queries, I learnt that some characters are not allowed in URLs. Such characters are "!"$$()" etc. In order to use them, they must be encoded into UTF-8. More information can be found here.
GraphQL
While I was exploring a new feature, I realised that there is no dedicated sandbox for testing the API/Queries. This made it hard for me to understand how the queries work and what the queries response look like. It was very troublesome to have to look at the network tab and look at the response.
I also learnt about the difference GraphQL features like schema and fragments which are important for creating reusable and easily maintable queries.
I also learnt how WATcher uses pagination to perform queries to GitHub using cursor.
Postman
Following the exploration of GraphQL, I found that some of my teammates were trying to implement new features that required data from GitHub. However, they were struggling with understanding the GraphQL queries due to the lack of visualization. This has prompted me to create a sandbox for testing the GraphQL queries.
I discovered how to create reusable queries in Postman using collection variables such that anyone can fork the collection and start working on it without having to set up anything other than authorization.
I also learnt how to create environments for workspaces such that sensitive data such as secret keys will not be shared to public.
SOH ZHENG YANG, MARCUS
Tool/Technology 1
Angular
Angular is the main tool used in both CATcher and WATcher. It is based on TypeScript.
Angular is a component-based framework. Each component is generated with:
- *.component.ts
- *.component.html
- *.component.css
Component state is maintained in the .ts file. These state variables can be bound to HTML elements through use of curly braces .
Angular offers directives such as ngIf, ngFor that allow us to "use" JS in the HTML files.
Services are used for processing, for tasks that don't involve what the user sees. This is different from the .component file, which directly handles things the users see. Services are kept in a separate directory /services/*.
Angular services can be "injected" into other services. This is done in the constructor. Once injected, the service can access of any the injected service methods. But, it's important to not design the code in such a way that it causes a circular dependency. This was something I faced when implementing the presets, as the preset service relied on the filter service but the filter service also relied on the preset service. To fix it, we can redesign the code such that it doesn't have this circular dependency or we can extract out the parts into a 3rd service that is then injected into both.
Models in Angular can be used to enforce the type of data. This can also make it easier to separate and isolate related methods, such as putting preset-related functions in the Preset model.
Angular also has lifecycle hooks ngOnInit(), ngOnDestroy(). These setup and cleanup functions function quite similarly to React's useEffect, and are primarily used (among other things) to setup and clean up listeners, to prevent memory leaks
Tool/Technology 2
RxJS
RxJS is the core component required for reactivity in Angular applications. It exposes the idea of "observables", and when the state of that observable changes, it notifies any listeners attached to it.
Observables can be subscribed to and de-subscribed to at any time, using the .subscribe function. It is common practice to dennote observables as variables with
a trailing "
An observable is somewhat similar to a stream. We can register "stream processing functions" such as map, filter.
Tool/Technology 3
Material Angular
Material Angular is the design library used by CATcher and WATcher. Unfortunately, it is currently using version 11, when the latest version is 19. Despite this, most of the API is similar.
Material Angular allows us to use pre-made components that follow the Material design style, allowing us to have a consistent and coherent UI experience.
Material Angular provides advanced customization through the ::ng-deep CSS selector. Normally, any CSS written in the .css file will not apply to the generated Angular Material HTML components, however, by using ::ng-deep, it can be.
However, it's important to note that this is a deprecated in future versions.
Tool/Technology 3
Github API
GraphQL API Queries to Github are used extensively in WATcher. As a result, it is not uncommon that rate limits will be hit when opening a large repository. The rate limit of Github is 5k "points" per user per hour, and upon hitting this limit, we are locked out of the GraphQL API (but NOT normal Github API!) for 1 hour.
...
TNG WEN XI
Angular
CATcher and WATcher are both built using the Angular framework, which is a single-page web appliation framework. Angular comes with a CLI tool to accelerate development.
Components
- Components are the fundamental building blocks of Angular applications.
- Generating a component will create a TypeScript file, a HTML file, a CSS file, and a test file.
- The TypeScript class defines the interaction of the HTML template and the rendered DOM structure, while the style sheet describes its appearance.
- The
@Componentdecorator in the .ts file identifies the class immediately below it as a component class, and specifies its metadata. It associates a template with the component by referencing the .html file (or with inline code). - Template syntax
- A template contains regular html as well as Angular template syntax, which alters the HTML based on the application's logic and the state of application and DOM data.
- Templates can use:
- Data binding
- Pipes
- Directives
Services
Dependency injection (DI) is a design pattern for creating and delivering some parts of an application to other parts of an application that requires them. In the DI system, there are two main roles: dependency consumer and dependency provider.
In Angular, dependencies are typically services. When a service is provided at the root level, it becomes a singleton and and all classes will share the same instance of the service. This allows different classes (components, services, etc.) to inject the service and share information through it.
GraphQL
- CATcher and WATcher use GraphQL to fetch and update issues, PRs, and comments from GitHub.
- GraphQL is a query language, which is a specific syntax used to query a server to request or mutate data.
Drawbacks to using a traditional REST API:
- Overfetching
- Getting back more data than needed
- Underfetching
- Getting back less data than needed
- Need to make multiple requests to different end points
GraphQL API is resolved into its schema and resolvers:
- Schema describes how the API will work
- Every schema has two required types: the query and the mutation type
- Query: for fetching and reading data
- Mutation: For creating, updating, or deleting data from API
GraphQL allows users to manually choose which fields they want to fetch from the API
In the case of WATcher, using GraphQL means that additional fields can be fetched easily simply by adding new fields to the query and changing the Angular model for the issue / PR. For instance, when working on displaying reviewers in the PR cards in WATcher, I only had to add to the FetchPullRequests query and edit the respective Angular models to include the newly fetched data.
Rate limits
GitHub's GraphQL API has limitations in place to protect against excessive or abusive calls to GitHub's servers. While working on WATcher, we noticed that opening a large repository such as NUSMods will cause the rate limit to be exceeded very quickly, and this could be a potential problem for users who want to use WATcher for large repositories.
Primary rate limit
Users have a limit of 5000 points per hour per user, where the point value of a query can be calculated as specified in their docs.
Secondary rate limit
GitHub also enforces secondary rate limits to prevent abuse of the API. GitHub does not allow too many concurrent requests, and no more than 2,000 points per minute are allowed for the GraphQL API endpoint.
MarkBind
ADRIAN LEONARDO LIANG
Tech Stack
VueJS
VueJS is a JavaScript framework for building user interfaces, similar to React. It offers reactive data binding and a component-based architecture, allowing developers to create reusable components that allow for parent-child relationships. Vue is used extensively in MarkBind to create and render website components, such as pages, boxes, code blocks, etc.
<script>
Vue components often have a <script> block which defines the logic for the component. It involves sections like:
props- Defines data received from a parent componentdata()- Returns an object containing local reactive state variablescomputed- Defines derived properties that automatically update whenever dependencies changemethods- Functions that you can call within your template or events- Lifecycle hooks (
created,mounted, etc.) - Functions Vue calls automatically at specific points in the component's lifecycle
Template Refs
Vue provides a way to directly access underlying DOM elements using the ref attribute. Using either useTemplateRef or this.$refs, we can obtain the reference and directly manipulate the DOM element. However, this ref access should only be done after the component is mounted. Before it is mounted, it's possible for either methods to return null or undefined, which may lead to issues down the line.
One example of this was in the Tab and TabGroup of MarkBind. this.$refs.header was accessed within the computed property, which could be evaluated before the component mounts. This lead to an issue with Tabs not rendering. To fix this, the header reference should only be accessed after the component has mounted, such as under the mounted() lifecycle hook.
Resources:
- VueJS Tutorial - Official tutorial for VueJS
- VueJS Guide - Official VueJS Guide
- Template Refs - Vue3 Docs for Template Refs
TypeScript
TypeScript is a programming language that builds upon JavaScript by adding static typing, enabling developers to catch errors at compile time and write more maintainable code as compared to JavaScript. MarkBind uses TypeScript primarily in its core package.
MarkBind also has documentation describing the migration process from JavaScript to TypeScript. The migration PR should be structed as two commits, a "Rename" commit and an "Adapt" commit.
- The "Rename" commit is a commit specifically for renaming files from having the
.jsextension to having the.tsextension. Git should regard the changes of this commit as arename. - The "Adapt" commit is to adapt the files fully to TypeScript. This means fixing things like changing syntax to match TypeScript's syntax or adding types as necessary.
This two-step process for the migration helps to ensure Git views these changes as a renaming and adaption of the same file, rather than a deletion and creation. This helps with the review process on GitHub, as the diffs are shown side-by-side instead of entirely different files. For example, see the commit history in this PR. It also ensures that the history of a .ts file can still be traced back to its .js version, preserving valuable information for future developers.
TypeScript uses a configuration file tsconfig.json to define how the TypeScript compile tsc should compile .ts files into JavaScript. It is used primarily in MarkBind to exclude the compilation of node_module files and .test.ts files.
Resources:
- TypeScript Handbook - Official documentation for TypeScript
- TypeScript Migration - MarkBind's documentation for TypeScript migration
Jest
Jest is a JavaScript testing framework that can be used for any JavaScript project. It runs tests defined in .test.js files using a built-in test runner. Jest provides helpful functions like describe, test and expect, along with matchers like toEqual and toThrowError to define and assert test behavior.
In MarkBind, Jest is used extensively to test JavaScript and TypeScript files. It is primarily used for unit testing components and utility functions. These tests help prevent regressions and ensure code reliability as features evolve or are added to the codebase.
It supports setup and teardown of any preparation needed for the tests, using beforeEach, beforeAll, afterEach and afterAll. This is especially useful when some setup is needed to ensure that tests are independent of each other and that they are tested under the same conditions every time. An example of this can be seen in Site.test.ts, where before each test enviroment variables are deleted to avoid affecting the tests themselves.
It also supports function mocking, allowing developers to simulate and monitor function behavior — such as the number of calls and the arguments used — which is especially useful for unit testing. This can be found in NodeProcessor.test.ts, where Jest is used to mock the logger.warn function in order to track that certain messages are properly logged to the console for users.
Jest normally works by default but it is also possible to configure it using the jest.config.js file. There are many options you can configure, like verbose which reports every individual test during the run and testMatch which can be used to specify which test files to run, rather than running all .js, .jsx, .ts and .tsx files inside of __tests__ folders. testMatch was used this semester to ensure only the TypeScript version of tests are ran, preventing duplicated testing from running both .ts and .js files.
Resources:
- Jest Docs - Official Jest Documentation
- Jest Config Docs - Official Documentation on Jest Config
ESLint
ESLint is a JavaScript and TypeScript linter that statically analyzes code to find and fix problems, enforcing consistent coding styles and catching potential bugs before runtime. It parses the code and applies a set of rules to detect issues such as syntax errors, stylistic inconsistencies and potential bugs. These rules can be configured in .eslintrc.js by extending presets like airbnb-base or by specifying individual rules like "func-names": "off".
MarkBind uses ESLint to maintain code quality and consistency across the codebase. It helps enforce coding standards among the developers in both JavaScript and TypeScript files. ESLint is run not only during development but also during testing and CI. MarkBind has configured .eslintrc.js to match its desired coding standard, such as enforcing a 2-space indentation.
Resources
- ESLint Docs - Official ESLint Documentation
- MarkBind's ESLint Config - MarkBind's
.eslintrc.jsFile
GitHub Actions
GitHub Actions are a set of tools that allow developers to automate certain workfloaws and add them to their repositories. One of its main uses in MarkBind is to implemenet a Continuous Integration (CI) pipeline. PRs and commits are automatically built and tested to ensure the code stays functional, verifying the integrity of MarkBind's master branch.
The workflows are defined in .yml files located in the .github/workflows directory. Each .yml file describes:
- Triggers: When the workflow should run (e.g. on push, pull requests, etc.)
- Jobs: A set of tasks to do, such as installing dependencies, running tests or uploading to CodeCov
- Steps: The individual commands within each job (e.g.
npm install,npm run setup,npm run testetc.)
CodeCov
CodeCov is a code coverage reporting tool that helps developers understand how much of their code is tested and accounted for by automated tests. It is able to visualize which lines of code are covered and which aren't. CodeCov can be a part of the CI pipeline, where the test coverage is uploaded after all tests have passed.
MarkBind uses CodeCov to generate the code coverage reports within PRs. The code coverage report can then be used during the review process to determine if any drop in code coverage is acceptable or should be minimized.
Code Coverage Calculations:
One thing I learnt about CodeCov was how code coverage is calculated and how indirect changes affect it:
- Code coverage is calculated only for files that have at least one test. That means that files with no tests at all are excluded from the coverage percentage, even if they're 0% tested. If a test is later added to such a file, that file then becomes part of the coverage calculation.
- Indirect changes occur when testing one file brings in other previously untested files. For example, if an untested file (File A) depends on other untested files (Files B, C), adding a test to File A will also pull File B and C into the coverage calculaton, even if they remain untested.
This behaviour explains the drop in coverage in this commit. Tests were added to serve.js, which was originally untested. This lead serve.js to be included in the coverage calculations. However, since serve.js depends on other untested files like logger.js, live-server/index.js and serveUtil.js, those files were also included indirectly in the calculation. Because those additional files were also untested, the overall coverage percentage dropped, causing the commit to fail the CI coverage check.
Upload Tokens:
Another issue with CodeCov was its use of global upload tokens to upload coverage reports. These tokens were limited, meaning that during periods of high traffic, PRs would not reliably generate coverage reports (see discussion issue #2658). This would hinder the review process and was also the reason why the drop in coverage in the previous example was only noticed after the PR had already been approved.
We resolved this by migrating from CodeCov v3 to v5. In v5, the release notes stated that it was now possible to upload reports without an upload token, provided certain conditions were met. One of these conditions was that our repository was public and the reports had to come from an unprotected branch.
Since MarkBind follows a fork-and-PR workflow, these PRs from forks are considered as unprotected branches. This allowed us to take advantage of the new tokenless upload feature, making coverage uploads far more reliable during CI runs.
Resources:
- CodeCov Docs - Official CodeCov Documentation
- CodeCov v5 - CodeCov v5.0.0 Release Notes
- Forking Workflow - MarkBind's Forking Workflow Guide
RegEx
Regular Expressions (RegEx) are a sequence of characters used to match a patterns in text. They can range from simple exact-word matches to complex patterns using special characters.
RegEx is typically used in MarkBind to validate user inputs andc heck for discrepancies. Some examples include:
- The Highlighter component, to match the highlighter rules
- Within the
servecommand, to detect IP zero addresses and check the validity of IP addresses
Resources:
- RegEx Cheatsheet - A reference for RegEx constructs
- RegEx101 - An interactive tool for testing RegEx patterns
MarkBind
MarkBind Highlighter Component
In MarkBind, users can specify highlighter rules following the syntax in our User Guide. MarkBind then highlights the code block appropriately when rendering the site.
Implementation Details
Markbind's core package processes highlighter rules in the following steps:
- Parsing Highlighter Rules
- Uses RegEx in
core/src/lib/markdown-it/highlight/HighlightRuleComponent.tsto match the syntax for rules such as character or word-bounded highlights.
- Uses RegEx in
- Calculating Character Bounds
- Utilizes
computeCharBounds()to adjust user-specified bounds, ensuring they are valid. - Handles unbounded values and adjusts for indentation level so that bounds are relative to indentation level.
- Clamps values to ensure they stay within the valid range.
- Utilizes
- Wrapping Highlighted Content
- Wraps text content within
<span>elements (highlightedorhl-data) to apply the necessary highlighting when rendered.
- Wraps text content within
Absolute Character Position Highlighting
Problem
Previously, the highlighter could not highlight indentation since it automatically adjusted for it during character bound calculation.
Solution
I introduced a feature allowing users to specify absolute character positions rather than relative positions.
- Users can prefix their character bounds with
+to indicate absolute positioning. - The RegEx parser was updated to accomodate this syntax.
computeCharBounds()was modified to skip indentation length adjustments if absolute bounds were detected.
Edge Case: Handling Tab Characters (\t)
An issue arose when using absolute bounds with tab characters. Since \t was considered a single character but visually occupied more space, the highlighting results were inconsistent. To resolve this:
- I implemented an automatic conversion of tab charactes to four spaces using
code.replace(/\t/g, ' '). - This ensured consistent highlighting behavior regardless of tab spacing.
MarkBind CLI commands
MarkBind provides several Command Line Interface (CLI) commands, such as init, serve and build. Details can be found in the User Guide.
Implementation Details
MarkBind's CLI functionality lies within the cli package. It uses the commander library to create and configure its CLI commands. The library allows developers to customie the commands, such as their aliases, options, descriptions and action. The user's specified root and the options are then passed on to the corresponding action function.
MarkBind's serve command
MarkBind's serve command allows users to preview their site live. It follows these steps:
- Receiving the CLI command
- The
commanderlibrary processes theservecommand, along with user-specified options. - These values are passed to the
serve()function incli\src\cmd\serve.js.
- The
- Building the Site
- The
serve()function performs preprocessing to verify that the user-specified root contains a valid MarkBind site. If not, an error is thrown and execution stops. - A
serverConfigobject is created and passed to theSiteinstance before being used to configureliveServer.start().
- The
- Starting the Web Server
- The server is started using
cli\src\lib\live-server\index.js, which is a custom patch of thelive-serverlibrary. live-serveruses Node.js'shttpmodule to start the web server.- It listens for the
errorevent, handling errors such asEADDRINUSE(port already in use) andEADDRNOTAVAIL(address not available). - It also listens for the
listeningevent, indicating that the server is ready so the site URL can be opened.
- The server is started using
- Opening the Live Preview
- The
opnlibrary is used to automatically open the preview URL. live-serverlistens for file system events likeaddorchangeto trigger areloadevent, updating the preview in real-time.
- The
Issues with live-server Patch
MarkBind's live-server patch had some issues, particularly with IPv6 addresses:
Invalid IPv6 URLs
When an IPv6 address is supplied by the user, the opened URL is invalid. IPv6 URLs require square brackets[], e.g., the address::1should be opened with a URL likehttp://[::1]:8080instead ofhttp://::1:8080. As a side note,localhostresolves to::1.Incorrect Open URL for EADDRNOTAVAIL
When this error occurs (indicating the specified address is unavailable), the patch retries using127.0.0.1. However, the opened URL still referenced the original unavailable address, causing confusion for users.Missing Warning for IPv6 Broadcast Address
serve.jsissues a warning when users specified0.0.0.0(IPv4 broadcast address), but the equivalent warning was missing for IPv6 addresses like::.
Resources
- 'commander' Package - Official
commandernpm page live-serverPackage - Officiallive-servernpm page
Project Management
MarkBind has documentation for Project Management with topics ranging from Managing PRs, Doing a Release, Acknowledging Contributors and Managing the Repository. This information will be useful when working on MarkBind as a senior developer for CS3282.
Managing PRs
MarkBind follows the general guidelines stated under Working with PRs @SE-EDU. In particular, the way we phrase our PR review comments is important for a good discussion.
PR Approvals
MarkBind follows the rule that PRs should normally need two approvals before merging. This is to allow other developers to review the PR before hastily merging. If the PR is simple enough, then there's no need to wait for another approval.
As a side note, it's important to check for certain things in a PR. For example, PRs should not make any unnecessary changes in the codebase when solving an issue. It's also good to make use of the report generated by the CI pipeline, such as where all test cases pass and the coverage report generated by CodeCov. If any drop in coverage is detected, the reviewer will need to consider whether such a drop is too severe or could be avoided and addressed by the PR author.
Resources
- Project Management - MarkBind's documentation for Project Management
CHAN GER TECK
List the aspects you learned, and the resources you used to learn them, and a brief summary of each resource.
Internal Tools/Technology
How MarkBind Works (Overview of everything)
In order to make more well informed changes and tackle deeper issues, I decided to cover the whole codebase of Markbind just so I could have a much fuller understanding of how different parts worked together.
While doing so, I used a MarkBind site to document the architecture and different packages and classes in the MarkBind codebase. The site can be viewed here: https://gerteck.github.io/mb-architecture/
Markbind's Search Utility
How Native MarkBind Search works
Collection of Title and headings in generation:
- We trace the website generation in
Site/index.ts. - When building source files, during the page generation process,
Page.collectHeadingsAndKeywordsrecords headings and keywords inside rendered page into this.headings and this.keywords respectively. - When writing site data, the title, headings, keywords are collected into pages object.
Page Generation and Vue Initialization
- In
core-web/src/index.js, thesetupWithSearch()updates the SearchData by collecting the pages from the site data.setupWithSearch()is added as a script in the file templatepage.njkused to render the HTML structure of Markbind pages.- This file template is used during the page generation process.
- Note also that
VueCommonAppFactory.jsprovides a factory function (appFactory) to set up the common data and methods for Vue application shared between server-side and client-side, and provides the common data properties and methods.- In particular,
searchData[]andsearchCallback(), which are relevant in the following portion. - When using
<searchbar/>, this is where to use MarkBind's search functionality, we set the appropriate values:<searchbar :data="searchData" :on-hit="searchCallback"></searchbar>
- In particular,
Vue Components: Searchbar/SearchbarPageItem.vue Searchbar.vue
- The searchbar uses the
searchData[]indata, filters and ranks the data based on keyword matches and populates the dropdown withsearchbarPageItems. - It calls the
on-hitfunction (whichsearchCallbackis passed into) when a search result is selected. - Presentation wise, each search result is represented by a
searchbar-pageitemvue component.
SearchbarPageItem.vue
- Presents the component conditionally based on whether item is a heading or a page title.
How the new Markbind PageFind Plugin Works
About PageFind: A fully static search library that aims to perform well on large sites, while using as little of users bandwidth as possible, and without hosting any infrastructure.
Documentation:
Integration of Pagefind into MarkBind
It runs after the website framework, and only requires the folder containing the built static files of the website. A short explanation of how it works would be:
- PageFind indexes the static files
- If pagefind is included as a plugin, we indexSites with PageFind, which writes the index files _site/pagefind
- Plugin exposes a pagefind JS API for searching
- Alternatively, use pagefind default UI for searching. This is done by processes containers with
id="pagefind-search-input", and initialing a default PageFindUI instance on it, not unlike how algolia search works.
- Alternatively, use pagefind default UI for searching. This is done by processes containers with
- This JS API is used by a custom Vue component searchbar.
External Tools/Technology
Vue
Vue 2 to Vue 3
I got the chance to experience this firsthand.
- Through the process (ongoing), it has also allowed me to uncover a significant number of bugs in MarkBind.
https://v3-migration.vuejs.org/migration-build
MarkBind (v5.5.3) is currently using Vue 2. However, Vue 2 has reached EOL and limits the extensibility and maintainability of MarkBind, especially the vue-components package. (UI Library Package).
Vue 2 components can be authored in two different API styles: Option API and Composition API. Read the difference here It was interesting to read the difference between the two.
- The Option API organizes code into predefined options like data, methods, and computed, making it simpler and more beginner-friendly but less flexible for complex logic.
- In contrast, the Composition API uses a setup() function and reactive utilities like ref and reactive, allowing logic to be grouped by feature for better modularity and reusability. While the Option API relies on mixins for reuse, which can lead to conflicts, the Composition API enables cleaner and more scalable code through composable functions.
- Additionally, the Composition API offers superior TypeScript support and is better suited for large, complex applications, though it has a steeper learning curve compared to the straightforward Option API.
Server-side rendering: the migration build can be used for SSR, but migrating a custom SSR setup is much more involved. The general idea is replacing vue-server-renderer with @vue/server-renderer. Vue 3 no longer provides a bundle renderer and it is recommended to use Vue 3 SSR with Vite. If you are using Nuxt.js, it is probably better to wait for Nuxt 3.
Currently, MarkBind Vue components are authored in the Options API style. If migrated to Vue 3, we can continue to use this API style.
Vue 2 to Vue 3 (Biggest Shift)
Vue 2 In Vue 2, global configuration is shared across all root instances as concept of "app" not formalized. All Vue instances in the app used the same global configuration, and this could lead to unexpected behaviors if different parts of the application needed different configurations or global directives.
E.g. global API in Vue 2, like Vue.component() or Vue.directive(), directly mutated the global Vue instance.
Some of MarkBind's plugins depend on this specific property of Vue 2 (directives, in particular, which are registered after mounting).
However, the shift to Vue 3 took into consideration the lack of application boundaries and potential global pollution. Hence, Vue 3 takes a different approach that takes a bit of effort to migrate.
Vue 3
In Vue 3, the introduction of the app instance via createApp() changes how global configurations, directives, and components are managed, offering more control and flexibility.
- The
createApp()method allows you to instantiate an "app," providing a boundary for the app's configuration -- Scoped Global Configuration: Instead of mutating the global Vue object, components, directives, or plugins are now registered on a specific app instance.
Also some particularities with using Vue 3:
Vue SFC (Single File Components)
Vue uses an HTML based template syntax. All Vue templates
<template/>are syntactically valid HTML tht can be parsed by browsers. Under the hood, Vue compiles the template into highly optimized JS code. Using reactivity, Vue figures out minimal number of components to re-render and apply minimal DOM manipulations.
SFC stands for Single File Components (*.vue files) and is a special file format thaat allows us to encapsulate the template, logic, styling of a Vue component in a single file.
All
*.vuefiles only consist of three parts,<template>where HTML content is,<script>for Vue code and<style>.SFC requires a build step, but it allows for pre-compiled templates without runtime compilation cost. SFC is a defining feature of Vue as a framework, and is the reccomended approach of using Vue for Static Site Generation and SPA. Needless to say, MarkBind uses Vue SFCs.
<style>tags inside SFCs are usually injected as native style tags during development to support hot updates, but for production can be extracted and merged into a single CSS file. (which is what Webpack does)
Vue Rendering Mechanism
Reference: https://vuejs.org/guide/extras/rendering-mechanism
Terms:
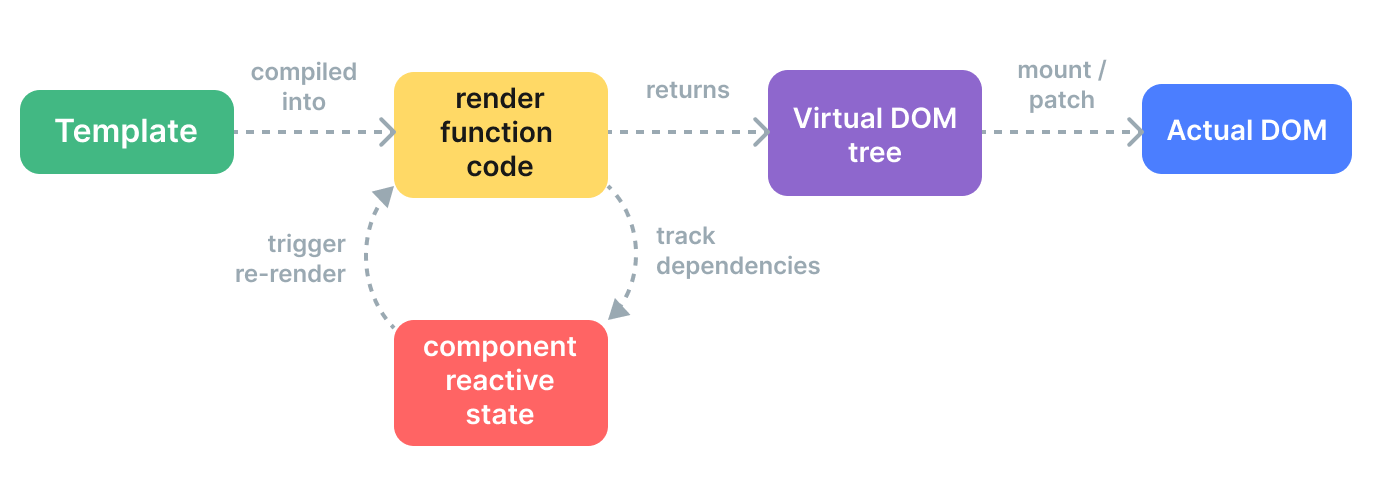
virtual DOM (VDOM)- concept where an ideal 'virtual' DOM representation of UI kept in memory, synced with the 'real' DOM. Adopted by React, Vue, other frontend frameworks.mount: Runtime renderer walk a virtual DOM tree and construct a real DOM tree from it.patch: Given two copies of virtual DOM trees, renderer walk and compare the two trees, figure out difference, apply changes to actual DOM.
The VDOM gives the ability to programmatically create inspect and compose desired UI structures in a declarative way (and leave direct DOM manipulation to renderer).
Render Pipeline What happens when Vue Component is Mounted:
- Compile: Vue template compiled into render function, functions that return VDOM trees. (Done ahead of time in MarkBind)
- Mount: Runtime renderer invoke render function, walks VDOM, creates actual DOM node.
- Patch: When dependency used during mount changes, effect re-runs, new updated VDOM created. Then, patch the actual DOM.
Vue Server Side Rendering (SSR)
It is possible to render the Vue components into HTML strings on the server, send directly to the browser and finally 'hydrate' static markup into fully interactive app on the client.
Advantages of SSR:
- Faster time to content, especially on slower devices
- Unified Mental Model using same language and same declarative
- Better SEO since crawlers see fully rendered page
Roles of Server and Client in SSR:
SSR: The server's job is to:
- Compile the Vue template into a render function.
- Use the render function to generate static HTML.
- Send the static HTML to the browser.
Client-Side Hydration: Once the browser receives the static HTML from the server, the client-side Vue app takes over. Its job is to:
- Attach event listeners and reactivity to the static HTML.
- Make the app interactive (e.g., responding to user actions like clicks or input).
Vue 3 createApp() vs createSSRApp() createApp does not bother with hydration. It assumes direct access to the DOM, creates and inserts its rendered HTML. createSSRApp() used for creating Vue application instance specifically for SSR, where inital HTML is rendered on the server and sent to client for hydration. Instead of rendering (creating and inserting whole HTML from scratch), it does patching. It also does initialization by setting up reactivity, components, global properties etc, event binding during the mount process (aka Hydration).
External Packages used by MarkBind
live-server– A simple development server with live reloading functionality, used to automatically refresh the browser when changes are made to MarkBind projects.commander.js– A command-line argument parser for Node.js, used to define and handle CLI commands in MarkBind.fs(Node.js built-in) – The File System module, used for reading, writing, and managing files and directories in MarkBind projects.lodash– A utility library providing helper functions for working with arrays, objects, and other JavaScript data structures, improving code efficiency and readability in MarkBind
Research on Other SSGs
While working on Markbind, I thought that it would definitely be essential to survey other Static Site Generators and the competition faced by MarkBind.
Researching other SSGs available (many of which are open source as well) has allowed me to gain a broader picture of the roadmap of MarkBind.
For example, Jekyll is simple and beginner-friendly, often paired with GitHub Pages for easy deployment. It has a large theme ecosystem for rapid site creation. Hugo has exceptional build speeds even for large sites. Other SSGs offer multiple rendering modes (SSG, SSR, CSR) on a per page basis, support react etc. Considering that the community for all these other SSGs are much larger and they have much more resources and manpower to devote, I thought about how MarkBind could learn from these other SSGs.
Insights that could be applied to MarkBind
Overall, some insights that can be applied to MarkBind would be to:
- Focus on Content-Heavy Instructional Websites
- Double down on features tailored for educational, project documentation, and course websites.
- Highlight built-in components like popovers, tabs, and collapsible panels as unique differentiators.
- Emphasize "Out-of-the-Box" Functionality
- Simplify onboarding and documentation for new users.
- Provide all essential features for documentation by default (e.g., diagrams, code snippets, multi-level navigation).
- Position MarkBind as a solution that minimizes configuration while maximizing flexibility.
- Provide beginner-friendly guides and videos for quick adoption.
- Develop Pre-Built Templates
- Create specialized templates for use cases like course sites, research documentation, or user guides.
- Create ready-made themes/templates focused on education and documentation.
- Allow users to deploy quickly with minimal setup.
General Development Knowledge
CommonJS and ESM
CommonJS (CJS) is the older type of modules and CJS were the only supported style of modules in NodeJS up till v12.
- Use the syntax
requireandmodule.exports = {XX:{},} - Global, synchronouse require function added to import other odules.
- mark the file as a CJS module by naming as
.cjsor by using typecommonjsin package.json.
EcmaScript Modules (ESM) standardized later and are the only natively supported module style in browsers. It is the (EcmaScript standard) JS standard way of writing modules/
- use
import { XXX } from YYY(top of file),const { ZZ } = await import("CCC");andexport const XXX = {}. - Syntax addition to JS and allows to easily import and export static members.
Issues I faced:
- I didn't realize tha my TypeScript code was being compiled to CommonJS (
require) instead of ES module syntax (import), and henceimportwas not working correctly. - Had to change the
tsconfig.jsonsettings appropriately.
Classic Scripts vs Module Scripts in JS
JavaScript offers two script types: module and non-module. (For web pages, JavaScript is the Prog. Lang for the web after all).
Module Script Files: use ES Modules (import/export), run in strict mode, and have local scope, making them ideal for modern, modular applications. They load asynchronously and are supported in modern browsers and Node.js (with .mjs or "type": "module").
- Scope: Local (encapsulated)
- Execution: Strict mode by default
- Loading: Asynchronous, deferred
- Reusability: High (modular)
- Browser Support: Modern browsers
- Node.js: Native (
.mjsor"type": "module")
Non-Module Script File rely on global scope, lack strict mode by default, and load synchronously. They work in all browsers and use CommonJS (require) in Node.js, making them suitable for legacy projects or simple scripts.
- Syntax: No
import/export - Scope: Global (pollution risk)
- Execution: Non-strict by default
- Loading: Synchronous by default
- Reusability: Low (global dependencies)
- Browser Support: All browsers
- Node.js: CommonJS (
require)
Use modules for modern, scalable apps and non-modules for legacy compatibility or simpler use cases. Transition to modules for better maintainability.
TypeScript
TypeScript has two main kinds of files. .ts files are implementation files that contain types and executable code. These are the files that produce .js outputs, and are where you normally write your code. .d.ts files are declaration files that contain only type information. These files don’t produce .js outputs; they are only used for typechecking.
DefinitelyTyped /
@types: The DefinitelyTyped repository is a centralized repo storing declaration files for thousands of libraries. The vast majority of commonly-used libraries have declaration files available on DefinitelyTyped.Declaration Maps:
.d.ts.mapDeclaration map (.d.ts.map) files also known as declaration source maps, contain mapping definitions that link each type declaration generated in .d.ts files back to your original source file (.ts). The mapping definition in these files are in JSON format.- This is helpful in code navigation. This enables editor features like “Go to Definition” and Rename to transparently navigate and edit code across sub projects when you have split a big project into small multiple projects using project references.
CHEAH GEE NUNG, IAN
Tool/Technology 1
List the aspects you learned, and the resources you used to learn them, and a brief summary of each resource.
Vue
1. Components of Vue
A Vue component typically consists of three main sections.
- Template: this defines the HTML structure
- Script: Contains the logic and data for the component
- Style: Defines the CSS specific to the component
2. Using Computed Properties in Vue.js
When doing experimental changes, I thought of letting users specify things like font size, font type, etc. Upon looking up the other components and stackoverflow, this is what I found
- In a basic Vue component, we can define a computed property by plaing it in the
computedoption. These properties are automatically updates when the underlying data changes.
3. Using Computed Properties vs Lifecycle Hooks
While working on PR, I learned about different approaches to access DOM elements.
In the TabGroups.Vue file, the original approach is to do
computed: {
    headerRendered() {
        return this.$refs.header.textContent.trim();
    }
}
By having the headerRendered() under computed:, the benefit is that this is reactive by nature, it automatically updates when dependencies change. However, it can cause errors if accessed before DOM is ready.
To solve the issue of Tabs not showing correctly, this is the approach we adopted:
mounted() {
    this.headerRendered = this.$refs.header.textContent.trim();
}
In this new approach, it guarantees DOM availability, which is better for one-time calulations. However, there are cons as well. This is not reactive, it requires manual upates if content changes.
I would summarize my learning in the following 3 points:
- Computed properties are best for reactive data that needs to stay synchronized
- Lifecycle hooks like
mountedare safer for DOM-dependent operations - $refs are only populated after the component is mounted
Here are the resources that I referenced while working on the issue
4. My Vue2 vs Vue3 research over the recess week
Since gerteck was working on Vue2 to Vue3 migration, I explored some differences between the 2 over the recess weeks and here are my gained knowledge.
- Reactivity System
- Vue2: uses
Object.definePropertyfor reactivity - Uses ES6
Proxy, enabling reactivity for dynamically added properties
- Composition aPI
- Vue2: Options API only (
data,methods,computed) - Vue3: Introduces Composition API (
setup()), allowing better logic reuse
- Performance
- Vue2: Slower cirtual DOM diffing.
- Vue3: Faster due to optimized virtual DOM and tree-shaking support
- Fragments
- Vue2: Requires a single root element in templates
- Vue3: Supports multiple root nodes (fragments).
Here are some documentations I referenced
HTML & CSS
1. Adding Hyperlinks in HTML and Markdown
When writing in Markdown, hyperlinks are created using a specific syntax, but behind the scenes, this Markdown code is converted into HTML.
In Markdown, we use syntax like
[Java Docs](https://docs.oracle.com/javase/8/docs/api/java/lang/String.html)to create a hyperlink. When the Markdown is converted to HTML, it generates an anchor tag in the form of<a href="https://docs.oracle.com/javase/8/docs/api/java/lang/String.html">Java Docs</a>. This would open the link in the same tab, as no additional attributes are specified.In contrast, when we write HTML durectly, we can specify additional attributes, such as
target="_blank", to control how the link behaves. Using the same example,<a href="https://markbind.org/userGuide/templates.html" target="_blank">User Guide: Templates</a>will ensure that the link opens in a new tab.
2. Rendering of font awesome icons using CSS
In one of my deployment on netlify, some of which did not display the font-awesomes icons properly, leading me to research on them.
Each font awesome (fa-linkedin, fa-github) is mapped to a Unicode character in the font file. For example,
when running the HTML code <i class="fa-house"></i>, CSS will first apply the fa-solid class based on its
mappings, CSS will also set aside the unicode charater for fa-house. The browser loads the web font fa-solid-900.woff2 and displays the icon.
What is woff2?
WOFF2 is a webfont file format, and it is a more compressed version of WOFF and is used to deliver webpage fonts on the fly. In the context of rendering font-awesome, font awesome icons are stored as glyphs in WOFF2 font files, when running <i class="fa-house"></i>, the browser loads fa-solid-900.woff2 if it is supported.
This page page is pretty useful
Web Architecture Concepts
1. Server-side Rendering(SSR) vs Client-side Rendering(CSR)
While investigating how components behave in Vue, I came across 2 interesting concepts - Server-Side Rendering (SSR) and Client-Side Rendering(CSR), especially in the context of statc site generation with Markbind. (interestingly, I got asked this alot during interviews when explaining Markbind)
SSR refers to HTML content on the server and sending the fully rendered page to the browser. This leads to faster initial page loads and better search-engine optimization (SEO), since search engines can search for contents drectly. Markbind takes a similar apporach - content is pre-rendered during build time, allowing static HTML to be servd efficiently without requiring JS to render everything on the client
CSR, on the other hand, renders the content in the browser using JS after the initial page load. This allows for highly dynamic, interactive applications but can result in slower time-to-content and challenges with SEO unless additional tools like prerendering are used.
By comparing these approached, it gave me a better understanding on why MarkBind's static generation strategy works well for documentation websites. These are cases where the content is relatively stable and fast load times are prioritized.
Here are some resoruces I referenced:
npm
In the beginning of the project, I ran npm commands by following instructions on the developer guide, without deep understanding of what each of them does. Here are what I learnt about npm and the different commands I frequently used.
1. What is npm
npm (Node Package Manager) is a command-line tool and online registry that allows developers to install, manage, and share packages for their Node.js applications. It simplifies the management of dependencies and project automation through scripts, helping to ensure consistent evnvironments and automate repetitive tasks like testing, building and deployment.
2. npm link
What it does:
npm linkis udes to symlink a local package for development purposes. It creates a global symlink to a local package and links it into another project, allowing us to test changes to a package without needing to reinstall it. How I used it- One example would be when I am testing the version of markbind. I used
npm linkto connect my local development version of MarkBind, to the CS2103T website. This allows me to serve the CS2103T website locally, to check for any regression issues.
3. npm run build:backend
What it does:
npm run build:backendis a custom npm script defined in MarkBind. This command is used to compile server-side code, to help build static files How I used it:- When I make changes to any
.tsfile, the changes will not be reflected after saving those cahnges and serving the test site. Instead,npm run build:backendneeds to be run before the new changes can be reflected
Cheerio
1. What is Cheerio
Cheerio is a fast, lightweight library for parsing and manipulating HTML and XML on the server side, using a jQuery-like syntax. It is built for Node.js and is ideal for use cases like:
- Server-side HTML manipulation
- Web scraping
- Static site generation tools Here are some resources I referenced when working with Cheerio
- Cheerio docs
- Cheerio github
2. Usage of Cheerio in markbind
While working on the PR #2649 Branch inline highlight new I gained deeper on how Markbind uses highlight for various types of inline highlighting.
- Whole line highlight
- Whole text highlight
- Partial text highlight - This is where Cheerio is used
For partial text highlight, Cheerio is used to dynamically parse and manipulate the HTML content, with the following steps
- It parses the rendered HTML to locate the specific section that needs to be highlighted
- Then it wraps the portion with the appropriate
<span>or similar tags to apply the highlight styling. - This manipulation is done server-side before the final HTML is served
Tooling and workflow
1. Lerna
While working with PR #2647 Remove parallel flag from test scripts, I experimented with Lerna's --parallel flag which runs tasks across packages concurrently. Here's what I learnt while playing around with it
- The
--parallelflag speed up execution but can cause interleaved logs, making test failures harder to trace Through my own research, I believe Lerna achieves this concurrency with the help of Node.js's single-threaded event loop architecture.
Here are the docs I referenced:
- https://www.linkedin.com/pulse/oncurrency-node-js-khaleel-inchikkalayil?utm_source=chatgpt.com
- https://levelup.gitconnected.com/exploring-parallelism-and-concurrency-in-node-js-4b84c2f397b
2. CJS vs ESM: Differences and Implications
In JavaScript, there are 2 major module systems for managing dependencies and code: CommonJS(CJS) and ECMAScript Modules(ESM)
- CJS
This is the traditional module system used in Node.js. It uses
require()to load modules andmodule.exportsto eport functionality. Example:
const fs = require('fs');
const myFunction = require('./myModule');

module.exports = { myFunction };
Key features include:
require()loads modules synchronously, blocking execution until the module is fully loaded.require()can be called anywhere in the code- It is the default module system in Node.hs until ESM became more widely supported
CJS is ideal for traditional Node.js environments, especially when working on backend systems where synchronous loading is acceptable
- ESM ESM is the official JS module introduced in the ES6 specification and is now the standard for JS modules. The usage of ES6 differs from CJS. Using the same example as above, we got:
import fs from 'fs';
import { myFunction } from './myModule.js';

export { myFunction }
Key features include:
- Modules are loaded asynchronously using the
importstatements - `supported natively by modern browsers and increasingly in Node.js as of version 12 and beyond
ESM is the preferred choice of JS applications, especially in frontend development and for projects that need to take advantage of tree shaking (the process of elimination dead code from the final JS bundle) and performance optimization
Here are some resrouces I referenced:
JAVIER TAN MENG WEE
CSS
CSS (Cascading Style Sheets) is a stylesheet language used to control the presentation of HTML documents.
word-break property: The word break property provides opportunities for soft wrapping.
- Different languages can specify different ways of breaking a sentence of text
- Significance comes from deciding how to break up a word either by character or word.
- For instance, in some languages like Ethopic, it has two styles of line breaking, namely by word seperators or between letters within a word.
- Markbind is mainly catered to English content and thus specifies line breaks at spaces.
Differences in render environment
Safari, Chrome and Firefox are commonly used web browsers. They all adhere to web standards, however they face differences in terms of how they handle the rendering of a web application.
The different rendering engine that each browser is built on can cause different rendering outcomes for different functions. Browsers can intepret the different CSS styles differently
Vue
Vue is a JavaScript framework that is used to create interactive interfaces. it is built on top of standard web tech like HTML, CSS and JavaScript and enhances them with its API. Vue has features such as reactivve rendering, allowing for components to update automatically without needing any manual developer manipulation as well as component-based architecture promoting reuse and modularity in applications.
Markbind uses Vue for most of its frontend components, mainly with the Options API of Vue.
<template>
This is the content that gets rendered into the DOM. It takes on regualar HTML syntax alongside Vue-specific syntax (Vue directives) to bind data, handle events and conditionally render elements.
Some useful vue directives are:
v-for: Loop through a listv-if: Conditionally render an element (removes from DOM)v-else: Used afterv-ifto handle the "else" casev-show: Conditionally display an element (usesdisplay: none)v-bind: Bind a value to an attribute dynamically
<script>
This is the part that is used to handle logic of my component. It is also used to give components "reactivity". For example, declaring props, data, writing methods, importing libraries or vue components, handling lifecycle hooks, generating constants, etc.
Options:
data- Used to declare reactive states of a component.mounted- Lifecycle hook that runs after the component is mounted to the DOM. Useful to call methods to populate variables defined indata.props- Defines external data passed into the component from the parentcomponents- Registers child components used inside the current componentmethods- Defines functions that can be used inside the templatecomputed- Declares derived values that update reactively based ondataorpropsProperties are being passed to vue components as props. These properties specifies the different configurations of the html templates.
Content passed by the
slotsAPI are considered to be owned by the parent component that passes them in and so styles do not apply to them. To apply styles to these components, target the surrounding container and then the style using a CSS selector such as.someClass > *
<style>
This defines the css styles that can be applied to this current component. If no style is defined, then it will just inherit any global or parent styles that applies.
Virtual DOM
“virtual” representation of a UI is kept in memory and synced with the “real” DOM
- Mounting - A runtime renderer walking through the virtual dom and construct an actual dom tree from it
- Patching - Two copies of virtual DOM trees walked and compared differences are found and changes are applied to the actual DOM
Main benefit of virtual DOM is that it gives the developer the ability to programmatically create, inspect and compose desired UI structures in a declarative way, while leaving the direct DOM manipulation to the renderer
How Vue components are mounted
- Compilation - Vue templates are compiled into render functions. The render functions are used to generate virtual doms
- Mounting - render function is called, and virtual dom is walked to create actual dom
- Performed as a reactive effect, keeps track of all reactive dependencies used
- Patch - a dependency used during mount changes, the effect re-runs → a new, updated Virtual DOM tree is created and patching is done
Rendering on the server side (SSR)
Reference By default, the DOM is produced and manipulated directly on the browser. This can be slow especially in the case of large DOMs. Vue supports server side rendering where the DOM is generated and HTML strings are created on the server, sent over to the browser and "hydrate"-ed into an interactive application on the client side by inserting all the reactive elements, listeners, etc.
Advantages:
- Faster time to content
- Unified mental model
- Better SEO
Tradeoffs:
- More involved build setup and deployment requirements
- Development constraints, Browser-specific code can only be used inside certain lifecycle hooks
- More server-side load
Testing:
Vue component test utilities library: Wrapper
According to my current understanding:
- Testing is done by first creating a wrapper with the component to be tested.
- The
$nextTick()function of the vm of the wrapper is then called which waits for the next DOM update flush. - The generated HTML is then compared with the snapshot that is generated.
DevOps
Github Actions is used when writing workflows. It allows for automating the building, testing and deployment pipelines. Markbind uses it for various purposes:
- Testing (ensuring existing/new test cases pass)
- Automated replies (Checking of new user)
- Ensuring workflow procedures are followed (Checking for missing pr information)
GitHub Actions details:
- Workflows are defined using YAML
- They are trigered by
eventsthat is used to automate checks. Some events include pushes, pull requests, issues, and more. - Workflows can make use of GitHub Actions context variables to gain information about the workflow runs, variables, runner environements, jobs and steps.
Context Variables:
github context is freuqently used for retrieving useful information of the current workflow run. Some examples used(but not limited to) include :
github.actoris used to detect the username of the user that triggered the workflow event. It can also be used to detect bots who trigger the events.github.event_nameis used to detect the name of the event that triggered the workflow. In the context of markbind, this is often used to check if the triggered workflow is of a particular event (such as pull request) before running the script.
A potential limitation arises when using github.actor to detect bot accounts. That is, if the bot is a github account that is automated by a user. In this case, github currently has no way to detect such accounts.
- Proposed potential workaround: Manually identify the human bot accounts.
Bots
Markbind uses the all-contributor bot to add contributors to automate the process of adding contributors to the project
LocalHost
Local testing of sites often uses localhost to run up a local server. This often resolves to the IP address of 127.0.0.1.
Markbind allows users to specify the address of localhosts in the IPV4 format. It does not support specifying IPV6 IP addresses.
- IP addresses that starts with 127 are reserved and are “local loopback addresses”, this means it references a device on the private , local network
- Outside devices cannot reach local loopback addresses, making it suitable for testing.
- Locally, localhost acts as the domain name for the loopback IP address 127.0.0.1
CORS (Cross-Origin Resource Sharing)
Cross origin resource sharing (CORS) is a mechanism that allows a web client to requests for resources over the internet. This can be things like third party APIs, videos, fonts, etc.
Cross-origin: A resource URL that is not the same as the URL of the visited browser.
Importance of CORS
The issue of cross site forgery issues: malicious attackers can trick users to execute unwanted actions on a web application while being autenthicated. For instance, if a user is logged into a banking application, the attacker can trick the user into loading an external website on a new tab. Then, using the cookie credentials of the user, the attacker can impersonate the user and access banking information of the user.
One solution built around this issue is the same origin policy. This policy specifies that clients can only request for a resource with the same origin as the client's url.That is, the protocol, port and hostname of the client's URL should match with that of the server. Any cross origin requests are not allowed by the browser. This means that any website you visit on the browser cannot access any other resource such as your email invox or online banking application as they belong to a seperate origin.
Same origin policy is like a ninja working in the shadows, preventing malicious users from trying to attack you. However, such tight restrictions means browsers are not able to access data across different origins. This may be necessary for applications that rely on external services such as calling third party APIs. This is where CORS come into place - it extends SOP by relaxing SOP in a controlled mannner.
The workings of CORS
CORS is primarily used when there is a need for a browser to pull or share data from an external resource. The request-resposne process is as follows (assume HTTP):
- Browser wants to access a cross origin resource, browsers adds origin header, protocol, host and port number to the HTTP request.
- Server receives the request, checks the origin header and responds with the requested resource alongside a
Access-Control-Allow-Originheader. - Browser receives the access control request header and returns the requested resource with the client application only if the
Access-Control-Allow-Originheader matches theOriginvalue of the request header
If a mismatch happens in step 3, then we get a CORS Missing Allow Origin error.
CORS Preflight Request
Preflight requests are usually used for more complex and riskier requests. It is used to ensure that the server knwows what complex methods and headers to expect. They are also automatically issued by the browser.
CORS specification defines a complex request as follows:
- A request that uses methods other than GET, POST, or HEAD.
- A request that includes headers other than Accept, Accept-Language or Content-Language.
- A request that has a Content-Type header other than application/x-www-form-urlencoded, multipart/form-data, or text/plain.
CDN (Content Delivery Network)
A Content Delivery Network is basically a hosting service for libraries. They offer content delivery services to serve files such as JavaScript libraries, stylesheets, fonts, and other static assets from distributed servers all over the world. Serving files from the CDN can help improve loading time and reduce latency through serving the assets from the closest server.
So why CDN over serving the file locally? There are many reasons for this:
- Faster load times - users get files delivered from the closest server as compared to our own server which may be far away. In the case of Markbind, this means that the place where the author chooses to host their website will determine the location that serves the asset if we were to bundle the files locally.
- Caching - files used frequently are cached on the browser. This means that the browser does not need to refetch the data again and can immediately use the file again, which can significantly improve on the load time.
- Lower load on server - your server will thus not need to store extra information (the bundled files) and send them over to the reader. This saves on bandwith and can also improve loading times.
However, there can be some cases where having the file served locally can be ideal:
- Offline usage - one downside of CDNs is the need to access the internet. This prevents us from getting access to the asset if the device is not connected to the internet and can cause some issues with the rendered site (in the case of Markbind).
- Unreliability in CDN servers - Though rare and unlikely to happen due to the distributed architecture of CDNs, the assets can sometimes not get delivered due to issues on the server side. In such a case, the rendered site will not be able to render properly as well (as in #2667 where we faced the CORS issue).
JavaScript Moduling Systems (CJS VS ESM)
Syntax:
| Feature | CommonJS (CJS) | ES Modules (ESM) |
|---|---|---|
| Import | const module = require('module') | import module from 'module' |
| Export | module.exports = value or exports.foo | export default value or export const foo = ... |
CJS (CommonJS)
Module system that is used in Node.js environments to organise and reuse code across different files. Modules in JavaScript are organised chunk of code that makes up a more complex application.
Benefits:
- Allows for dependency tree analysis
- Established ecosystem
Drawbacks:
- Synchronous
- Requires bundling for non-cjs runtimes (this applies to modern browsers)
ESM (ECMAScript Modules)
Modern JavaScript module system that is standardized in the ECMAScript specification and supported natively in both browsers and Node.js.
Benefits:
- Supported in both modern browsers and runtimes like node
- Allows synchronous and asynchronous loading
What to use
CommonJS tend to be older and still used for legacy reasons. The benefits associated with ESM greatly outweighs those of CJS. Though both module systems can work together as well but it gives some complications with regards to the issue of default and named exports.
RepoSense
ALEXANDER LISWANDY
Defining requirements
I learned the importance of defining clear requirements for changes and how to do so more effectively. When implementing the portfolio mode, requirements, assumptions and intended behaviors were not confirmed before starting implementation. This led to some misalignment between the frontend and backend changes, that could have been avoided with proper planning. There were also edge cases that were not considered due to assumptions.
From these learning experiences, I learned that exact requirements and behaviors should be thought of and confirmed before implementing, and to clear up any assumptions especially when working with others to reduce any unnecessary fixes and changes.
Code Reviews
Through the code reviews I have received and given, I have learned the true utility of it.
- Useful to have a fresh perspective looking at changes to help catch unconsidered edge cases.
- Ensures better code quality, allowing for reviewers to suggest improvements, and also making the author accountable for good code, sufficient testing and documentation.
- Allows reviewers to have a deeper understanding of changes that may be required for their own changes. This was particularly helpful for me in understanding the backend changes, allowing me to implement the frontend for individual repository date ranges.
AI Use
I used AI, specifically LLMs like Claude & ChatGPT, to help with some of my changes. While working on a larger codebase, I found out what these tools can be useful for and how to utilise them effectively. AI was particularly useful in solving smaller, simpler tasks, like writing test cases, refactoring smaller functions and logic etc., but fail at making large changes that spanned multiple components. While it may be possible with enough prompting, it is definitely harmful to productivity and dangerous especially if the user does not fully understand the changes.
My key takeaway for productive and safe AI use in projects is to use them for simple, localized tasks that do not require an understanding of larger context, and avoid using it for large, complicated changes. It is also important to understand all changes, both for own learning and to reduce unintended bugs.
Vue
As the frontend utilized Vue, I had to familiarize thoroughly with it. The codebase was following the Options API (instead of Composition API).
I appreciate the simplicity of it, having options such as data, computed, mounted etc. to effectively organize code in a component.
I had to learn about mixins as well to refactor duplicate logic in components that follow the Options API.
v-model was another useful thing I learned, which enabled simple two-way binding between parent and child.
References:
Cypress
As Cypress was used extensively for frontend testing, I had to familiarise myself thoroughly with the available commands to effectively write test cases. This was particularly useful for more complicated tests that required navigating to another page, clicks on specific location, etc.
Coming from a Selenium background, Cypress was significantly easier to setup and run, not requiring additional drivers etc., and also a lot easier to write tests in.
References:
Vite
Better understood what Vite does and the basics of configuring it.
Implemented new modes in the config file to support using custom public directory.
References:
Gradle
Learnt more about Gradle as a tool and its functionalities. I realized the utility of Gradle tasks, being capable of running various things not limited to Java, even including triggering the frontend Cypress tests.
I enhanced the tasks related to frontend testing to serve and run on multiple reports, and learned how to create more complex tasks with dependencies and background tasks.
References:
GitHub Actions
Familiarised myself with how GitHub Actions work at a high level, and understood basic workflow syntax to debug failing workflow runs.
There was an issue that was due to the differences between pull_request and pull_request_target. pull_request_target runs in the context of the base of the pull request, rather than in the context of the merge commit. This causes changes to the workflow in the PR to not be reflected in the runs.
Since the failure was a special case due to the deprecation of certain actions, exception was made to merge with the failing run. Precaution was taken to ensure the change is as intended, but trying it out on personal fork.
References:
CHEN YIXUN
Gradle
The Gradle build typically include three phases: initialization, configuration and execution.
There are four fundamental components in Gradle: Projects, build scripts, tasks and plugin.
A project typically corresponds to a software component that needs to be built, like a library or an application. It might represent a library JAR, a web application, or a distribution ZIP assembled from the JARs produced by other projects. There is a one-to-one relationship between projects and build scripts.
The build script configures the project based on certain rules. It can add plugins to the build process, load dependencies and set up and configure tasks, i.e. individual unit of work that the build process will perform. Plugins can introduce new tasks, object and conventions to abstract duplicating configuration block, increasing the modularity and reusability fo the buld script.
Resources:
- https://tomgregory.com/gradle/gradle-tutorial-for-complete-beginners
- https://docs.gradle.org/current/userguide/userguide.html
Github Actions
CI/CD platform automates build, test and deployment pipeline. There are several main components for Github Actions: workflow, event, job, action and runner
Workflow
configurable automated process that will run one or more jobs. Defined by YAML file in .github/workflows. A repo can have multiple workflows.
- One or more events that will trigger the workflow.
- One or more jobs, each of which will execute on a runner machine and run a series of one or more steps.
- Each step can either run a script that you define or run an action.
Events
a specific activity that triggers the workflow run, e.g. creating PR and openning issues.
Jobs
A job is a set of steps in the workflow that is executed on the same runner. Each step can be a shell script or action
Actions
Reusable set of repeated task. This helps reduce the amount of repetative code.
Runners a server that run the workflows when they are triggered. They can be configured with different OS.
Concurrency in github actions By default, GitHub Actions allows multiple jobs within the same workflow, multiple workflow runs within the same repository, and multiple workflow runs across a repository owner's account to run concurrently. This means that multiple instances of the same workflow or job can run at the same time, performing the same steps.
Use concurrency to ensure that only a single job or workflow using the same concurrency group will run at a time. GitHub Actions ensures that only one workflow or job with that key runs at any given time. When a concurrent job or workflow is queued, if another job or workflow using the same concurrency group in the repository is in progress, the queued job or workflow will be pending.
To also cancel any currently running job or workflow in the same concurrency group, specify cancel-in-progress: true
Docker
official document
https://docs.docker.com/?_gl=1433w1k_gaMjAxNDMzNDYxNi4xNzE1MzAwOTY4_ga_XJWPQMJYHQ*MTcxNTMxMjY4My40LjEuMTcxNTMxMjY4My42MC4wLjA.
Containerization
https://www.ibm.com/topics/containers
Containerization is a way to deploy application code to run on any physical or virtual environment without changes. Developers bundle application code with related libraries, configuration files, and other dependencies that the code needs to run. This single package of the software, called a container, can run independently on any platform. Containerization is a type of application virtualization.
Use Docker for containerization
Docker is an open platform for developing, shipping, and running applications. Docker enables you to separate your applications from your infrastructure so you can deliver software quickly. With Docker, you can manage your infrastructure in the same ways you manage your applications.
Docker provides the ability to package and run an application in a loosely isolated environment called a container. The isolation and security lets you run many containers simultaneously on a given host. Containers are lightweight and contain everything needed to run the application.
Docker architecture
The Docker client talks to the Docker daemon, which does the heavy lifting of building, running, and distributing your Docker containers. The Docker client and daemon communicate using a REST API, over UNIX sockets or a network interface
Another Docker client is Docker Compose, that lets you work with applications consisting of a set of containers
The Docker daemon (
dockerd) listens for Docker API requests and manages Docker objects such as images, containers, networks, and volumes. A daemon can also communicate with other daemons to manage Docker services.The Docker client (
docker) is the primary way that many Docker users interact with Docker. When you use commands such asdocker run, the client sends these commands todockerd, which carries them out. Thedockercommand uses the Docker API. The Docker client can communicate with more than one daemon.A Docker registry stores Docker images. When you use the
docker pullordocker runcommands, Docker pulls the required images from your configured registry. When you use thedocker pushcommand, Docker pushes your image to your configured registry.Docker objects:
- An image is a read-only template with instructions for creating a Docker container.
- A container is a runnable instance of an image. You can create, start, stop, move, or delete a container using the Docker API or CLI. You can connect a container to one or more networks, attach storage to it, or even create a new image based on its current state.
how it works
- Dockerfile: how to configure documents that run the app
- image: OS, dependency and code
- container: instantialisation of image -> stateless and portable
Dockerfile
A Dockerfile is a text-based document that's used to create a container image. It provides instructions to the image builder on the commands to run, files to copy, startup command, and more.
FROM -> base image to start + image tags WORKDIR -> create source directory and put the source code RUN -> install dependencies USER -> create a non-root user COPY -> copy from local machine to image ENV -> environment variable ...
Build build the docker image based on Docker file .dockerignore -> ignore certain files
Run: create a container based on the image
Kill & Stop: stop a container
define multiple docker applications in single yaml: https://docs.docker.com/compose/gettingstarted/
docker compose for client side with proxy: https://stackoverflow.com/questions/60808048/react-app-set-proxy-not-working-with-docker-compose
docker networking: https://www.geeksforgeeks.org/basics-of-docker-networking/
docker storage: https://www.geeksforgeeks.org/data-storage-in-docker/
Lighthouse CI
Lighthouse CI is an open-source suite that brings Google’s Lighthouse audits into your continuous integration pipeline, automating performance, accessibility, SEO, and best-practice checks on every commit. It provides a CLI to run Lighthouse runs, assert thresholds, and upload reports, and can be paired with a dedicated Lighthouse Server for historical dashboards and CI-based pull-request annotations.
During the developmemt, I experienced with how to use Lighthouse CI to integrate it with current CI/CD workflow and use it to catch regressions related to github actions routing issue early.
Vue framework
Vue.js is a progressive, component-based JavaScript framework for building user interfaces and single-page applications. It emphasizes an approachable API layered atop standard HTML, CSS, and JavaScript.
Some technical details:
- Component System: Single-file components (.vue files) with
template,script, andstyle scoped. - Declarative rendering with
createAppanddata - Attribute binding with
v-bindor: - Event listener
v-onand function declaration usingmethodsoption - Form two-way bindings using
v-model - Conditional rendering with
v-if - List rendering with
v-list - Usage of computed property to track other reactive state used in its computation as dependencies, and change its states respectively
propsto pass parameters to child component andemitto trigger event from parents- Lifecycle Hooks: beforeCreate, mounted, updated, beforeUnmount (Vue 3) for DOM interaction.
Java Gson library
Gson is Google’s open-source Java library for serializing Java objects to JSON and deserializing JSON back into Java objects. It handles arbitrary object graphs (including generics and nested classes) via reflection, with customization options via GsonBuilder for pretty printing, custom serializers/deserializers, and exclusion strategies
JUnit testing
JUnit is the de facto Java unit-testing framework (xUnit family) that supports annotation-driven test methods (@Test, @BeforeEach, @AfterEach), various assertions, and extensions through the JUnit Platform and TestEngine APIs. JUnit 5 (Jupiter) introduced modular architecture, parameterized tests, and more flexible lifecycle control
Cypress testing
Cypress is a modern, JavaScript-based end-to-end testing framework that executes tests directly in the browser, providing real-time reloading, automatic waiting, and an all-in-one API for E2E, component, and accessibility testing.
Some important techniques used in the development:
- DOM interaction
- Component testing
HING YEN XING
GitHub Actions & CI/CD Workflows
GitHub Action Runners
Issues encountered:
- CI pipeline was failing due to deprecated macOS-12 runner
- Cypress frontend tests failed on new runner configurations due to missing dependencies
- Needed to update Ubuntu runner to latest version (24.04)
- Implementing automated CI/CD deployment for publish-reposense
Knowledge gained:
- Learned how GitHub Actions uses strategy matrix to configure different environments simultaneously. This allows defining multiple OS versions and configurations in a single workflow file.
- For example, the code snippet shows how strategy matrix is used in a
yamlfile:
- For example, the code snippet shows how strategy matrix is used in a
  strategy:
    matrix:
        os: [ubuntu-24.04, macOS-13, macOS-14, macOS-15]
- Developed systematic approach to identifying CI failures through careful analysis of workflow logs and understanding environment variables.
References:
- Using GitHUb Strategy Matrix to select a runner
- Github Actions: Customize runners
- Cypress documentation issue
CI Deployment Configurations
Issues encountered:
- CI/CD pipeline wasn't triggering automatically due to restrictive conditions
- Need to ensure that the pipeline is triggered only when expected
Knowledge gained:
- Learned to restrict deployments to specific branches (e.g., only allowing deployment from the master branch) by setting conditions in the workflow.
if: (github.event_name == 'push' && github.ref == 'refs/heads/master') || github.event_name == 'schedule'
- Configured workflows to automatically run tests on pull requests to ensure code quality before merging.
- Discovered how GitHub Actions defines trigger events and how to properly configure them to ensure workflows are triggered when expected.
on:
  pull_request:
  push:
    branches:
      - master
- Learned to schedule workflows using cron syntax in GitHub Actions, allowing tasks like routine checks or deployments to run automatically at set intervals without manual triggers.
    schedule:
        - cron: '0 0 * * *'
References:
YAML File Structure
Issues encountered:
- Encountered deprecation warnings in workflow YAML files
- Needed to understand workflow file structure to implement reliable CI/CD
Knowledge gained:
- Developed deeper understanding of YAML syntax
- Learned how to define dependencies between jobs using the needs keyword, ensuring proper execution order.
deploy:
    needs: build
    runs-on: ubuntu-24.04
References:
Backend Development (Java)
Issues encountered:
- Initial implementation lacked proper abstraction for different blurb types
- Needed to refactor code to improve maintainability and readability
Knowledge gained:
- Applied abstraction for creating different types of blurb model and parsers.
- Learned to use Java's inheritance and polymorphism to create a base class for blurbs and extend it for specific types.
- Used generics to create a flexible and reusable parser class that can handle different blurb types.
- Developed comprehensive test cases to validate parser behavior with various input formats and edge cases.
- Learned to use Java's Path API effectively for cross-platform file path handling.
References:
Frontend Development (Typescript, Vue.js)
Issues encountered:
- Codebase used verbose directive syntax in Vue templates
Knowledge gained:
- Learned about Vue's shorthand directive syntax and its benefits for code readability.
- Developed systematic approach to refactoring multiple template files while ensuring consistent behavior.
References:
Code Review
Issues encountered:
- Need to provide valuable feedback to team members during code reviews
- Hard to understand code changes quickly
Knowledge gained:
- Developed systematic approach to reviewing PRs, focusing on functional correctness, code structure and organization, and documentation quality.
- Learned to provide actionable feedback that helps improve code quality without discouraging contributors.
PR Merging
Issues encountered:
- Needed to create clear and informative PR descriptions
- Managing merge conflicts
Knowledge gained:
- Learned to create comprehensive PR descriptions
- Discovered how to properly attribute work to multiple contributors using the
Co-authored-by:syntax in commit messages.
References:
Summary
As nearing the end of the work on RepoSense for this semester, I can say that I have gained a lot in technical areas throughout various fronts. The project gave us a hands-on experience in developing a real-world project. However, the most important thing I learned was how to properly develop in someone else's codebase and give meaningful contributions while respecting the architectural integrity.
Of particular importance, the blurb extension taught me a lot about properly considering abstraction and design patterns: my first solution was frankly unextendable, but feedback from my peers and iterations led to a cleaner solution that accommodates different types of blurb through proper inheritance hierarchy design.
The other hands-on experience provided to me with GitHub Actions and CI/CD pipelines had improved my understandings in DevOps paradigms that are important to software development in today's world.
Finally, collaborative processes of PR management, issue-tracking, and code review form exposure to best practices in software development.
I am grateful for the opportunity to work on this project with my team and look forward to applying these skills in future endeavors.
NG YIN JOE
Sorting
Learnt about how sorting is done in more complex scenarios, for example when entities are grouped using different attributes, and when there are ties in the values to sort. Had the opportunity to further improve sorting efficiency for descending sorts by avoiding recomputations.
Unit Tests
In the process of enhacing descending sorts, I managed to detect a bug in the existing sorting code where unit tests were passing previously due to verifiying incorrect behavior. Through this experience, I learnt that existing unit tests are not infallible, especially if they verify incorrect behavior. I also learnt to pay more attention to details and dive deep into the logic of the codebase without making any assumptions.
Developer Productivity
I wrote a relatively complex unit test where the Cypress code copies an iframe,
extracts the URL from it, then enters a new window to check for the existence of a logo.
This would have taken an hour to write if I manually referred to the documentation,
and I didn't even know whether it was possible to write such a test. With the help of an
LLM, I was able to do it in minutes. I learnt to recognize situations where LLM would
magnify productivity in scenarios like this one (imperative code) and actually decrease
productivity in other scenarios (changes requiring an overall understanding of specific
nuances in the codebase, spanning multiple files).
Regression
When merging a PR to enable datetime for since and until dates, I had an undetected regression in which ramps are not displaying due to relying on dates to determine the ramp color. This bug was not detected in any unit tests or system test. I learnt to be more attentive to the impact of new implementations and also do manual tests due to the complexity of defining tests on the UI (Cypress). I also learnt about the tradeoffs of defining UI tests on tools like Cypress, where it enables better detection on regressions but also slows down the changes in new features due to failing test cases. For example, a small change in the CSS might cause a large amount of Cypress tests to fail if they include the CSS properties in their correctness check. The developer will then need a lot of time to figure out the reason of each of the individual test failures.
Code Review
I have reviewed code changes made by my teammates and also one external contributor. Through this experience, I learnt about various aspects of code review, for example, verifying correct behaviour, ensuring code quality, and requesting for more tests or documentation if applicable. I also explored LLM-powered code reviewing, for example, using Copilot to do auto code reviews. I recognized the tradeoffs of these solutions, where they are very good at detecting smaller details that human reviewers might miss, but currently lack a good "sight" on the overall context of the changes.
Performance Benchmarking
When benchmarking a migration from npm to pnpm, I learnt about performance benchmarking, either in time (CPU) or space (RAM/disk). Multiple runs are neeeded and the average is computed. I also learnt about the tools needed to measure the consumption of various resources such as CPU time, RAM and disk.
Vite
Learnt about how Vite build identifies the base directory when
serving static assets. Learnt about how Vite manages its dependencies in chunks, and how chunk sizes should be minimized to optimize load perfomance. I also learnt more about how the package highlight.js supports code highlighting in multiple programming languages.
ESLint
Learnt about how ESLint ensures a unified style of JS/TS code. Had the chance to go through the ESLint documentation for member-delimiter-style, https://eslint.style/rules/ts/member-delimiter-style, understand how it works, and make the modifications in the ESLint configurations and the codebase to ensure CI job for lintFrontend passes.
Vercel
Learnt how to configure Vercel on a GitHub repository.
Immutability in Java
Learnt about the various aspects to consider when designing and immutable class in Java, such as:
- private and final variables
- elimination of setter methods
- returning copies for mutable variables
- considerations for constructor design (method overloading vs Builder pattern)
Datetime in Java
I learnt about how timezones are represented in Java LocalDatetime. I also learnt about the intricacies of timezone conversion, for example, for timezone 'Asia/Singapore', it is UTC+7.5 before 1982 and UTC+8 after 1982.
WONG LI YUAN
Git vs GitHub in RepoSense
Understanding the Distinction
While doing my user experiments on RepoSense, I noticed that the GitHub IDs of contributors were not displayed correctly in the generated contribution dashboards with only the "--repos" flag without the config files. This led me to investigate how RepoSense handles GitHub-specific information and how it differs from Git. Since Reposense use Git logs to extract commit metadata such as author names and emails, RepoSense is unable to capture GitHub-specific information like GitHub IDs.
Git and GitHub, while related, are fundamentally different: Git is a version control system that tracks code changes locally, whereas GitHub is a platform built on top of Git that provides additional features like user profiles and collaboration tools. As a result, the current implementation of RepoSense cannot directly link contributions to GitHub profiles without the config files.
Gradle
When I first joined the RepoSense project, my understanding of Gradle was minimal. I knew it was "the tool that runs Java projects".
Learning Outcomes
I began by breaking down what I saw in the build.gradle file. First, I noticed the plugins section:
plugins {
    id 'application'
    id 'checkstyle'
    id 'idea'
    // and more...
}
I learned that Gradle is a flexible system that can handle many aspects of our project, including both the Java backend and JavaScript frontend components.
Next, I studied how dependencies work. Instead of manually downloading libraries, Gradle automatically manages them:
dependencies {
    implementation group: 'com.google.code.gson', name: 'gson', version: '2.9.0'
    // more dependencies...
}
Tasks are the individual operations Gradle performs when building the project. RepoSense has many tasks:
- Tasks that compile Java code
- Tasks that build frontend resources
- Tasks that run different types of tests
- Tasks that package everything together
I discovered that running ./gradlew tasks shows all available commands, which helped me explore further.
I also learned how tasks depend on each other. For example, when the shadowJar task runs, it first makes sure the zipReport task completes. This ensures everything happens in the correct order.
Practical Application
This knowledge changed how I worked on RepoSense:
- When changing Java code, I could run specific tasks like
./gradlew build - When working on frontend code, I could use
./gradlew hotReloadFrontend - When debugging build issues, I could trace which task was failing and why
This knowledge helps me contribute more effectively to RepoSense and gives me valuable skills for future Java projects. Having this knowledge helped me to debug the CI more efficiently and develop Java applications with more confidence.
Frontend and Styling Insights
CSS Normalization
When investigating why <hr> elements in Markdown files weren't appearing in RepoSense reports (PR: #2279), I learned about normalize.css. This tool provides default styling for HTML elements (the <hr> element height was defaulted to 0) and ensures consistent rendering across different browsers by correcting bugs and inconsistencies for more predictable styling.
Development Techniques
Debugging Approach
While working on various features, I used IntelliJ IDEA's debugger to trace program flow. By applying breakpoints and watches, I could investigate how absent fields in config files were being handled and how data was processed through the system. This systematic debugging approach allowed me to understand complex interactions between components and implement robust solutions.
Testing Strategies
I learned to develop comprehensive test suites that maintain code coverage when introducing new features. For the Code Portfolio configuration, I wrote JUnit tests that load test data from resource files, which proved valuable for testing config file parsing by comparing expected results against actual outcomes. This approach ensured new features didn't break existing functionality while confirming the new behavior worked as expected.
Java Version Compatibility
After I completed the Refresh Text Only feature (PR: #2338), I received a bug report about Java 17 unable to compile the newest commit of Reposense. Developing in Java 11 while others can use Java 17 created unexpected problems. I learned to test across multiple Java versions, understand language differences between versions, and appreciate the importance of clear documentation about environment requirements.
TEAMMATES
DHIRAPUTTA PATHAMA TENGARA
Tool/Technology 1: Mockito
Aspects Learned
Stubbing Methods with
when(...).thenReturn(...):I learned that this technique lets me define fixed return values for specific method calls. I can instruct Mockito to return a predetermined value when a certain method is invoked with given arguments. By stubbing methods with
thenReturn(), I isolate the class under test from its real dependencies. For example, if my code calls:Course course = mockLogic.getCourse(course.getId());I can specify:
when(mockLogic.getCourse(course.getId())).thenReturn(expectedCourse);This approach ensures that the tests only focus on the behavior of the class under test without relying on actual implementations or external systems like databases or service layers.
Simulating State Changes Using
doAnswer(...):One of the most powerful techniques I learned was using
doAnswer()to simulate side effects and state changes. This method enables me to dynamically alter the behavior of mocked methods based on actions performed within the test.Syntax:
doAnswer(invocation -> {
    // Custom logic to simulate a side effect or state change
    // ...
}).when(mockLogic).someMethod(...);
This technique is especially helpful when my method under test changes the state of its dependencies. For example, when simulating the deletion of an instructor, I can use
doAnswer()so that subsequent calls (such as fetching the instructor by email) returnnull—mirroring the real-life behavior after deletion.
Advanced Stubbing Techniques with
thenAnswer():In addition to
doAnswer(), I learned how to usethenAnswer()to provide dynamic responses based on the input parameters of the method call. This custom Answer implementation allows for:Syntax:
when(mockLogic.someMethod(...)).thenAnswer(invocation -> {
    // Custom logic to compute and return a value based on the invocation
    // ...
});
This method is ideal when I need the stub to return a value that depends on the input. It adds flexibility to my tests, especially when I want my mocked method to behave differently based on its argument.
Mocks vs. Spies:
I learned that the key difference is:
Mocks: Mockito creates a bare-bones instance of the class where every method returns default values (like
null,0, orfalse) unless explicitly stubbed.Spies: A spy wraps a real object. By default, a spy calls the actual methods of the object while allowing me to override specific methods if needed.
Examples:
Mocks:
List<String> mockedList = mock(ArrayList.class); mockedList.add("item"); verify(mockedList).add("item"); assertEquals(0, mockedList.size()); // Returns default value 0 because it’s fully stubbed.Spies:
List<String> realList = new ArrayList<>();
List<String> spyList = spy(realList);

spyList.add("item");
verify(spyList).add("item");
assertEquals(1, spyList.size());  // Now size() returns 1 because the real method is called.
When to Use Each:
Mocks: I use a mock when I want to completely isolate my class under test from its dependencies.
Spies: I choose a spy when I need most of the real behavior of an object but want to override one or two methods.
Static Mocking:
Mockito allows mocking static methods using
MockedStatic<T>, which is useful when working with utility classes or framework methods that are difficult to inject as dependencies.- Syntax:
try (MockedStatic<ClassName> mockStaticInstance = mockStatic(ClassName.class)) {
    mockStaticInstance.when(ClassName::staticMethod).thenReturn(mockedValue);

    // Call the static method
    ReturnType result = ClassName.staticMethod();

    // Verify the static method was called
    mockStaticInstance.verify(ClassName::staticMethod, times(1));
}
- Syntax:
Advanced Verification Techniques:
Mockito’s advanced verification APIs allow me to check that the correct interactions occur between my class under test and its dependencies—not just that methods were called, but also that they were called in the right order and the correct number of times.
Call Order Verification: Using Mockito’s InOrder API to verify that methods were called in a specific sequence.
InOrder inOrder = inOrder(mockLogic);
inOrder.verify(mockLogic).startTransaction();
inOrder.verify(mockLogic).executeQuery(anyString());
inOrder.verify(mockLogic).commitTransaction();
Invocation Count Verification: Applying verification modes like
times(),atLeast(),atMost(), andnever()to assert the precise number of method invocations.verify(mockLogic, times(2)).processData(any()); verify(mockLogic, never()).handleError(any());
These techniques are crucial when the order and frequency of interactions are essential for the correctness of the code, ensuring that the tested methods not only produce the right results but also follow the intended flow.
Resources
-
- A reference for exploring and understanding the framework’s capabilities and best practices.
-
- Additional tutorials that provide further insights.
Conclusion
I learned these Mockito techniques mainly during the migration of our tests from our previous datastore to Google Cloud PostgreSQL.
The new test classes required a robust mocking framework, so I leveraged a combination of fixed-value stubbing with when(...).thenReturn(...), dynamic behavior simulation with doAnswer() and thenAnswer(), and careful selection between mocks and spies.
This approach enabled me to write unit tests that are both targeted and reliable.
Although I did not extensively use advanced verification techniques during the migration, I appreciate the potential they offer for validating interactions between components.
These insights have been essential for developing robust tests, and I look forward to applying them in future projects.
Tool/Technology 2: Objectify and Jakarta Persistence (JPA)
Aspects Learned
Objectify for Google Cloud Datastore (NoSQL):
Objectify is a lightweight Java library that simplifies working with Google Cloud Datastore, a NoSQL database. It provides easy-to-use annotations for mapping Java objects to Datastore entities, while also supporting schema evolution.
Key Features:
@Entity: Marks a class as an entity that will be stored in Datastore.
@Id: Defines the primary key for the entity.
@Index: Defines a Datastore index for a property to optimize querying. This annotation allows specifying custom indexing rules for properties that will be queried frequently.
@Load: An annotation for lazy-loading data, allowing entities to be loaded only when needed, improving efficiency when handling large datasets.
@AlsoLoad: Maps a field to a different property name in Datastore, useful for schema evolution.
Example:
@Entity
public class Course {
    @Id
    private Long id;

    @Index
    @AlsoLoad("course_name")
    private String name;

    // Constructors, getters, setters...
}
Fetching an entity:
Course course = objectify.load().type(Course.class).id(courseId).now();Jakarta Persistence (JPA) for Relational Databases:
Jakarta Persistence (JPA) is the standard Java API for Object-Relational Mapping (ORM), used for storing Java objects in relational databases such as PostgreSQL. It provides annotations to define how Java objects map to SQL tables and how relationships between entities are managed.
Key Features:
@Entity: Defines a persistent Java object.
@Table: Defines the table in the database that the entity will be mapped to. By default, the table name will be the same as the entity class name, but the
@Tableannotation allows you to specify a different table name.@Id: Marks the field as the primary key of the entity.
@GeneratedValue: Specifies the strategy for auto-generating the primary key (e.g.,
GenerationType.IDENTITY,GenerationType.AUTO).@Column: Maps a field to a specific column in the database table. It allows specifying additional attributes like column name, nullable, unique constraints, and default values.
@OneToMany, @ManyToOne, @ManyToMany: Establishes relationships between entities.
@JoinColumn: Specifies the column used for joining tables in relationships. This is often used with
@ManyToOneand@OneToManyannotations to define the foreign key.
Example:
@Entity
@Table(name = "students")
public class Student {
    @Id
    @GeneratedValue(strategy = GenerationType.IDENTITY)
    private Long id;

    @Column(name = "student_name", nullable = false)
    private String name;

    @Column(name = "email", unique = true)
    private String email;

    // Constructors, getters, setters...
}
Fetching an entity:
Student student = entityManager.find(Student.class, studentId);
Resources
-
- A comprehensive guide to using Objectify for Google Cloud Datastore.
Jakarta Persistence Documentation
- The official Jakarta Persistence specification.
Conclusion
In my experience with Objectify and Jakarta Persistence, I learned how to map Java objects to Datastore entities and relational database tables, respectively.
I was working on standardizing naming conventions for variables and had to modify Java variable names and change the entity/SQL entity names.
One of my mentors pointed out that without using the correct annotations, mismatched entity or column names between the code and the actual database schema could lead to errors.
To address this, I utilized annotations like @AlsoLoad("oldName") and @Column(nullable = false, name = "<COLUMN_NAME>") to ensure proper mapping of fields to database columns and to avoid potential issues.
Understanding and applying these annotations correctly was key for me in preventing errors and ensuring smooth database operations.
Tool/Technology 3: Selenium with Java
Aspects Learned
Selenium WebDriver Basics:
Selenium is a powerful tool for automating web applications for testing purposes. It provides a simple API to interact with web elements, simulating user actions like clicking buttons, entering text, and navigating through pages.
WebDriver: The main interface for controlling the browser. It allows me to create an instance of a browser (like Chrome or Firefox) and perform actions on it.
Locators: Selenium provides various ways to locate elements on a webpage, including:
By.id(): Locates an element by its ID.By.name(): Locates an element by its name attribute.By.className(): Locates an element by its class name.By.tagName(): Locates an element by its tag name.By.linkText(): Locates a link by its visible text.By.partialLinkText(): Locates a link by part of its visible text.By.cssSelector(): Locates an element using CSS selectors.By.xpath(): Locates an element using XPath expressions.
Example:
WebDriver driver = new ChromeDriver();
driver.get("https://example.com");
WebElement element = driver.findElement(By.id("elementId"));
element.click();
Implicit and Explicit Waits:
Selenium provides mechanisms to handle dynamic content loading on web pages.
Implicit Wait: Sets a default wait time for the WebDriver to poll the DOM for a certain period when trying to find an element. It applies to all elements in the test.
driver.manage().timeouts().implicitlyWait(10, TimeUnit.SECONDS);Explicit Wait: Allows me to wait for a specific condition to occur before proceeding. It is more flexible and can be applied to specific elements.
WebDriverWait wait = new WebDriverWait(driver, 10);
WebElement element = wait.until(ExpectedConditions.visibilityOfElementLocated(By.id("elementId")));
Page Object Model (POM):
The Page Object Model is a design pattern that enhances test maintainability and readability by creating a separate class for each page of the application. Each class contains methods that represent actions that can be performed on that page.
Example:
public class LoginPage { private WebDriver driver; @FindBy(id = "username") private WebElement usernameField; @FindBy(id = "password") private WebElement passwordField; @FindBy(id = "loginButton") private WebElement loginButton; public LoginPage(WebDriver driver) { this.driver = driver; PageFactory.initElements(driver, this); } public void login(String username, String password) { usernameField.sendKeys(username); passwordField.sendKeys(password); loginButton.click(); } }- Advantages:
- Improved code organization and readability.
- Easier maintenance: If the UI changes, I only need to update the page object class instead of every test case.
- Reusability: I can reuse page object methods across multiple test cases.
- Advantages:
Resources
Selenium Official Documentation
- Official documentation for Selenium, including guides and API references.
Conclusion
I learned how to use Selenium when trying to understand the existing E2E test code. It is definitely a powerful tool for automating web applications and testing.
LI MINGYANG
Tool/Technology 1: Angular and Dark Mode Implementation for the frontend
Aspects Learned
Angular Component Communication:
- Understanding how child components communicate with parent components using
@OutputandEventEmitter. - Applying event binding in parent templates to listen for changes emitted by child components.
- Understanding how child components communicate with parent components using
Conditional Class Application:
- Dynamically applying CSS classes to elements using Angular’s
ngClassdirective. - Dynamically applying CSS classes to elements using Angular’s
[class]binding syntax. - Managing theme switching logic in the parent component.
- Dynamically applying CSS classes to elements using Angular’s
Event Binding:
- Utilizing Angular’s
(event)binding syntax to handle user interactions. - For example:
(change)="handleChange($event)"to trigger functions when events likechangeoccur, passing the event object as an argument.
- Utilizing Angular’s
Resources Used and Summary
Angular Official Documentation:
- Components and Templates: Learned how to use
@OutputandEventEmitterto enable child-to-parent communication. - NgClass Directive: Understood how to conditionally apply CSS classes dynamically based on variables.
- Components and Templates: Learned how to use
Udemy Course: "Angular - The Complete Guide" by Maximilian Schwarzmüller:
- This course, although I have yet to complete it provided a basic understanding of Angular, including component communication and dynamic class management, which were instrumental in implementing the dark mode feature.
Final Thoughts
By combining these resources, I was able to implement a basic dark mode feature that functions effectively but still requires refinement. One key area for improvement is ensuring the dark mode state persists when navigating between routes. Currently, when the route changes (e.g., from localhost:4200/web/ to another route), the boolean variable controlling the dynamic CSS class allocation using ngClass resets to its default light mode, even if dark mode was active prior to the route change.
I suspect this behavior occurs because the page component is re-rendered during navigation, causing the component's state (including the boolean variable) to be re-initialized. To address this, I plan to research and implement a solution to persist the dark mode state. A promising approach might involve using a shared Angular service to store and manage the state globally, ensuring it remains consistent across routes. While I am not yet an expert in Angular, I am confident that further exploration and practice will help me refine this feature.
Tool/Technology 2: Mockito and advanced unit testing
Aspects Learned
Argument Matchers and Primitive vs. Boxed Types
One thing that really stood out to me while working with Mockito was how it handles primitive vs. boxed types. I always assumed that sinceBooleanis just the boxed version ofboolean, their argument matchers would behave the same way. However, I discovered that:anyBoolean()works for bothbooleanandBoolean, butany(Boolean.class)only works forBoolean.- This small but crucial difference helped me understand why some of my test cases weren’t behaving as expected.
Handling Null Values in Argument Matchers
Another unexpected challenge was thatany()does not matchnullvalues. I initially thoughtany()would work universally, but my tests kept failing whennullwas passed in. After some research, I found that I needed to usenullable(UUID.class)instead. This was an important learning moment because it made me more aware of how Mockito’s matchers handlenullvalues differently.Verifying Method Calls
I also gained a deeper understanding of method verification in Mockito.- To check if a method was called a specific number of times, I can use:
verify(mockObject, times(n)).methodToBeTested(); times(1)ensures the method was called exactly once, whilenever(),atLeastOnce(), andatMost(n)give more flexibility in defining expected call frequency.- I used to take method verification for granted, but now I see how powerful it can be for ensuring the correct interactions in my tests.
- To check if a method was called a specific number of times, I can use:
Difference Between
mock()andspy()I decided to dive deeper into stubbing with mockito which led me to learn more about the difference between
mock()andspy().mock(Class.class): Creates a mock object that does not execute real method logic.spy(object): Creates a partial mock where real methods are called unless stubbed.- Although I'm not using spies now in TEAMMATES, I’ll need to be mindful of them in future projects, as unstubbed methods execute normally and can unexpectedly impact tests.
Resources Used and Summary
Mockito Official Documentation:
- This was my go-to reference for understanding Mockito’s features, especially argument matchers and verification techniques.
Mockito Series written by baeldung:
- Baeldung's examples helped me bridge the gap between learning individual Mockito features and applying them in real-world testing scenarios.
Final Thoughts
Working with Mockito has made me more confident in writing unit tests. I also gained a much deeper appreciation for argument matchers and null handling. Learning that any() does not match null but nullable(Class.class) does was an unexpected but valuable insight. These small details can make or break test reliability, so I’m glad I encountered them early on.
Looking ahead, I aim to sharpen my Mockito skills by exploring advanced features like mocking final classes and static methods. I also plan to experiment further with ArgumentCaptor, as it offers a more structured approach to inspecting method arguments in tests.
Mockito has already helped me write more effective and maintainable unit tests, and I’m excited to continue improving my testing skills with its advanced features!
Tool/Technology 3: E2E testing with Selenium
Aspects Learned
Simulating User Workflows with Selenium
While writing E2E tests forInstructorFeedbackEditPageE2ETest, I got hands-on experience with simulating real user actions using Selenium—like clicking buttons, selecting dropdowns, and filling text fields.- It gave me a better understanding of how an app is used from a user’s point of view, and how to verify behavior from the outside in, rather than relying on internal implementation.
- I also learned how Selenium interacts with the browser via dedicated WebDriver binaries (e.g.,
chromedriver,geckodriver) that serve as a bridge between the test script and the actual browser. This enables automated control over the DOM, allowing scripts to locate, manipulate, and verify UI elements dynamically. - It was insightful to see how tests can launch and control real browsers programmatically, enabling full-stack validation of user flows across the frontend and backend.
Using the Page Object Pattern for Maintainability
One of the standout aspects of TEAMMATES’ E2E testing architecture is its use of the Page Object Pattern.- I interacted with
InstructorFeedbackEditPagewhich abstracts user interactions likeeditSessionDetails(),copyQuestion(), anddeleteQuestion()into easy-to-read methods. - This helped me avoid brittle selectors in test code and focus purely on the behavior under test. I now better appreciate why decoupling UI structure from test logic improves maintainability.
- I interacted with
End-to-End Testing Mindset
E2E testing forces a shift in mindset: instead of testing small functions, I had to think of user workflows.- For example, in
InstructorFeedbackEditPageE2ETest, I verified the flow from editing session settings to saving and checking if the changes persisted. - It taught me to balance test coverage vs. cost, as E2E tests are more expensive to run and maintain than unit tests. That’s why I learned to focus on happy paths and common exceptions, while leaving edge cases to unit/integration testing.
- For example, in
Resources Used and Summary
TEAMMATES Developer Guide - E2E Testing Section
- This was my main reference to understand how TEAMMATES structures E2E tests.
Selenium Official Documentation
- Helped me learn proper techniques to interact with web elements and handle dynamic UI changes using
waits,findElement, andactions.
- Helped me learn proper techniques to interact with web elements and handle dynamic UI changes using
InstructorFeedbackEditPage and Existing E2E Tests in TEAMMATES Codebase
- Studying similar E2E test files gave me reusable patterns for structuring assertions, handling browser context switching, and organizing test logic.
-
- I learned more about the Page Object Pattern from this website.
Final Thoughts
Working on InstructorFeedbackEditPageE2ETest taught me how to write robust, user-centered tests that are maintainable and comprehensive. I no longer see E2E testing as just UI clicking automation — it's about capturing workflows, ensuring frontend-backend consistency, and protecting critical paths of the app from regression.
Looking ahead, I want to deepen my understanding of TEAMMATES' E2E infrastructure—particularly why parallel test execution tends to be flaky on GitHub Actions. I’m also interested in contributing to making E2E tests more stable and predictable in CI environments, possibly by reviewing test data setup and teardown practices.
Overall, this experience has made me more confident in both automated testing and system-level thinking as a developer.
POH JUN KANG
1. Angular and Frontend
List the aspects you learned, and the resources you used to learn them, and a brief summary of each resource.
Aspects Learnt
Components
Coming from a React background, it was interesting to understand how Angular components work and how it talks to each other. A lot of the features are built in with their custom names like ngFor and (click) as compared to using JSX. It was very modular in nature which made the learning easier as I can focus on one component without having to break the rest or needing to learn the codebase of more than the surrounding components.
Observables
Angular uses a lot more of observables, emittors and listeners which is based on services to communicate between components. It was very different from React Redux and parent-child that I know of. This was what I had to make use of for one of my first PRs #13203 to deal with dynamic child components listening to a hide/show all button.
Resources Used
Angular Crash Course by Traversy Media: A crash course for learning how Angular works for developers with some frontend experience. It covers the basics of Angular, including components, services, and routing.
2. Unit Testing and Mockito
Aspects Learnt
Mocking functions
The use of when() was rather cool for me coming from JUnit and CS2103T. I did not expect to be able to mock functions and their return values. when() overrides a function call when that provided function is called, and returns the values given with chain functions. It allows me to perform unit tests much more easily as we do not need to worry about the implementation of the method being complete. There are other functions like verify(), doThrow(), any() which I've learnt to use as well that are extremely helpful for migrating the unit tests. They help me check if a method was called, to throw exceptions when a method is called, and to check if the parameters passed in are of the correct type.
Masquerading
The idea of masquerading was new and unique to me. I would not have expected that Admins can masquerade as any user and perform actions as them. This was a very interesting concept that I had to learn about when migrating the unit tests. Understanding it allowed me to refactor the access controls better as there are a few unique cases of masquerading. One such was if Admins had no access to a certain action, they should not be able to masquerade as a user to perform that action. This was an issue I faced that took many hours to settle, as I needed to mock an entire new class as well just to check the inability to masquerade.
Resources Used
Mockito Documentation: Official documentation for Mockito
3. Docker
Aspects Learnt
Containerised Applications
This was my first time using Docker and it made development much easier by containing our backend in its own sandbox environment. It keeps the application standardised by running on one type of environment and ensures smooth development by not worrying about multiple types of environment to cater and develop for during production.
4. E2E Testing with Selenium
Aspects Learnt
E2E Testing
E2E testing was not a new concept for me, but it was the first time I had my hands wet with it. My part was to migrate the E2E tests from datastore to SQL. I learnt and understood how the data bundles from JSON was loaded, deleted and restored. I also learnt how to use the Selenium API to perform actions like retrieving, filling and waiting for elements to load and seeing the results live as Selenium does all the testing.
Final Thoughts
After the course, I have definitely learned a lot of testing related things by migrating multiple unit and e2e test cases, refactoring access controls, and scratching my head solving complicated issues. I have also learnt a bit on Angular trying to add the show all/collapse all button for the student submission page. It taught me the importance of testing and how it should not be underestimated. Testing allowes us developers to surface hidden issues that we might not find ourselves as we test weird edge cases. The project has also allowed me to understand why big projects take so much longer than small personal projects. The large codebase of TEAMMATES, combined with the never ending amount of test cases creates for all the features, and balancing workload with other modules make contributing to the project a slow process, causing V9 of TEAMMATES to take so many years to develop. Looking into the future, I hope to continue contributing to TEAMMATES here and there before CS3282 starts so that V9 can be completed soon and we can move on to touching deeper into other parts of the codebase other than testing.
TENG WEI LOON
Tool/Technology 1 : Mockito
Aspects Learnt:
- Mockito is a mocking framework for unit tests to mock dependencies.
- One interesting thing about Mockito is that it can be used to reduce dependencies by creating test stubs of certain classes.
- For instance, the Logic class is stubbed using
mock(), creating a test stub forLogic.
- For instance, the Logic class is stubbed using
- Mockito has
when()that allows you to specify areturn objectusingthenReturn()without running the actual method. This can reduce the chances of any bugs from dependencies affecting the unit test. - Mockito has
verify()that allows you to verify if a certain method call has been made. I think this helps greatly in debugging especially in a large code base. - Mockito's
when()requires the arguments of the method to mock to be specified, in some cases, we cannot pass in the arguments directly due to equality checks for the different objects, hence we can bypass that by usingany(<ClassName>.class)where any argument of that class will trigger the mock method call. - Mockito's
when()allows you to throwException.classwhen you wish to mock the method to throw an exception. The method to mock throwing exceptions when the return type is not void is similar tothenReturn(), except we usethenThrow. But if the mocked method return type is void, then the way to do it isdoThrow(Exception.class).when(mockClass).add(anyString()).add(anyString(), anyString());`
Resources used:
- I used the original documentation to learn how it runs.
- Overall, the documentation helps with what the method does, but I had to test out what they mean using the test cases that I am working on to test the result
- For instance, I only realised that using
when()does not call the actual method itself.
- For instance, I only realised that using
I learnt that Mocks and Stubs are both used in unit tests to reduce dependencies between classes during testing. I believe that Stubs are used in a way where we write some simplified classes that return exactly what we want from the other classes that have dependencies with the SUT. Whereas, Mocks are used to observe and verify the interactions between the SUTs and classes with dependencies, making it slightly different from Stubs. I am not exactly sure of which is better in unit tests, and hopefully I can figure this out along the way.
Tool/Technology 2 : Selenium
Aspects Learnt:
- Selenium is used to automate web applications for testing purposes.
- Selenium WebDrivers allow you to test the application on different browsers. Eg: Chrome, FireFox, Edge.
- Selenium is used to run our E2E Tests in Teammates, to ensure that all the integrated components of the application work together as expected when used by the end user.
Resources used:
- I used the original documentation to learn how it runs.
- Overall, I had to set up the E2E tests locally, and run some E2E tests to learn how they work before writing new test cases.
Selenium is still a new tool for me and I hope to learn more as I write more E2E tests for Teammates.
Final Thoughts
After the course, I first understood the importance of testing the software, both in isolated environments like unit tests as well as end-to-end tests to ensure that the entire system works as expected when all the classes are integrated. Testing is definitely not an easy task and it might take longer to write certain unit tests but these are all crucial to identifying bugs in the code. Before writing tests, we should first understand the behaviour of the SUT and expected outcomes, then we can easily write the tests and find bugs if there are any. Working with such a huge codebase, I noticed a huge level of abstraction even just in the tests and I believe that this is important in keeping the code clean and readable for new developers. I think that working on real world projects definitely helped to give a little push towards learning the different tools such as Docker, Selenium, Mockito. This is also a great introduction towards tools that are used in real projects, which can help me to consider the different tech stacks better for future projects.
WONG XING HUI BERTRAND
Tool/Technology 1: Mockito
Aspects Learnt:
- Mockito is a framework for mocking dependencies
- Use
mock()to create a mock class. Most of instantiating the mock classes is done inBaseActionTest. - Use
when()andthenReturn()to mock a specific function and return result. - Use
verify()to check if a function is called 0-N times (usenever()for 0 times, and times(N) for N times). Helpful to check if a certain flow in application code was run - Use
reset()to reset a mock (e.g. no. of times a function of the mock was called, etc.)
Resources used:
- I looked at the official website as well as the helpful links it suggested.
Tool/Technology 2: TestNG
Aspects Learnt:
- For TestNG, I mainly learnt that TestNG natively supports parallel execution of unit tests
- You can control exactly what to run in parallel (methods, classes, tests, or instances) and how many threads to use, directly from your TestNG configuration or annotations.
- e.g.
testng-e2e-sql.xml
<?xml version="1.0" encoding="UTF-8"?>
<!DOCTYPE suite SYSTEM "https://testng.org/testng-1.0.dtd">
<suite name="e2e-tests-sql" parallel="tests" thread-count="2">
    <test name="e2e-tests-sql" parallel="classes">
        <packages>
            <package name="teammates.e2e.util" />
        </packages>
        <classes>
            <class name="teammates.e2e.cases.sql.FeedbackMcqQuestionE2ETest" />
            <class name="teammates.e2e.cases.sql.FeedbackMsqQuestionE2ETest" />
            <class name="teammates.e2e.cases.sql.FeedbackTextQuestionE2ETest" />
            <class name="teammates.e2e.cases.sql.FeedbackNumScaleQuestionE2ETest" />
            <class name="teammates.e2e.cases.sql.FeedbackRubricQuestionE2ETest" />
            <class name="teammates.e2e.cases.sql.InstructorStudentRecordsPageE2ETest" />
            <class name="teammates.e2e.cases.sql.InstructorCourseDetailsPageE2ETest" />
            <class name="teammates.e2e.cases.sql.InstructorFeedbackEditPageE2ETest" />
            <class name="teammates.e2e.cases.sql.InstructorStudentListPageE2ETest" />
            <class name="teammates.e2e.cases.sql.StudentHomePageE2ETest" />
            <class name="teammates.e2e.cases.sql.StudentCourseJoinConfirmationPageE2ETest" />
            <class name="teammates.e2e.cases.sql.AdminSearchPageE2ETest" />
            <class name="teammates.e2e.cases.sql.AdminHomePageE2ETest" />
            <class name="teammates.e2e.cases.sql.FeedbackRankOptionQuestionE2ETest" />
            <class name="teammates.e2e.cases.sql.InstructorHomePageE2ETest" />
            <class name="teammates.e2e.cases.sql.InstructorCourseEnrollPageE2ETest" />
            <class name="teammates.e2e.cases.sql.InstructorNotificationsPageE2ETest" />
            <class name="teammates.e2e.cases.sql.StudentCourseDetailsPageE2ETest" />
            <class name="teammates.e2e.cases.sql.RequestPageE2ETest" />
            <class name="teammates.e2e.cases.sql.InstructorCourseStudentDetailsEditPageE2ETest" />
            <class name="teammates.e2e.cases.sql.InstructorCourseStudentDetailsPageE2ETest" />
        </classes>
    </test>
</suite>
- Or you could do something like:
@Test(threadPoolSize = 3, invocationCount = 6, timeOut = 10000)
public void loadTest() {
    // This single test method will be invoked 6 times,
    // running up to 3 invocations concurrently.
}
Resources used:
- Official website as well as ChatGPT for some examples.
Tool/Technology 3: Angular
Aspects Learnt:
Structural directives:
*ngForand*ngIffor dynamic template rendering*ngIf: Conditionally includes or removes a chunk of the template based on a boolean expression.*ngFor: Renders a template once per item in an iterable.<ul> <li *ngFor="let item of items; let i = index; trackBy: trackById"> NaN. </li> </ul>
Two-Way Binding with
[(ngModel)]
<!-- Binds input value to component property and updates it on each keystroke -->
<input [(ngModel)]="searchText" placeholder="Search items">
<p>You’re searching for: </p>
- One-Way Binding + Change Event:
[ngModel]&(ngModelChange): Gives you explicit control over when and how changes propagate.
<!-- html -->
<input
  [ngModel]="searchText"
  (ngModelChange)="onSearchTextChange($event)"
  placeholder="Search items">

<!-- ts -->
searchText = '';
onSearchTextChange(updated: string) {
  this.searchText = updated.trim().toLowerCase();
  this.filterItems();
}
Resources Used
- Angular Official Documentation
- Structural Directives Guide – Overview of *ngIf, *ngFor, and how to write your own structural directives
- Forms Guide – Detailed coverage of template-driven forms, including ngModel and (ngModelChange)