Knowledge gained from Projects
CATcher:
MarkBind:
RepoSense:
TEAMMATES:
- Chang Weng Yew, Nicolas
- FANG JUNWEI, SAMUEL
- JAY ALJELO SAEZ TING
- LIU ZHUOHAO
- MOK KHENG SHENG FERGUS
- ZHAO JINGJING
- Zhang Ziqing
CATcher
Goh Yee Chong, Gabriel
Error messages and Hint labels in Angular forms
Forms have a FormGroup, where each part of the form is controled by a FormControl component.
In the ts file, Validators check and ensure the form is valid for submission. If it is not, the submit button is greyed out.
In the html file, the individual form input boxes are built, and shown with *ngIf statements. <input> also has additional parameters to specify whether the input is required and the max length of the input. The form error messages are programmed here in the html file, for example:
<mat-error *ngIf="title.errors && title.errors['required'] && (title.touched || title.dirty)">
    Title required.
</mat-error>
Hint labels can be used to show the remaining characters in a input box with limited characters when approaching that limit.
While a string with validators could be used to instantiate a FormGroup, a FormControl element ensured that validators are processed such that the form error messages are shown in components that are children to other Angular components. (PR #861)
Resources:
Lifecycle Hooks in Angular
After a component is instantiated, the ts file has lifecycle hooks in the form of methods that initialize or modify the component content or state. These methods are prefixed with ng.
The sequence in which these lifecycle hooks are called:
- OnChanges
- OnInit
- DoCheck - repeated
- AfterContentInit
- AfterContentChecked - repeated
- AfterViewInit
- AfterViewChecked - repeated
- OnDestroy
Most notably used is ngOnInit, which used to instantiate the component variables. In CATcher, ngAfterViewInit is also used to load issues after the component has been initialized.
Resources:
- Lifecycle Hooks
- Angular lifecycle hooks explained
- What's the difference between ngOnInit and ngAfterViewInit of Angular2?
- Video: Angular - Zero to Hero - Life Cycle Hooks
ViewChild in Angular
While html files can add custom child components using custom defined decorators such as <my-custom-component>, the parent component may need references to these children components to add change content or add interactability. ViewChild, ContentChild are queries to access child components from the parent component.
For example:
@ViewChild(ViewIssueComponent, { static: false }) viewIssue: ViewIssueComponent;
Static vs Dynamic queries
Static queries are queries on child components that do not change during runtime, as such result of the reference to the child component can be made available in ngOnInit.
Dynamic queries are queries on child components that change during runtime, so reference to child component can only be made available in ngAfterViewInit.
Resources:
- Angular @ViewChild
- Static query migration guide
- Video: Better concepts, less code in Angular 2 - Victor Savkin and Tobias Bosch
- What's the difference between @ViewChild and @ContentChild?
Property Binding
Square brackets in html tags in angular indicate that the right hand side is a dynamic expression. For example:
<span
        (click)="$event.stopPropagation()"
        *ngIf="issue.testerDisagree"
        [ngStyle]="this.labelService.setLabelStyle(this.labelService.getColorOfLabel('Rejected'))" >
The dynamic expression can be evaluated in the context of the corresponding .ts file of the html file.
Event binding
Parenthesis within html tags, for example (click) are used to call the component's corresponding method on click. In the example above, $event.stopPropagation() is a Javascript call that prevents the label Disagree within the issue bar from being clickable because its parent is clickable. The click event from parent is stopped from propagating to this particular child.
Resources:
- Angular Doc Property Binding
- Angular Doc Event Binding
- StackOverflow simple summary
- StackOverflow Stop Propagation
Git Rebase
Below is a link to a good explanation with visuals to explain rebasing. Rebasing helped to clean the commit history of my main branch after accidental merging with other branches.
Resource:
Github File Upload API: CreateFile vs CreateTree
The API for committing a single file and committing multiple files at once are different. Attempting to do multiple single file commits in a short duration of time will likely cause HttpError to occur. The current recommeded fix is to put in sleep before the next single file commit, or merge multiple single file commits into a single multiple file commit.
Resources:
Lee Chun Wei
Observer design pattern (in rxjs)
In CS2103/T, I learnt about the Observer design pattern but I did not really see it being used often until I had to work with rxjs in Angular.
Observables are used in Angular to provide a form of lazy transfer of data to the observer in both a synchronous and asynchronous manner, in a beautiful functional programming style. For example, if we want to get API data of the authenticated user from github, we can call
const observable = from(octokit.users.getAuthenticated()).pipe(
    map((response) => response['data']),
    catchError((err) => throwError('Failed to fetch authenticated user.'))
);
from(...) will convert the Promise object octokit.users.getAuthenticated() into an observable. We can then change the values returned by this promise by using pipe(...). In the example, the map(...) function in the pipe will only retrieve the 'data' values of the response from the API call. Afterwards, we can subscribe to the observable somewhere else by calling subscribe(...). In the example below, we will subscribe to the observable and print the data to the console.
observable.subscribe((data) => console.log(data));
rxjs provides a wide range of transformation operators (such as map) that will make programming with lazy data (like asynchronous API calls) easier. For more information, visit https://rxjs.dev/guide/overview.
Logging
Though it might seem to be redundant at first, log messages are helpful to developers when users report a bug that cannot be resolved easily. In CATcher, logging is used at various levels, from logging error messages to logging network HTTP requests to the github server. The octokit API library that is used to perform API requests to the Github server allows developers to customize the various logging levels, so that there is no need to manually hard-code the logging messages for every method that has a Github API call. By separating the various logging levels, developers can easily filter through the less important messages if there is a critical error. There are usually 4 levels of logging for the console (other than the general console.log), shown below in increasing severity:
- debug: Provides useful information to the developer in development mode. Usually debug messages are not very useful in production, especially for CATcher, since they take up a lot of space in the log. An example of a debug message can be the HTTP request details of an API call to Github.
- info: Provides information about a less important event occuring or a state change. Such information is not very important to the developers, but in certain situations, the developer may find such messages helpful.
- warn: Provides an important warning to the developer if there is an unexpected situation or bad code, but the application can continue to work. Developers should take note of such warnings and address these warnings if possible.
- error: Provides an important error message to the developer if one or more components of the application fails and stop functioning properly. This usually constitutes as a bug that developers should work on promptly.
View Encapsulation
Suppose you want to create an Angular component which contains a child component that needs to be styled. The best way is to apply the CSS styles to the child itself. But sometimes, it is not possible or just too tedious. For example, in this CATcher PR, I want to apply markdown-like CSS styles to a custom generated HTML code. To do this, I have to put the HTML inside an article tag, set the class of the article to "markdown-body", and let the css file handle the styling. However, the CSS styles did not get applied to the generated HTML. Why?
To solve this issue, we will have to learn about view encapsulation in Angular. There are currently 3 types of view encapsulation in Angular: ShadowDom, Emulated (default) and None. The table below summarizes the different view encapsulation modes.
| View Encapsulation | Description |
|---|---|
| ShadowDOM | In Angular, ShadowDOM uses the browsers's internal Shadow DOM API to encapsulate/hide the Angular component's view inside a ShadowRoot and applies the styles specified only to the component itself. See mdn docs for more details on what is ShadowDOM. The drawback of this is that some browsers may not support ShadowDOM (but major browsers like Chrome and Firefox support ShadowDOM). |
| Emulated | This is the default view encapsulation in Angular. It emulated the behaviour of ShadowDOM, without using ShadowDOM. Angular does this by adding unique attributes to the component templates and edits the css by applying the attributes too. See the picture below for an example. |
| None | Perhaps the easiest to understand. Unlike ShadowDOM and Emulated, the HTML and CSS is untouched. However, this can cause the CSS to be applied to the entire webpage. We try to avoid using this if possible, in case of styling conflicts. |
Example of emulated view encapsulation:
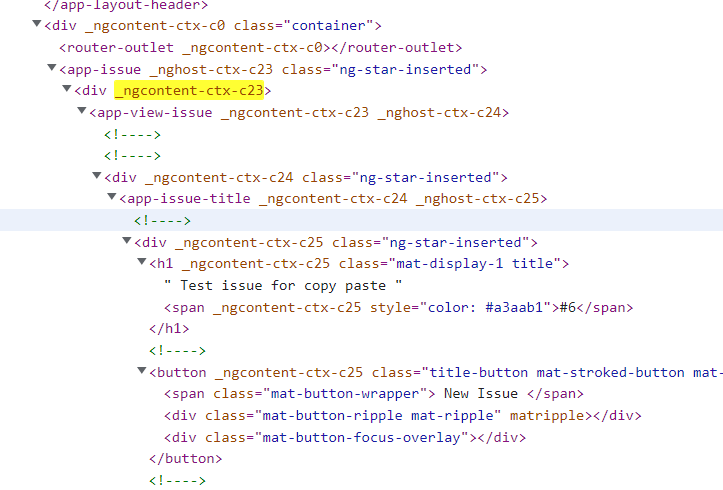

Notice that there is a special _ngcontent-ctx-c23 attribute applied to the elements within app-issue component, while the app-issue element itself acts as a "shadow host", hence the attribute _nghost-ctx-c23. However, the content of the child component app-issue-title will not have this attribute. In the bottom picture, we see that Angular has changed our CSS styles such that it will only be applied to elements with attributes such as _ngcontent-ctx-c23. This prevents the style from being applied throughout the web page, hence emulating the behaviour of ShadowDOM.
Going back to the initial question, why were the styles not applied to the generated HTML? This is because we were using the default emulated view encapsulation, so the imported CSS file will be edited to include the unique attribute _ngcontent-ctx-cXX. The generated HTML however, does not have this attribute. Therefore, we will need to set the view encapsulation to None, so that we can apply the markdown-like CSS styles to the generated HTML.
Authentication and authorization
In CATcher, we need to perform authentication to ensure that users who log in are Users are actually who they claim to beauthentic. Authorization is also needed to ensure that only the relevant students, tutors and admins can log in to CATcher. To achieve this, CATcher uses Github OAuth to authenticate and authorize users.
OAuth is an open-standard protocol for authorization. By using Github OAuth, the user first authenticates himself by logging into his own Github account. Then, Github will ask the user for permission to allow CATcher to access certain content and perform certain actions. By accepting the permission request, Github will authorize CATcher to act on the user's behalf, for example, to create a new issue during PE. Here are the details behind the OAuth process when a user tries to log into CATcher:
- User selects a session and logs in.
- CATcher will redirect the user to Github to log in, and specify the scope of permissions needed for CATcher.
- The user is redirected back to CATcher. Github will send an authorization code to CATcher.
- CATcher will request for an access token from Github. However, it has to do so through a backend server (gatekeeper).
- The browser receives the access token from Github via gatekeeper. This access token will be used to authenticate future Github API requests made by the user.
Thanks to OAuth, users can grant third-party applications permissions to access, modify or delete content on another account. CATcher benefits from this because users do not need to use the Github interface directly to do their PE.
However, the access token must be securely kept, since anyone who has the access token can perform actions on behalf of CATcher.
More resources here: Github OAuth guide, IETF RFC6749 document
Lee Xiong Jie, Isaac
CSS Flexbox
Flexbox is used to order, align and space out items in a one dimensional container (i.e. a row or a column), even when the size of the items are unknown or dynamic.
Items can be given a default size (flex-basis), and can also grow (flex-grow) and shrink (flex-shrink) according to the extra space in the container (or lack thereof). These three properties can be controlled with the flex property, e.g.
.item {
    flex: 0 1 10%
}
where the three parameters correspond to flex-grow, flex-shrink and flex-basis respectively. In this case, the default width of the item is 10% of the width of the container, and it does not grow nor shrink relative to the other items (assuming the other items also have their flex property set to 0 1 auto).
The flex-basis property can also be set to the content keyword, where the width of the item is based on the content within the item (e.g. if it contains text, then the width of the item is the length of the text string). This allows for dynamically sized items within the container, which may enable the layout to look cleaner.
For a helpful summary of flexbox properties, visit https://css-tricks.com/snippets/css/a-guide-to-flexbox/
Prettier, husky and pretty-quick
Prettier is a tool to format code according to a given code style automatically. Unlike a linter such as TSLint, prettier only cares about formatting, rather than detecting programming errors. Prettier supports both Typescript and Angular, which CATcher is written in.
Since it is quite wasteful to run prettier to format the entire codebase every time a change is made, so a more efficient method is to format the codebase once, and then format only the changes made during each commit.
This is where the husky tool comes in, which enables hooks to be run before each commit. The relevant hook here is pretty-quick, and this formats the changed/staged files during each commit. This frees developers from having to fuss with maintaining code formatting or fixing formatting mistakes, leading to less frustration.
For more information, visit Prettier and husky
Arcsecond
Arcsecond is a zero-dependency parser combinator library for Javascript that is now being used in CATcher to parse GitGub issues and comments.
Previously in order to parse the comments, we used the regex string (${headerString})\\s+([\\s\\S]*?)(?=${headerString}|$)\gi which is neither human readable nor maintainable. In addition, this string only finds matches - more regex is used to extract relevant information from the comments.
In comparison, arcsecond offers human friendly parsers such as str, char, letters, digits, between and so on, and these parsers can be composed and run in sequence. This makes building and maintaining parsers much easier. In addition, arcsecond also allows you to extract certain information from a string (as opposed to the entire string) by way of the coroutine parser.
For example, take the string "Today is Wednesday and the weather is 30 degrees Celsius", and you want to extract the day (Wednesday) and the temperature (30). One parser that can achieve that is:
const dayWeatherParser = coroutine(function*() {
  yield str("Today is "); // parse and ignore
  const day = yield letters; // parse 'Wednesday' and store
  yield str(" and the weather is "); // parse and ignore
  const temperature = yield digits; // parse '30' and store
  yield str(" degrees Celsius"); // parse and ignore

  return {
    day: day,
    temperature: temperature
  }
})
This allows us to build complex and versatile parsers easily, yet in a way that is clear and understandable. For more information, check out the tutorial here
Jasmine
Jasmine is a testing framework for Javascript code. In Jasmine, test suites are functions in describe blocks, and each spec is also a function in an it block.
For example, here is a suite that tests a certain function:
function testMethod() {
  return true;
}

describe("testMethod suite", () => {
  it("testMethod should return true", () => {
    expect(testMethod()).toBe(true);
  });
});
Expectations are built with the function expect which takes a value (testMethod() in the example above), and is chained with a Matcher such as toBe, toEqual or toBeGreaterThan. This provides greater flexibility than say JUnit's assert methods, since one assert method corresponds to one condition.
Since test suites and specs are functions, normal Javascript scoping rules apply, so variables can be shared between specs. In addition, there are separate setup and teardown methods such as beforeEach and afterAll.
For more information, check out the Your First Suite tutorial here
MarkBind
Hannah Chia Kai Xin
Frontend
Rounded vs Square edges for signalling functionality
Researching whether to use rounded corners, sqared off corners, or fully rounded boxes was interesting from a usability perpective. Some resources I used to learn about them:
- https://ux.stackexchange.com/questions/40744/mixing-rounded-corners-and-square-corners
- https://medium.com/@carolinalina/how-to-design-ui-buttons-that-convert-d5ebb1080969
- https://prototypr.io/post/the-rounded-user-experience/
The information from https://uxdesign.cc/make-sense-of-rounded-corners-on-buttons-dfc8e13ea7f7 in particular made a case for fully rounded buttons for primary content when you have space to spare, to direct users attention to those buttons. They suggested to avoid fully rounded buttons when many are used next to each other as it may not be obvious which to click. I used this information to infer what the average user might takeaway if minimized panels were pills rather than rounded buttons.
Vue
- https://v1.vuejs.org/guide/instance.html
- Scoped styles: https://vue-loader.vuejs.org/guide/scoped-css.html, also informing the issue I created #1768 in MarkBind
- Learning about slots: https://learnvue.co/2021/03/when-why-to-use-vue-scoped-slots/#conclusion, https://www.smashingmagazine.com/2019/07/using-slots-vue-js/
Scrollbars
Using overflow-x: scroll on the default navbar, seemed to cause the dropdown to break.
After a few stack overflow posts and reading, I found this article: https://css-tricks.com/popping-hidden-overflow/ that explains that setting overflow-x sets overflow-y as well, and it's just not possible to have a dropdown peep out of a scrollable overflow without setting positions relatively. This discussion with the offered solution was also interesting.
I briefly explored existing libraries like https://floating-ui.com/. Libraries like this exist to make it easier to accomplish this surprisingly complex task.
I also learned about the accessibility of scrollbars (https://adrianroselli.com/2019/01/baseline-rules-for-scrollbar-usability.html) and (https://www.w3.org/WAI/standards-guidelines/act/rules/0ssw9k/proposed/), which discussed what goes into making scrollbars accessible. Visually, visible scrollbars provide an obvious indication that there is more content. These design tips on scrollbars (https://www.nngroup.com/articles/scrolling-and-scrollbars/) were also interesting, particularly the note to avoid horizontal scrolling wherever possible.
This informed my decision that it would be better not to make a scrollable navbar the default, but have a dropdown menu with more options for smaller screens
[]::webkit-scrollbar](https://developer.mozilla.org/en-US/docs/Web/CSS/::-webkit-scrollbar) pseudo-element does not work for all browsers and should be used with caution.
Open source dependencies
ghpages
Used when researching the deploy and build commands for MarkBind.
Commander
Used to write CLI programs.
- https://www.npmjs.com/package/commander
- https://en.wikipedia.org/wiki/Usage_message (conventions in defining parameters)
jest
Mainly studied the changelog to see if this would break when dependencies were updated.
- Introduction: https://jestjs.io/ and repository(https://github.com/facebook/jest)
- relevant blog post: https://jestjs.io/blog/2021/05/25/jest-27
- changelog
- Jest testrunners: they plan on changing the default test-runner from
jasmine2tojest-circusin version 27, withjasmine2to be discontinued afterwards. Though I think we're usingjasmine2and notjest-circus, but MarkBind we never explicitly specify a change from the default
fs-extra
Handy utility that I ended up using extensively
Git
CI pipeline (particularly with git):
- https://docs.github.com/en/actions/automating-builds-and-tests/about-continuous-integration, particularly the section on github actions
- Follow-up research about github actions
- Basic research about Travis CI and Netlify
Logging Framework
- https://www.sentinelone.com/blog/logging-framework/ as an introduction
- https://se-education.org/se-book/errorHandling/#-12 also as an introduction
- https://github.com/winstonjs/winston (library used with markbind)
Ways Versioning is Implemented
- Learn about semantic versioning: https://semver.org/
- Alternate versioning solutions:
Javascript
Javascript with regard to object oriented programming
Looking into this was inspired by the issues on refactoring the large core/site/index.js file which is over 1.5k lines into more manageable class. At present, most of the file is made up of the Site class, which makes sense from an object oriented perspective. All the functions which are supported by Site are things which affect what the site itself holds or does: generating itself, deploying itself, initialising itself.
One suggestion for refactoring would be separating out each command into separate files. We could abstract away the command logic might be separating each command into classes, having each command inherit from a Command class, and having the site class just generate and execute each command when it is called to do so. But is this necessary or desirable?
Java and Javascript are different in that Java is class based and Javascript is prototype-based. Class based languages are founded on the concept of classes and instances being distinct, where classes are an abstract description of a set of potential instances which have the properties defined in the class - no more and no less. Prototype based languages have a 'prototypical object' which is the template used to create a new object, but once you create it or at run time the object can specify its own additional properties and be assigned as the prototype for additional objects (source: mozilla, class-based vs prototype based languages)
Nevertheless, Site.js does use "classes" of managers to manage externals, etc, so perhaps in production avoiding classes is not a big deal. Would still be a useful abstraction to manage the complexity of the file.
Certain functions in javascript
Jovyn Tan Li Shyan
Vue Lifecycle Hooks
I learnt about Vue's lifecycle hooks while working on popovers as I was facing errors with undefined instance properties.
For instance, the $el property is only resolved after the instance is mounted.
When working with instance properties such as $el, I also learnt more about the different lifecycle hooks and when different properties are instantiated.
I came across this important note while browsing the docs on lifecycle hooks:
Don’t use arrow functions on an options property or callback, such as
created: () => console.log(this.a)orvm.$watch('a', newValue => this.myMethod()). Since an arrow function doesn’t have a this, this will be treated as any other variable and lexically looked up through parent scopes until found, often resulting in errors such asUncaught TypeError: Cannot read property of undefinedorUncaught TypeError: this.myMethod is not a function.
Resources
Vue Templates & Slots
Templates/slots are a way to pass content from parent to child components, and are used by bootstrap-vue (in place of props) in cases that require reactivity. Using slots could make the code more readable. It's also a convenient way to pass components into another component, and enables reactivity in the popover use case.
Resources
Data attributes
I came across the use of data attributes (data-*) to pass data between different components/nodes in MarkBind.
I thought it was an interesting feature of HTML that allows for extensibility as users can store extra properties on the DOM without interfering with standard attributes.
It also guards against future changes in standard HTML attributes (i.e., avoids the problem of using a non-existent attribute that may become a standard attribute in a future version of HTML).
This was something that I was previously not aware of so it was interesting to see how it could be used in a practical scenario.
Resources
Server-Side Rendering
Some things that helped me solve SSR/hydration issues this week:
- Conditionally render data when it has been fully loaded
- Take note of the different lifecycle hooks (
mountedonly runs on the client)- Vue's docs for lifecycle hooks (linked above) were once again a good resource
- Take note of how the Vue component will be compiled, ensure that the HTML is correct and aligns on both client- and server- side
Resources
- Data reactivity on the server
- Data reactivity is unnecessary on the server, and is disabled by default.
mountandbeforeMountwill only be executed on the client
- Client-side Hydration
- Instead of throwing away the markup that the server has already rendered and re-creating all the DOM elements, we “hydrate” the static mark-up and make it interactive
- In development mode, Vue will assert that the client-side generated virtual DOM tree matches the DOM structure rendered from the server
- If mismatch: bail hydration, discard existing DOM, render from scratch
- This is disabled in production for performance reasons
- What to do when Vue hydration fails | blog.Lichter.io
- This resource was very helpful in debugging the source of hydration errors: Solving the hydration failure
Useful Git tricks
--skip-worktree
After adding some config files (e.g. .ignore for Ag), I wanted to ignore these config files to keep my git history clean.
I first tried using git update-index --skip-worktree to "hide" the .ignore file, but this didn't work because the file wasn't indexed yet (so update-index doesn't make sense).
Instead, the following approach worked:
- Add
.ignoreto.gitignore git update-index --skip-worktree .gitignore
- You can "undo" this in the future using the
--no-skip-worktreeflag
From here, git status shows no changes to the .gitignore file, and .ignore is no longer tracked.
Another option was --assume-unchanged instead of --skip-worktree (comparison is linked under "Resources").
Resources:
npm Dependencies
While updating package.json, I had to clarify the meaning of some versioning syntaxes:
~1.2.3means "approximately equivalent to v1.2.3" => accepts all future patch versions, i.e. ≥1.2.3 and <1.3.0^1.2.3means "compatible with v1.2.3" => accepts all future minor/patch versions, i.e. ≥1.2.3 and <2.0.0@org/package=> 'org' is a scope, and 'package' is a package name within the scope
Some learning points on the different types of dependencies:
- devDependencies - only required during development (e.g. external tests, documentation)
- installed on
npm install, unless the--productionflag is passed
- installed on
- peerDependencies - compatible with, but not required (e.g. the module may expose a specific interface specified by the host documentation)
- installed if missing, unless there is a dependency conflict
- bundledDependencies - will be bundled when publishing the package
- Can be specified as a boolean or an array of strings (package names).
truewill bundle all dependencies,falsewill bundle none and an array of package names specifies which packages to bundle.
- Can be specified as a boolean or an array of strings (package names).
Resources:
- Specifying version ranges for dependencies
- Scope
- devDependencies, peerDependencies, bundledDependencies
- Explanation on different types of dependencies
- When to use bundled dependencies
Simple scripting
Bash scripting was very useful when I needed to modify a large number of files (like vue.min.js for upgrading the Vue version, or bootstrap.min.* for upgrading Bootstrap).
I picked up a bit of bash scripting and used this to mass copy the minified files:
find . -name "*vue.min.js" | xargs -n 1 cp ~/Downloads/vue.min.js
find . -name "*vue.min.js"finds all filepaths ending withvue.min.js|uses the output offind . -name "*vue.min.js"as input for the right side|is called a pipe.- Redirects the left-hand side stdout to stdin of the right-hand side
xargs -n 1converts each line of input to arguments for the commandcp ~/Downloads/vue.min.jsxargsconverts input from stdin to arguments for a command.-n 1means to use only one argument for each iteration. Since arguments are space-separated, this essentially breaks the input up by lines-pcan be used to echo each command iteration and prompt a confirmation before proceeding. (yto confirm)
Another helpful command: using sed, delete all lines containing 'bootstrap-vue' in HTML files
find . -name "*.html" | sed -i '' '/bootstrap-vue/d'
find . -name "*bootstrap-vue.min.css" | xargs -n1 rm
Replace all instances of font-weight- with fw-:
ag -l 'font-weight-' | xargs -n1 sed -i '' 's/font-weight-/fw-/g'
Resources
Traversing the DOM
While working on the Bootstrap 5 migration, due to changes in how Bootstrap handles event listeners, several components' logic had to be modified to maintain the same behaviour. This was done by using selectors and methods to modify the DOM.
- Using selectors: recursively (
.find) or only on immediate children (.children) - Toggling classes on a Vue slot: by using selectors and
.toggle
One useful trick for CSS selectors is that you can right-click on an element in Chrome Devtools and copy its CSS selector!
Resources
Chrome Devtools
While testing and debugging, I found many features of Chrome Devtools to be useful:
- Copy the CSS selector of an element
- View all event listeners on an element
- Force a state on an element (e.g. hover, focus)
- View the properties of an element, which can be queried and/or modified with JavaScript
ONG JUN XIONG
Special characters encoding on URI
On windows, file paths are separated by the directory separator character which
is a \. This is different from the linux and mac's / separator. When
building tools to be used cross-platform, it is important to be able to parse
and encode file paths correctly. This is especially important when dealing with
URI since they only accept 84 characters with \ not being one of them. Hence,
if a URI contains a \ character, it will be encoded as %5C and may cause
issues with the path on a webpage. Read more about this
here.
HTML Canvas drawing
I used HTML canvas to help with image annotation. I choose to use HTML canvas since it provided the best performance and I felt it was well suited to the task of drawing arrows and annotating over images.
Below are some things that I found useful while working with HTML canvas.
The HTML <canvas> element is used to draw graphics, on the fly, via
JavaScript. The <canvas> element is only a container for graphics but the
actual drawing of the graphics is done using javascript by the user. I made use
of lines, boxes, text and image to help annotate over images. Once an image/line
is drawn, there is no way to erase that line unless the whole canvas is wiped
out (or draw a white box over that section). Due to this feature of canvas, I
had to parse all the image data and set the proper width, height and coordinates
directly before actually beginning to draw the canvas element. This made drawing
individual annotations harder since I had to account for the starting position
of each element and make sure that they are all in line.
I also found that resizing the canvas width or height will cause the whole canvas to be reset to a blank slate. This was one of the bigger issues I ran into since now I had to pre-calculate the final size of the canvas.
Resources:
DIVs vs SVG vs HTML Canvas for drawing
Advantages
DIVs are simple to work with and are the most common components for frontend developers. They are quite user friendly and are good for simple animations and drawings.
SVGs scale well and are a good choice for complex drawing. They are also relatively fast compared to DIVs and are computed in a way that there is no loss of quality at any scale.
Canvas is a good choice for lines, boxes and text drawing. It is the fastest of the 3 methods and can be used to draw over an existing image. This functionality makes it a good choice for annotating over any given image.
Disadvantages
DIVs did not offer the flexibility of SVG and HTML canvas, especially for drawing more complex shapes like arrowheads. Positioning of div elements also tends to be clunky as I would have to work with CSS positioning as well. This might be an issue when scaling is involved since relative position tends to change significantly depending on the size of the screen.
SVGs were complicated to overlay over an image and creating many different custom SVGs would require a use of a external library (or very complicated code). SVGs would also have to be referenced for each rended object and this would be troublesome since I am passing child components to the parent (making references difficult due to the similar names).
HTML canvas is complicated to work with and requires a lot of javascript. It also requires the image to be drawn in one go (depending on application) as often times drawing over a already drawn image does not preserve quality well.
Resources:
Final choice: DIVs for annotating over images
DIVs provided more flexibility since using CSS on them is simple compared to Canvas which is drawing over the image directly. Using components also allowed for the implementation of hover actions and was much simpler than the implementation in Canvas.
Attributes and Query Selector
The querySelector method is used to find elements in the DOM. I used it to get
the info of all child classes from the annotation-wrapper. This allowed me to
get the attribute data needed to build the html canvass before drawing. I choose
to use querySelector over emitters due to the way my components where
structured. By using querySelector adding more annotation features to the
class will be relatively easy since all I have to do is add another method to
query the new element id.
Resources:
Debounce - JS
In JavaScript, a debounce function makes sure that your code is only triggered once per user input.
Vue Element Selectors
This feature of Vue was really awesome. It allowed me to get elements from the
DOM without having to use the base javascript querySelector method.
Element selectors are used to find elements in the DOM. I used them to get the image of the parent element and from there managed to calculate the width and height of the image.
Element selectors are generally used in the created() section of vue but can
be used elsewhere too.
Example: this.$el.qureySelector('.image-wrapper')
CSS pointer redirection
Learnt that in CSS if you have 2 overlaying areas, and you want to ignore the
top area, you can use pointer-events: none; on the top level element and then
use pointer-events: all; on the bottom level element. This makes it so that
all pointer events in that area are redirected to the proper element.
Vue computed vs Vue method
Generally not much difference between computed and methods. However the key differences are:
Methods:
- Similar to JS functions that are used to perform actions on the data.
- Will only run when called
- Can take in parameters
Computed:
- Re-rendered every time the data changes
- Properties are available in data store
- Automatically cached
- Good for expensive operations
- Cannot send parameters
Resources:
RepoSense
CHAN JUN DA
FileSystems, Bash and CMD
Specifying File Paths in Command Line Arguments
General:
- File path arguments should nearly always be wrapped in quotation marks to accommodate file paths containing spaces.
For UNIX file systems:
/is the separator used by UNIX systems- UNIX file systems allows for virtually any character to be used in the filename except
/andnull(and some specific restricted names). As such, filenames and paths containing non-standard characters can lead to unexpected errors in program execution. It is important to be aware of such a possibility.- For example, in RepoSense, a local repository's path is first read as input and then used as a String in a CLI argument. A valid \ character in a filename will end up behaving as an escape character in the new CLI command.
For Windows file systems:
- \ is the separator for Windows file systems. However, it is also compatible with
/. All/read in a file path are replaced with \ as per Microsoft's documentation. - Java's implementation of the
Paths::getmethod performs Windows file path validation if run on a Windows system. However, if used in a test method run from UNIX, the behaviour will differ.
Relative and Absolute File Pathing Specifics
- Both
./and../function similarly in both UNIX and Windows (replacing/with \). ~is an absolute pathing feature used in Bash which expands to the user's home directory.- If tilde expansion is used as follows:
~chan-jd/"some file path"/then~chan-jdis expanded to the$HOMEdirectory of the userchan-jd. - If wrapped within quotation marks, it becomes a literal
~char in the file path. Thus, to use both together, the tilde has to be left out of the quotation marks:~/"some test file". ~does not work in Windows command prompt but does work in Windows PowerShell
- If tilde expansion is used as follows:
- Windows has various methods to apply the current directory to a path
- If a file path starts with a single component separator like
\utilitiesand the current directory isC:\tempthen normalization producesC:\utilities - If it starts with a drive without component separator like
D:sources, it looks for the most recent directory accessed onD:\. If it isD:\tempthen the normalization producesD:\temp\sources. - Otherwise, a path like
example\pathwill be prepended with the current directory on normalization.
- If a file path starts with a single component separator like
Special Characters in Bash String Arguments
- Double quoting an argument will still allow for special characters like
$(variable substitution) to work. - Single quoting preserves the literal value of every single character within the quotes. Another single quote will end the quotation and there is no way to escape it.
- Reference manual link
- This stackoverflow post suggests a good way to handle quoting arguments containing both single quotes and special characters.
- Wrap all characters besides single quotes in
'. - For
', replace it with'"'"'. Consecutive quoted strings not separated by spaces are treated as a single argument in Bash. This quotes the single quote in double quotes where it does not have special meaning.
- Wrap all characters besides single quotes in
- A (possibly incomplete) list of special characters in Bash that need to be escaped can be found in this stackexchange post.
- Relevant note: On Windows CMD, the
'single quote has no special meaning and cannot be used to quote arguments in CMD. Only double quotes works for arguments containing spaces to be treated as a single argument.
Variable and tilde expansion in CMD and Bash
When we run something like java -jar RepoSense.jar some cli args, variable expansion and tilde expansion (for Bash) is performed for us before the Java program receives it.
- E.g. If I specify my repository as
~/reposense/Reposense, themainmethod in the Java program will receive the String/chan-jd/home/reposense/Reposensein itsargsarray. - This behaviour is mostly beneficial for us but can cause some non-uniform program behaviour when user has more than one way to specify their arguments. An example relevant to RepoSense is that users can specify their local repository file paths in both the command line or the
repo-config.csvfile. But when RepoSense reads the data straight from the CSV file, it does not perform the necessary expansions. Using the example above,RepoSensewill receive the raw version of the String,~/reposense/Reposenseinstead which might cause some issues. - One possible way to work around this is to
echothe command in CMD or Bash. The command output will include the substituted expansions.
GitHub
Deployments and Environments
- Environments can be viewed as the platform for which deployments are staged. There are generally fewer of them. For example in RepoSense, there is roughly two environments per active pull request for deployments.
- Environments can be viewed on the main page of a repository.
- They will linger so long as the deployment on the environment continues to exist and would normally require manual deletion.
- Deployments are requests to deploy a specific version of the repo such as a pending pull request. In the context of RepoSense, a single PR can have several tens of deployments if it is consistently updated.
- It is generally difficult to track and control deployments on the GitHub page itself.
- However, through the GitHub API, we can query all deployments relating to an environment and delete them. This will automatically remove the environment from the listing as well. This solution was taken from this stackoverflow post.
GitHub API
The GitHub API provides us with a way to interact with repositories via a RESTful API. Using curl commands:
- We are able to query (via
GET) for information such as branches, deployments and environments - We are also able to
POSTcommands to a repository to perform various actions such as deleting deployments. These generally require a security token which might not be available from a personal computer's CLI. When running GitHub Actions, it is possible to acquire one for the repository to perform actions such as closing deployments.
GitHub Actions
We must add GitHub action workflow files to the directory .github/workflows in order to automatically perform certain scripts on certain GitHub actions.
- The general workflow of a
.ymlworkflow file contains a declarationonwhich states under what scenarios will these actions be triggered- It is followed by a list of jobs. For each job, we can declare a name, platform to run on, environment variables, followed by sequential steps to perform.
- Under steps, we can use
runto run shell scripts similar to running the same command from a BASH terminal
- When setting up an environment to perform a specific workflow, we can generally choose exactly what OS to run, what versions of Java or other languages/packages to use.
- It is additionally helpful to be aware of what are the versions used by default for the various OS-es.
- Ubuntu 20.04 - here we can see the default Git used is 2.30.2. It might be helpful to be aware of such specifications as we might experience differing behavior in the future due to version differences.
- Related to RepoSense, and caused me quite a bit of trouble is that GitHub Actions uses the default timezone of UTC+00.00 which leads to some commits being assigned to the previous day as compared to if it were run locally on my own machine which is at UTC+8.
- It is additionally helpful to be aware of what are the versions used by default for the various OS-es.
Git Specifications:
Git Diff Output
The git diff command is used heavily by RepoSense for analyzing. The following are behaviour in the output that I discovered from self-testing as documentation about the behaviour was difficult to find:
The filename
/dev/nullrepresents a non-existent file. A mapping from/dev/nullto a file indicates a new file. Similarly, a mapping from a file to/dev/nullindicates a deleted file.For filenames containing certain special characters (i.e. the lines
--- a/some/file/nameor+++ b/some/file/name), the listing of filenames in the before-after comparison is adjusted slightly.- For files containing spaces, the filename will have a tab character at the end. E.g.
+++ b/space test\t. - For files containing special characters (not including space) such as \,
",\t, the filename will be placed in quotation marks. E.g.+++ "b/tab\\ttest/" - For files containing both of the above cases, the filename is first wrapped in double quotation marks followed by a tab character.
- For files containing spaces, the filename will have a tab character at the end. E.g.
These nuances in
git difffilename output may be important for filename designation as is done in RepoSense.
Git Log Output
Every commit in the log output displays the hash, author with email, date and message.
- If a user has set an email in their
git configbut set their Github 'keep my email address private' setting to true, web-based Git operations will list their email asusername@users.noreply.github.com. - It is possible to explicitly set the email to be empty through
git config --global user.email \<\>which will set it to<>. No email will show up in a commit done by such a user config.
Git Commit & Config Interaction
git commit commit information details can be found here.
- When committing with a
user.nameanduser.emailthat matches a GitHub account, commits on GitHub will be able to link the GitHub account to the commit.- However, committing with an empty email
<>will cause the commit to look like this on GitHub where there is no account linked to it.
- However, committing with an empty email
- It is possible temporarily set
user.nameas<>. However, it will not allow the user to commit, citing an invalid username.- It is also possible to set
user.nameas an empty string which is equivalent to resetting it. Git will not allow commits until auser.namehas been set.
- It is also possible to set
Git Changelogs
This section refers specifically to the changes to the Git tool itself. I have found out from my own experience that finding information relating to Git versions can be difficult as most search results relate to how Git can be used to manage those versions.
- The release notes can be found at https://github.com/git/git/tree/master/Documentation/RelNotes
- One (rather inefficient) way I have found to attempt to search for relevant information regarding when a specific change was made was to do the following:
- Clone the
gitrepository locally (Note the repository is quite large) - Create a bash script that takes in a string from the command line and
grep-es it against all the text files in the folderDocumentation/RelNotes
- Queries are generally quite fast. For example, if I wanted to find out when the
git blame --ignore-revs-fileflag was added, I could search forgit blameand see all relevant release notes and look them up manually. grepcan be set to quiet mode if I'm just looking for the file containing the reference. Otherwise, in non-quiet mode, the line in which the string match is found is printed. I can read the line and see if it is directly related to what I am looking for without having to look-up the file myself.
- Clone the
- Descriptions of the changes can be somewhat vague. It is usually easier to look for the specific command and see if it showed up in the specific release notes rather than trying to find keywords relating to the change in mind.
- For example the
ignore-revs-listflag addition was done in 2.23.0. The release notes reads"git blame" learned to "ignore" commits in the history, .... - For full details on the change, we need to go to the commit message itself. The commit messages are extremely detailed, e.g.
git blame --ignore-revs-filecommit can be found here.
- For example the
Javascript/Vue.js
New language for me, no prior experience. Learnt how to read and interpret most of the lines of Javascript in RepoSense.
- Javascript has
Objects which are a container of key-value pairs listing its properties, and some pre-defined methods.- Can perform operations on
Objects similar to what can be done to a map. UseObject.entries(object)to enumerate the key-value pairs. - The properties of an object can be created, edited and accessed from anywhere more similar to languages like Python's OOP
- Can perform operations on
- Javascript uses
(args...) => outputto write lambda functions as opposed to(args...) -> outputfor Java. - Javascript has something known as object destructuring where we can extract the properties of an object.
- Given something like
author = {name: JD, repo: RepoSense}, then doingconst {name, repo} = authorwould allow us to access thenameandrepoas local variables.
- Given something like
Interacting with objects on a webpage:
- Each click on an interactive component on the webpage fires off a
clickEvent.- In Vue, we can tag listener methods to a specific event a component might encounter.
- The event itself also contains details about the circumstances in which it was triggered such as other buttons that were pressed while the
clickEventwas created. - The default behaviour for clicking on an anchor link object is to open the hyperlink reference. This can be prevented with a listener that does
event.preventDefault().
HTML
hrefattribute of an anchor object provides the hyperlink reference to whichever URL page the anchor object is supposed to open.- Notably, if
hrefis not set and left asundefined, then a link will not be opened even iftargetis set.
- Notably, if
- In conjunction with the
hrefproperty, there is thetargetproperty which designates where the hyperlink will be opened.- Most commonly used in RepoSense is
target="_blank"which means to open a new window or tab. - There are other alternatives such as
_selffor opening in the same frame,_parentand_top.
- Most commonly used in RepoSense is
Regular Expressions
Java provides extensive support for Regex matching via the Pattern and Matcher classes which facilitate string parsing.
Patternis Java's class for handling various regex pattern.- The API provides a list of all the recognised syntax. In particular, I would like to go over the different quantifier types as I believe they are quite important for anyone who wants to build complex regex patterns.
Greedy quantifiers- what we see the most often:x?,x*,x+.- These will always try to be met if possible. They take precedence over
Reluctant quantifiers.
- These will always try to be met if possible. They take precedence over
Reluctant quantifiers- e.g.x??,x*?,x+?.- These matched only if it is required for the regex to fully match.
- For example, matching
(?<greedy>.*)(?<reluctant>.*)on the stringExample wordwill result ingreedy = Example wordandreluctant = "";
Possessive quantifiers- e.g.x?+,x*+,x++.- When Java does the matching from left to right, these quantifiers will be matched first. Once Java reaches the end of the line, it actually does backtracking to see if some greedy/reluctant quantifiers can give up some characters for the regex to match.
- However, possessive quantifiers will never give up their characters on backtrack even if it means that the matcher would otherwise have matched.
- Possessive quantifiers should be used carefully. However, their behaviour is more straightforward and easy to understand.
Matcher- We can perform
Pattern p = ...; p.matcher("some String")to obtain aMatcherobject. Most of the information that we want can be obtained from this object. - However, there are some points to be noted about the implementation of the
Matcherobject in Java.Matcherobjects (for Java 8 and 11) are initially just a mutable container containing the regex and the String. Matching logic has not yet been performed.- Suppose we have named groups within our regex pattern. We have to run a
matchesorfindmethod at least once for the object to mutate and support group queries.- Calling a
Matcher::groupdirectly without first callingmatchesorfindleads to anIllegalStateExceptionas the object never attempted to match anything yet.
- Calling a
- We can perform
Regex testing can be particularly cumbersome, slow and difficult to grasp why the regex is behaving the way it is. I personally found this website regex101 which allows convenient testing of various regex patterns on different inputs. It also supports regex testing for different languages.
GSON package
Gson (also known as Google Gson) is an open-source Java library to serialize and deserialize Java objects to (and from) JSON. (Taken from Wikipedia's description)
- I used this baeldung.com guide to learn about converting JSON objects into HashMaps. They also have various other articles describing other features like deserialization to greater depth. Their API can also be easily found online. This is their 2.9.0 API.
- From my experience, the general way in which GSON reads a JSON file is to read it into a
JsonElementabstract class with four different types, aJsonArray,JsonNull,JsonObjectandJsonPrimitive.- Most of the types listed above are very similar to their Java counterparts. The one that stands out is the
JsonObjectwhich is more similar to the Javascript object as it is a collection of name-value pairs where each name is a string and each value is anotherJsonElement.
- Most of the types listed above are very similar to their Java counterparts. The one that stands out is the
- In order to read JSON files into more exotic objects that we might have previously defined, we can either use a
TypeTokenfor the GSONJsonParseror implement our ownJsonDeserializerfor each class we want to be read from a JSON file.- One naive way of parsing a JSON file into a Map is to do
Map map = new Gson().fromJson(JSON_FILE, Map.class);. However, this immediately runs into the problem where the map class itself is using raw types.To avoid this, we can use a
TypeToken. By creating a new type as suchType mapType = new TypeToken<Map<String, Commit>>() {}.getType(); Map<String, Commit> map = new Gson().fromJson(JSON_FILE, mapType);We are able to preserve the generics class types used.
- One naive way of parsing a JSON file into a Map is to do
Others
"file" URI Scheme
- Specification can be found here RFC8089.
- A file URL looks like
file://host.example.com/path/to/file.- Double slashes following the colon
://indicates that the file is not local andhost.example.comis the 'authority' which hosts the file - Single slash or triple slashes after the colon
:/or:///will both be treated as a local file. Everything after the last slash forms the path to the file.
- Double slashes following the colon
- A file URL looks like
cURL command
cURL is a command-line tool to transfer data to or from a server using support protocols. In particular, GitHub Actions shows many examples of RESTful API calls using the curl command.
RESTful API
- REST stands for Representational state transfer. It is an architectural style for an API that uses HTTP requests to access and use data. (description taken from here).
- GitHub has its own RESTful API where we can make queries to repositories and possibly post commands to a repo provided we have proper access rights. The return type for queries is normally in the JSON format.
Bash Shell Scripting
- Can use
.shfiles to write shell scripts that can be run in Linux environments - Can specify functions as
function_name() { ... }- Functional arguments can be referenced from within the function declaration block with
${1}referring to the first argument,${2}referring to the second argument, etc. - These functional arguments can be specified by a user via
function_name "$argument1" "$argument2" $@can also be used to refer to all of the shell script's CLI arguments. It can be iterated through like an array.
- Functional arguments can be referenced from within the function declaration block with
Other popular remote repository hosts
- Any remote site that allows access to a
.gitdirectory is capable of hosting a remote repository - Popular remote repository domains besides GitHub include sites like GitLab and BitBucket
- Interacting with these are nearly identical to interacting with GitHub, with
httpsandsshoptions to clone a repository. - Relevant to RepoSense: the paths to commits and other features are usually different between the sites. For RepoSense to support all these websites, it'll have to take into account the differences in the path to these resources on the website.
- Interacting with these are nearly identical to interacting with GitHub, with
IntelliJ Inspect Code
The Inspect Code tool allows IntelliJ to look for common code quality issues such as
- Declaration redundancy
- Probable bugs
- Proofreading
Limitations:
- A full run of the code cleanup takes a long time to complete. A run on RepoSense itself takes ~10 minutes. This can be cut significantly shorter if we ignore the proofreading checks which cuts it down to 30 seconds.
- 'Unused' (as declared by IntelliJ) fields might not be redundant such as in
SummaryJson.javawhere the fields are necessary for conversion to a JSON file. - 'Unused' methods are sometimes necessary for other tools such as JavaBeans (requires setters and getters) and JavaFX (@FXML methods are not detected as 'used')
Thus, we should still exercise discretion in using this tool even if it is something as simple as removing unused variables or methods.
File locks
When Java opens a file for writing, it obtains a file lock in the form of filename.extension.lck with lck standing for lock.
This serves to support mutual exclusion for access to writing to the file. This appears in RepoSense when loggers attempt to write to the log file in which case, some kind of mutual exclusion gurantee is required.
- Notably, file locks (and other process resources) are released automatically when the main Java process
exits().- However, in some scenarios, releasing the lock only at the end of the entire process might be too late. One example I encountered is that when running
gradlewsystem tests, thelogfile lock is held on to for the entire duration of the run over multiple system tests. This causes issues with running consecutive system tests as I am unable to delete the previous system test's report due to the lingering file lock.
- However, in some scenarios, releasing the lock only at the end of the entire process might be too late. One example I encountered is that when running
- In some scenarios when the program does not exit properly, the
.lckfile might be left behind.- An example execution that results in this is running RepoSense via
gradlewcommand line with the-vcommand. Afterctrl+Cto close the server, the.lckfile persists even though it should have been cleaned up. For some reason, runninggradlewon Ubuntu 18.04 does not have the same issue.- However, this seems to be mostly harmless as it does not affect anything else.
- An example execution that results in this is running RepoSense via
- Suggested by this stackoverflow post, one way to easily release all log resources at the end of Java execution is to use
LogManager.getLogManager().reset()which immediately releases all resources.
Checkstyle
Their GitHub repository can be found here where we can view the features they are working on and bugs that other people are experiencing.
- In particular, there is a rather strange bug relating to
forceStrictConditionwhich is not able to properly detect parent lines of nested line wrapppings.- The relevant issues can be found in Issue #6024 and Issue #6020
- The above issues result in some somewhat strange enforcements, for example (taken from #6024), the code below has violations though it is what we expect the indentations to be
Arrays.asList(true,
        Arrays.asList(true,
                true, //violation
                true));  //violation
- While the same line of code below is what passes the checkstyle but has unusual indentation.
Arrays.asList(true,
        Arrays.asList(true,
        true, // no violation, but should be
        true));  // no violation, but should be
- There appears to be quite a distinct tradeoff here as without
forceStrictCondition, checkstyle only enforces the minimum required indentation level. A user's indentation can be as large as they desire so long as it does not exceed the line character limit.- However, if we were to
forceStrictCondition, then for nested line wrappings, the indentation being enforced can be somewhat strange.
- However, if we were to
Gokul Rajiv
Gradle
Gradle is a very flexible build automation tool used for everything from testing and formatting, to builds and deployments. Unlike with other build automation tools like Maven where build scripts written in XML (a widely hated feature of the tool), Gradle build scripts are written in a domain specific language based on Groovy or Kotlin, which are both JVM based languages. This means that it can interact seamlessly with Java libraries.
Gradle is also much more performant than alternatives like Maven because of its:
- Build caching: Only reruns tasks whose inputs have been changed.
- Gradle daemon: A background process that stores information about the project in memory so that startup time can be cut down during builds.
RepoSense recently added functionality for hot reload on frontend as a Gradle task, which made frontend development a lot more productive. Unfortunately, the feature isn't available on Linux because the package we were using (Apache Ant's condition package) could not specifically check for it. Migrating to Gradle's own platform package recently taken out of incubation, allowed us to support all 3 prominent operating systems.
References:
- https://docs.gradle.org/current/userguide/userguide.html
- https://docs.gradle.org/current/userguide/gradle_daemon.html#sec:why_the_daemon
- https://docs.gradle.org/current/javadoc/index.html?overview-summary.html
- https://docs.gradle.org/current/javadoc/org/gradle/nativeplatform/platform/package-summary.html
- https://ant.apache.org/manual/api/org/apache/tools/ant/taskdefs/condition/package-summary.html
- https://stackoverflow.com/a/31443955
GitHub Actions and API
Like Gradle, Github Actions help with automation of workflows like CI/CD and project management, and can be triggered by a variety of events (pull requests, issues, releases, forks, etc). It also has a growing library of plugins that make workflows a lot easier to set-up. I was surprised that there is some nice tooling support for GitHub actions on IntelliJ.
GitHub actions allows users to run CI on a variety of operating systems, such as Ubuntu XX.04, macOS and Windows Server (which is virtually the same as Windows 10/11 but with better hardware support and more stringent security features).
GitHub also provides a variety of API to interact with these objects. One quirk I came across with the API was that posting single comments on pull requests need to go through the issues endpoint instead of the pulls endpoint (the endpoint for pulls requires code to be referenced). This doesn't cause problems since issues and pulls will never have identical IDs.
GitHub deployment APIs also returns deployment information in pages, which is a sensible thing to do but can cause slight inconvenience when long running PRs have more deployments than can fit in a page.
Actions and APIs also have some great documentation:
- https://docs.github.com/en/rest/guides/getting-started-with-the-rest-api
- https://docs.github.com/en/actions/using-workflows/workflow-syntax-for-github-actions
- https://docs.github.com/en/actions/using-workflows/events-that-trigger-workflows
Git Remotes
Git exploded in popularity in large part due to Git hosting providers like GitHub. GitLab and Bitbucket are also commonly used Git hosts. RepoSense has thus far only largely supported GitHub, but there is a clear incentive to support other commonly used remotes. This is made a little challenging due to differences in conventions between the sites:
base_url | Commit View | Blame View | |
|---|---|---|---|
| GitHub | github.com | {base_url}/{org}/{repo_name}/commit/{commit_hash} | {base_url}/{org}/{repo_name}/blame/{branch}/{file_path} |
| GitLab | gitlab.com | {base_url}/{org}/{repo_name}/-/commit/{commit_hash} | {base_url}/{org}/{repo_name}/-/blame/{branch}/{file_path} |
| Bitbucket | bitbucket.org | {base_url}/{org}/{repo_name}/commits/{commit_hash} | {base_url}/{org}/{repo_name}/annotate/{branch}/{file_path} |
For example, Bitbucket uses the term 'annotate' instead of 'blame' because the word 'blame' is insufficiently positive.
Triangular Git workflows
In investigating the output of git remote -v, I noticed there were 2 remotes (fetch and push) for each remote name, which I was confused by. The utility of the separation of fetch and push remotes is for triangular workflows.
We are probably familiar with the common workflow for updating a branch on a forked repo which involves first pulling updates from upstream master, then making changes and pushing to our own fork. This requires remembering to fetch and push to separate repos. With triangular workflows, you can have fetch and push apply to separate repos but with the same remote name, which makes this process much more convenient.
Cypress Tests
Cypress is a frontend testing tool for testing applications that run in the browser, with tests that are easy to read and write. It uses browser automation (similar to Selenium) and comes with a browser and relevant dependencies out of the box, so it's very easy to set-up. Cypress also provides a dashboard for convenient monitoring of test runs.
https://docs.cypress.io/guides/overview/why-cypress#In-a-nutshell
Bash Scripting
Bash scripts can be run in a github action workflow, which greatly expands the scope of things you can do with actions. Bash is quite expressive (I hadn't realised just how much it could do). some cool things I learned you could do:
- {$VAR,,} to lowercase string in $VAR.
$*gives parameter values separated by the value inIFS(Internal File Separator).- Pipe output into
python3with a-cflag and perform more complex processing with a single line python program. - Standard output and error can be redirected separately (e.g.
ls 1> out 2> err)
Vue
Being relatively new to frontend tools, I found Vue.js to be quite interesting. Vue allows code reusability and abstractions through components. While I didn’t work extensively on the frontend, what I learned from the bits that I did work on was quite cool:
Vue state: I found it interesting that you could have computed properties that are accessed the same way as properties, but can depend on other properties and can dynamically update when these properties change. This is often more elegant than using a Vue watcher to update a field. You can even have computed setters that update dependent properties when set. A watcher, however, can be more appropriate when responses to changing data are expensive or need to be done asynchronously.
Vue custom directives: Directives are ways to reuse lower level DOM logic. Directives can define vue life-cycle hooks and later be bound to components (can actually take in any JavaScript object literal). For implementing lazy loads, I needed to use the vue-observe-visibility (external library) directive with slight modification to the hooks to be compatible with Vue3.
References:
- https://v2.vuejs.org/v2/guide/computed.html
- https://vuejs.org/guide/reusability/custom-directives.html
Pug
Pug is a templating language that compiles to HTML. It is less verbose and much more maintainable than HTML, and also allows basic presentation logic with conditionals, loops and case statements.
JavaScript Quirks
There are a lot of these, and most just remain quirks but some result in actual unintended bugs in production (often in edge cases). It was interesting to see this in our contribution bar logic. A technique sometimes used to extract the integer part of a number is to use parseInt (it's even suggested in a Stack Overflow answer). It turns out we were using this for calculating the number of contribution bars to display for a user. This works for most values, but breaks when numbers become very large or small (less than 10^-7). In this unlikely situation, we'd display anywhere from 1 to 9 extra bars (moral: use Math.floor instead!).
Browser Engines
An investigation into string representations in browsers led me down a rabbit hole of JavaScript runtimes and engines, and ultimately improved my understanding of JavaScript in general. Different browsers have different JS engines - Chrome uses V8, Firefox uses SpiderMonkey (the original JS engine written by Brendan Eich), Edge used to use Chakra but now also uses V8, Safari uses WebKit, etc. Engines often differ significantly in terms of the pipeline for code execution, garbage collection, and more.
The V8 engine as an example, first parses JavaScript into an Abstract Syntax Tree (AST) which is then compiled into bytecode. This bytecode is interpreted by the Ignition interpreter (Ignition also handles compilation of the AST into bytecode). Code that is revisited often during interpretation is marked "hot" and compiled further into highly efficient machine code. This technique of optimising compilation based on run-time profiling (Just-In-Time (JIT) compilation) is also used in other browser engines like SpiderMonkey and the JVM.
The engine is used for running things that are on the browser stack. JS is run in a single thread, and asynchronous tasks are done through callbacks in a task queue. The main script is first run, with things like promises and timeouts inserting tasks into a task queue. Tasks (and microtasks which are more urgent, lower overhead tasks that can execute when the call stack is empty even while the main script is running) in a task queue wait for the stack to be empty before being executed. Page re-renders are also blocked by running code on the stack (long delays between re-renders are undesirable). Using callbacks and hence not blocking the task queue, allows re-rendering to be done more regularly, improving responsiveness. The precise behaviour of task de-queueing (and lower overhead microtasks) can actually differ between browsers, which causes considerable headache.
References:
- https://cabulous.medium.com/how-v8-javascript-engine-works-5393832d80a7
- https://jakearchibald.com/2015/tasks-microtasks-queues-and-schedules/
- https://www.youtube.com/watch?v=8aGhZQkoFbQ
General Software Engineering/Design Considerations
Discussions over PRs, issues and generally attempting to solve issues, were a great way to explore design considerations. Here is a non-exhaustive list of interesting points that came up this semester:
In-house vs External Library
In implementing new functionality or extending existing functionality (Git interface for example), there is usually a question of whether it would be easier to maintain features in-house, or use external libraries. It might be a good idea to maintain core functionality in-house since we'd want more fine-grained control over these features and new features can be added/fixed quickly as needed. At the same time, external libraries save time and cost of learning about and solving possibly complex problems.
External libraries can however introduce vulnerabilities (several incidences of dependency sabotage with npm packages like color.js and node-ipc hit fairly close to home over the course of the semester). Hence, selection of libraries should be a well-deliberated process and should include considerations like active-ness of the project and diversity of maintainers.
Recency vs Ubiquity
In maintaining versions of dependencies, it is often important to weigh upgrading to a new version to get the newest features against possibly alienating users who don't already have that version. Neither is necessarily better than the other and will likely depend on the nature of the product. A new product for developers would probably have users who want new versions with the bleeding edge of features. On the other hand products that already have a large user base and aimed at less technical users might want to favour ubiquitous versions. Since RepoSense is aimed at users of all skill levels, including novice developers, we often default to the later approach.
In a similar vein, it might be important to make sure that new features don't break backward compatibility so that the end-user won't face significant hindrances with making upgrades. At the same time, the need to be backwards compatible can be a root of evil, introducing all manners of hacks and fixes. This highlights the importance of foresight in the early stages of development. Also, deciding when to stop backwards compatibility with a significant version bump can be a non-trivial decision. Doing so should come with thorough migration documentation (sparse documentation for Vue2 -> Vue3 migration caused a lot of developer grievances).
Isolated Testing
While it's fairly obvious that modularity with tests is important and that components should be tested in isolation with unchanging inputs, it is easy to let slip lapses in the form of hidden dependencies that prevent components from being isolated, or having inputs that are actually non-static. Some of these issues came up over the course of the semester but it struck me just how easy it was for them to slip by unnoticed. There aren't necessarily language-level features that enforce coupling rules for the most part since many of these dependencies can be quite implicit.
This had me thinking about the importance of being explicit in crucial sections of code, as described below.
Being Explicit
It is important that programmers make the behaviour of certain crucial sections of code as explicit as possible. One way of doing this is through good naming of methods and variables, and grouping statements semantically into methods or classes. Large chunks of code is detrimental and allows implicit slips in behaviour that can go unnoticed. So we might even want to make new special classes that do very specific things to make it clear that it is an important subroutine/behaviour that deserves its own abstraction.
At the same time, high reliance on object orientation can lead to too many classes, each class doing trivial things and with high coupling between the classes leading to spaghetti logic that doesn't do very much to alleviate implicit behaviour. There exists a delicate middle ground characterised by semantically well partitioned code.
Behavioural Consistency
The earlier section on Javascript quirks were a result of an overly accommodating feature integration during the early stages of development. It's become a cautionary tale of sorts of the importance of consistency and predictability in behaviour. In adding new features, it was personally very tempting to allow small inconsistencies in behaviour in favour of simplicity of implementation. While simplicity is a desirable outcome, I'd argue that consistency is more important (small inconsistencies can runaway into larger un-fixable differences).
Consistency can be with respect to various things. For example, we might want that identical inputs behave the same under similar conditions (differing in non-semantic respects) or that similar inputs (differing in non-semantic respects) behave the same under the identical conditions, etc.
Miscellaneous helpful tools
- The command line tool GitHub cli provides a very handy way to access GitHub API, and has been useful for checking out PRs, interacting with issues, managing workflows, etc right from the command line.
git bisectis a very nice way to find problematic commits. Given a bad commit and a previously good commit,git bisectdoes a binary search (either automatically with a test or with manual intervention) to find the problematic commit where the issue was introduced.- Search through previously run commands (with the first few characters) with ctrl-r in a bash shell.
- GitHub issues and PRs have advanced search syntax like
involves:USERfor all items that involve a user. This was very useful for updatingprogress.md. More features here.
TAY YI HSUEN
Git Cloning/Windows Credential Manager
These are the pointers that I learned while testing out git cloning for private repositories:
- When cloning private repositories for the first time, access is determined by GitHub account credentials.
- These credentials are stored on Windows Credential Manager, which allows cloning private repositories again without having to log in.
- The stored credentials can be deleted. In that case, for the next private repo cloning attempt, the credentials have to be keyed in again.
Java Date/Time APIs
Below is a table comparing some Java 8 date/time APIs that I worked with in PR #1625:
| Point of Comparison | Date | Calendar | LocalDateTime | ZonedDateTime |
|---|---|---|---|---|
| Packaged In | java.util | java.util | java.time | java.time |
| Formatter | SimpleDateFormat | SimpleDateFormat | DateTimeFormatter | DateTimeFormatter |
| Time-Zone | Dependent on time zone. Intended to use UTC, but may depend on host environment. | Dependent on time zone. | Itself not dependent on time zone, but can be combined with a time zone to give ZonedDateTime. | Dependent on time zone. |
| Month Indexing | Zero-based indexing (E.g. January is represented by the int 0) | Zero-based indexing | One-based indexing (E.g. January is represented by 1) | One-based indexing |
| Thread-Safety | No | No | Yes | Yes |
| Usage in RepoSense | No longer in use. Before PR #1625: Store commit timestamp. | No longer in use. Before PR #1625: Add/subtract date-time. | Store commit timestamp. Time-zone is stored separately. | Format dates for git commands and convert commit timestamps to user's time-zone. |
What happened when SimpleDateFormat was used in RepoSense:
- When formatting or parsing dates, the internal state of the
SimpleDateFormatis mutated. - This causes race conditions, as described in this post.
- There are two possible error scenarios:
- A
NumberFormatExceptionis thrown, just like in issue #1601. - A date string is parsed with no exceptions, but the date turns out to be wrong/weird. This can be detected by running tests or system tests involving date parsing/formatting and checking the test output against the expected output.
- A
Additional Resources:
- https://www.baeldung.com/java-8-date-time-intro
- https://www.baeldung.com/migrating-to-java-8-date-time-api
- https://www.callicoder.com/java-simpledateformat-thread-safety-issues/
Toolstack upgrades over many versions
Sometimes, the toolstack used in a project may be very out-of-date, requiring a jump over many versions to reach the latest version. Here are some tips for upgrading the toolstack:
- Start a separate branch for your upgrades.
- Check the current versions of the tools that your project is currently using.
- Also take note of any requirements from your current toolstack/project that need to be preserved.
- Check through the release notes for all versions from the current version to the target version that you intend to upgrade to.
- Although it is ideal to upgrade to the latest version, it may be unrealistic to jump straight there, given that major compatibility-breaking changes can accumulate.
- Instead, aim for an intermediate version to gradually resolve issues with backward compatibility.
- While searching through the release notes, take note of any deprecations and compatibility-breaking changes.
- Take note of any third-party dependencies. Some of them may not have been upgraded alongside the main tools.
- After upgrading the relevant tools, check that the toolstack/project requirements are preserved.
Gradle Task Configuration Avoidance
Gradle has 3 build phases:
- Initialization - determine which projects are part of the build
- Configuration - evaluate build script file and the task properties and dependencies
- Execution - run the relevant tasks
While trying to upgrade Gradle for RepoSense, I came across the task configuration avoidance feature, which allows skipping the configuration of unwanted tasks:
tasks.register("taskA") {
    // Configure the task here
}
What tasks.register does is to indicate that such a task exists. However, the task is only created and configured proper if something else in the build needs it.
Using the below syntax eagerly configures the task, regardless of whether the task is ultimately needed or not:
task taskA {
    // Configure the task here
}
By avoiding task configuration for unwanted tasks, build time for the necessary tasks can be reduced.
Java 8 vs 11: Why Java 8 is still popular
While exploring the possibility of migrating RepoSense to Java 11, one consideration was whether potential RepoSense users are also migrating beyond Java 8. If most users stay with Java 8, this would decrease the size of our user base.
A few surveys attest to the popularity of Java 8 vs other versions (including Java 11). These surveys can be found below:
- https://www.infoworld.com/article/3652408/java-8-still-dominates-but-java-17-wave-is-coming-survey.html
- https://snyk.io/blog/developers-dont-want-to-leave-java-8-as-64-hold-firm-on-their-preferred-release/
While long-term support (LTS) was cited as a key factor in staying with Java 8, this can only explain why Java 8 is more popular than non-LTS versions. Java 11 and 17 are also LTS versions after all.
Another possible factor is the change in Java licensing for Java 11 and beyond. As explained in this article, organisations using the Oracle JDK version of Java 11+ for commercial purposes need to pay for it. There is also OpenJDK, but in the same article, it was mentioned that some organisations are reluctant to use OpenJDK.
On an additional note, Java 8's Extended Support is expected to last longer compared to other LTS versions at this point in time. For example, while Java 8 has Extended Support until December 2030, Java 11's Extended Support will end in September 2026. However, support for Java 11 may be extended in the future.
Zhou Jiahao
Cypress
Cypress is a tool for testing anything that run in a web browser. It is fast and easy to use. It allows the user to write reliable tests. Cypress can cover unit tests, integration tests as well as end-to-end test. Cypress also records down all the states during test for easy debugging.
I learned how to set up a new Cypress test, fetch the target value and add assertions by using the Official Cypress Documentation. This was used in of one the PRs when I modify some frontend behaviours.
I also learned about the best pratices as well as some common anti-patterns when writing Cypress tests. One issue was raised over the use of wait() most of our Cypress tests. This is actually an anti-pattern as described in the guide. In short, the previous command will not resolve until a response is received (or timeout in a negative case). Therefore, there is no need to explicitly wait. The use of wait() in the context only slows the the test unnecessarily. After removing the use of wait(), the local test speed was reduced from an average of 135 seconds to 60 seconds, which is quite a significant improvement. For more details, please visit Cypress Best Practice.
Migration from Vue 2 to Vue 3
RepoSense uses Vue for frontend. The current Vue version used is Vue 2. Vue 3 was a major upgrade introduced in September 2020. It is a major revamp from Vue 2. It is faster, lighter and introduce better TypeScript support. Migrating to Vue 3 is inevitable from a long term perspective. However, with such a major upgrade, many of the exisiting sytanx are no longer supported/changed. This bring a lot of issue during migration. The Vue 3 Guide summarises the breaking changes.
The migration process is also long and tedious. The Official Vue Migration Build provides a clear path to upgrade. This is also the one that I am currently using to work on the migration.
(Vue) v-if and v-for
In Vue 2, when using v-if and v-for on the same element, v-for would take precedence. In Vue 3, v-if will always have the higher precedence than v-for. In the migration guide, it is stated that:
It is recommended to avoid using both on the same element due to the syntax ambiguity.

Rather than managing this at the template level, one method for accomplishing this is to create a computed property that filters out a list for the visible elements.
This makes a lot of sense. When we mix if and for together, we might end up confusing ourselevs and introduce bugs that are diffifcult to catch. When we operate on a filtered list, there is no ambiguity is the code. Not only does this help us to avoid bugs, it also makes the code easier to read and easier for someone else to understand.
(Vue) v-if vs v-show
v-if is a “real” conditional rendering as it is created/destroyed when the condition is true/false. v-if is also lazy in the sense that the condition within the conditional block will only be rendered until the condition is true.
On the other hand, v-show always renders the element regardless of the initial condition. The visibility is controlled by the css.
In general, v-if has higher toggle cost because it needs to render the element when the condition is true. However, it can be used to save some initial loading time if it is false initially. v-show might incur higher initial reader costs because everything is rendered on loading, but the toggling cost is very little. The general advice is that if you need to toggle the element very often, use v-show. Use v-if if the condition is unlikely to change during runtime.
(Vue) Watchers
Computed properties allow us to compute derived values declaratively. However, sometimes the values changes due to side effects of the program. Watchers allow us to trigger a function whenever a property changes.
We often use watcher on an array property. In Vue 2, the watcher is triggered whenever something within the array changes. However, this is not the default setting in Vue 3. In Vue 3, the watcher will only be shallow. Meaning that it will only be triggered when the watcher property has been assigned a new value. Any inner value changes will not trigger the watcher to fire. This is likely due to performance optimisation. To enable watcher action on all nested mutation, we need to use a deep watcher. The following code snippet is an example.
watch: {
    someObject: {
        handler(newValue, oldValue) {
            // action to take
        },
        deep: true // Needed in Vue 3 for mutation of nested values
    }
}
Checking Plugin GitHub Issue Page
When dealing with a plugin (debugging/upgrading), we sometimes face some unexplained behaviours. I spent hours debugging and searching for decumentation only to realise that it is a bug of the plugin. Always check the issue page of the plugin when in doubt, especially when it comes to compatibility issues after upgrading the plugin or other plugins.
Opening Issues
When opening an issue, we should make the problem clear. We should explicitly state the difference and the expected behaviour so that anyone can understand the issue clearly. An unclear issue may lead to misunderstanding and lead to hours wasted on an unrelated work.
Working with JSON files
Never put any comments in .json files. Comments of the form //... and /*...*/ are not allowed. Some IDEs do not flag out this as an error and such files might be able to be used normally. However, when error arises due to this issue, it is extremely difficult to find the error as the error message often do not point to the incorrect files.
Class-style component syntax
I came across this term during the integration of Typescript to our project. In Vue, this means that the syntax will be export default class Counter extends Vue. This is an alternative to the normal style we use. Some of the advantages includes the ability to utilize some ECMAScript language features such as class inheritance and decorators. For more details, please refer to here.
The use of a utility class
Some functions are used by many parts of the project. We might find it tempting to put everything in a utility class and make it accessible to everyone. However, this increases coupling and makes future debugs/updates extremely difficult. We should examine the consumers of the functions and group them in a sensible way. In stead of having a huge utility class, we can split it into smaller ones with clear responsibilities. This way we apply separation of concerns and we might not need to make the class global.
Some useful typescript syntax
- Optionals can be represented as
?. For example,age?: numberis equivalent toage: number | undefinedbut it is much simpler to read and write. - Arrays can be represented as
Array<T>orT[]. I personally think that it is better to use the latter as it allows us to define an array of any complex objects. - We can define our own type if it is used commonly. The syntax is straightforward. However, take note of the Differences Between Type Aliases and Interfaces.
TEAMMATES
Chang Weng Yew, Nicolas
Angular
File Structure
Unlike React which bundles structure and functionality into a single file, Angular divides this task for a few files such as:
- Component file: Defines the functionality of the component using Typescript (x.component.ts)
- Template file: Define structure and what the component looks like in HTML (x.component.html)
- Specification file: Used to perform unit/ integration on the component (x.spec.ts)
Directives
After defining the component it is still possible to use provide it with extra behaviour using directives. Directives are classes that can be added to the component when it is used on a page. The directives I have encountered are
- (NgIf)[https://angular.io/api/common/NgIf]: Allows conditional rendering for a component based on a boolean condition
- (NgbDropdown)[https://ng-bootstrap.github.io/#/components/dropdown/api]: Helps create dropdown menus - added from Angular Bootstrap
Event Emitters
Communication between components from the child to the parent are done through event emitters. These are helpful when a child component on a page has been clicked, and the parent has to have knowledge of which child has been selected before fetching data for the child to be displayed to the user. After defining an event emitter, the emit() method can be called to return a value to the parent.
This snippet uses the @Output decorator to informs the parent which row has been clicked when the function is called.
// Component file - reminder.component.ts
@Output()
sendRemindersToAllNonSubmittersEvent: EventEmitter<number> = new EventEmitter();

sendRemindersToAllNonSubmitters(rowIndex: number): void {
    this.sendRemindersToAllNonSubmittersEvent.emit(rowIndex);
  }

// child template file - child.component.html
<reminder (click)="sendRemindersToAllNonSubmitters(idx)">

// parent template file - parent calls sendEmail function open receiving event from child.
<table (sendRemindersToAllNonSubmittersEvent)="sendEmail($Event)">
Flow of inputs and outputs
There are 3 ways data can flow between components.
- [disabled]="canViewSessionInSections": [] bracket indicate data flows from parent's property canViewSessionInSections to the child's property disabled.
- (click)="sendRemindersToAllNonSubmitters(idx): () like the previous example, triggers the event emitter to inform the parent to send all reminders for the course on the xth row.
- [(size)]="fontSizePx": A combination of 1 and 2 and is called 2 way binding, where data can flow between parent and child.
References: Event Emitters inputs and outputs
Backend
Servlets and backend routing
My experience with the backend was limited to Express (a Node.JS framework), and did not even know that Java it was possible to have a backend in Java. TEAMMATES uses Jetty, a Java framework to route requests from users. The entry point to the backend is in web.xml a file that is read from top to bottom and can be thought of as a sieve which directs requests in that order.
<filter>
    <filter-name>WebSecurityHeaderFilter</filter-name>
    <filter-class>teammates.ui.servlets.WebSecurityHeaderFilter</filter-class>
</filter>
<filter-mapping>
    <filter-name>WebSecurityHeaderFilter</filter-name>
    <url-pattern>/web/*</url-pattern>
    <url-pattern>/index.html</url-pattern>
    <url-pattern>/</url-pattern>
</filter-mapping>
<servlet>
    <description>Servlet that handles the single web page application</description>
    <servlet-name>WebPageServlet</servlet-name>
    <servlet-class>teammates.ui.servlets.WebPageServlet</servlet-class>
    <load-on-startup>0</load-on-startup>
</servlet>
<servlet-mapping>
    <servlet-name>WebPageServlet</servlet-name>
    <url-pattern>/web/*</url-pattern>
</servlet-mapping>
<servlet>
    <description>REST API Servlet</description>
    <servlet-name>WebApiServlet</servlet-name>
    <servlet-class>teammates.ui.servlets.WebApiServlet</servlet-class>
    <load-on-startup>0</load-on-startup>
</servlet>
<servlet-mapping>
    <servlet-name>WebApiServlet</servlet-name>
    <url-pattern>/webapi/*</url-pattern>
    <url-pattern>/auto/*</url-pattern>
    <url-pattern>/worker/*</url-pattern>
</servlet-mapping>
Above is a snippet from the web.xml file in TEAMMATES. The main 2 constructs used in routing are filters and servlets. Filters can be thought of as sieves, where a request that matches the pattern found in <filter-mapping> would execute the filter defined in filter-class before continuing execution in the web.xml file. Servlets follow the same pattern but start with the prefix servlet for example <servlet-mapping>. Unlike filters, servlets dead-end a request, the request gets passed on to the servlet that it matches and does not get passed down any further.
Gradle
Tasks and Gradle configuration
Tasks are snippets of code that can be executed by gradle. There are a few tasks that are pre-configured to perform a task by configuring some variables. I used the javaexec task which executes a java script when run. One problem faced was that Gradle configures every task on build evaluating an expression and assigning it to the variable. This led to a null pointer exceptions even if the task was not run e.g user wants to use gradle to lint the project. This was because I had directly assigned the environment variable as the java class to be run. To get around this an if-statement which checks if the environment variable is present before assigning it to the variable. I had not done this previously as I had thought variables could only be assigned once and was not optional.
https://docs.gradle.org/current/dsl/org.gradle.api.tasks.JavaExec.html https://stackoverflow.com/questions/31065193/passing-properties-to-a-gradle-build https://www.youtube.com/watch?v=g56O_HeefBE https://docs.gradle.org/current/userguide/build_lifecycle.html http://www.joantolos.com/blog/gradletask/
Git
Fetching
During PR reviews, I learnt that it is sometimes better to see the changes a person has made directly in my browser. Previously, I was only familiar with git pull which under the hood combined the fetch and the merge into a single step, but required the branch to track a remote which was not feasible for PR reviewing since this remote would be used once or at most a few times. I then found that git fetch allowed you to specify the repository URL (the link used to clone a repo) and the name of the branch to fetch, assigning it to a reference called FETCH_HEAD, which can be checkout-ed. This allowed me to quickly fetch the branch and switch into it and make some testing, usually I would also create a temporary branch so that I can check on the changes at another time.
https://www.atlassian.com/git/tutorials/syncing/git-fetch https://git-scm.com/docs/git-fetch
Rebasing
When my team started to work on the notification banner feature, we realised that no matter how much planning is done, it was sometimes inevitable for our code to be dependent on someone elses. Instead of more conventional methods such as copying pasting code, which does not have the benefit of resolving conflicts, merging branches into my working branch would also be messy since their branches are actively updated, sometimes even force pushed. Instead, I learnt how to rebase from my teammates, which lets you put a series of commits on your branch on top another branch. This can be done several times, if a branch X is in turn dependent on branch Y, and you require Y. One downside is that you would have to fetch and update each branch and perform a rebase ontop of this new branch, but this is a small cost instead of rushing out a PR or idling, when the code you require is completed but just not merged into master.
FANG JUNWEI, SAMUEL
Sass
Sass is a preprocessor scripting language used in TEAMMATES that compiles to CSS. It extends CSS with additional functionalities such as
Variables: Variables can be defined as follows:
$variable-name. Once defined, they can be reused throughout the project. This can be used to help keep things consistent throughout the project. For example, we could define a color scheme to be used throughout the project.Nesting selectors: Sass allows one to nest CSS selectors, helping to keep things neat. An added benefit is that the nested CSS selectors follow the same visual hierarchy as the corresponding HTML, making it easier to follow logically. This commit (authored by me) is an example of how nested CSS selectors can help to make CSS neater, more readeable and improve future maintainability.
Modules and Inheritence: Sass has powerful functionalities that allows one to compose two stylesheets together, or inherit one stylesheet from another. This helps promote the Don't Repeat Yourself (DRY) principle, reducing repetition in our stylesheets.
Lots more features: There are lots more features such as mix-ins and operators that I didn't manage to explore! Take a look at the reference if you are interested 😃
References: https://sass-lang.com/guide
Google Cloud Datastore
Cloud Datastore is a NoSql Database used in TEAMMATES. In extremely simplified terms, Cloud Datastore is built upon what are essentially giant immutable maps (SSTable) across several servers(tablets), with servers organised into a hierarchy based on a B+ tree like structure. Software and fancy algorithms are used to coordinate the distributed storage system. A paper on this can be found here. This architecture results in certain limitations, some of which are discussed below, which we need to keep in mind when working with Cloud Datastore.
Queries at scale
Cloud Datastore (like most other NoSql databases) is built to be extremely scalable. Something I found rather interesting was that all queries scale with the size of the result set, not the size of the dataset. While pretty cool, this also limits the types of queries we can make. In particular, inequality filters cannot be applied on more than one attribute (e.g. startTime > 19:00 && endTime < 20:00). When we design data models which require complex queries, we need to be careful of what operations are supported.
A common anti-pattern is to use monotonically increasing sequential key names. This reduces performance as it creates "hot-spots" or keys that are close together, resulting in one server handling all the load due to how the database is organised (look up database sharding). An interesting side note is that a two byte scatter key is appended to the end of data properties in indexes (since data properties are used as the key) to increase cardinality of data to ensure database sharding works efficiently.
Indexes
Indexes help speed us efficiently query Cloud Datastore for entities. An over-simplified way to think about indexes are a map of property to key of the entitity. While indexes help speed up queries, each entity indexed requires storage space, calculated as the sum of key size, indexed property values and some fixed overhead. Storing an index incurs storage costs.
A point to note is that we have to be careful with how many indexes we have. Having too many indexes is an anti-pattern and will result in a longer time before consistency is reached, as discussed in the next section.
Consistency
Consistency is an issue for most distributed databases and Cloud Datastore is no exception. One common misconception is that all operations are eventually consistent, this is not true. In particular, lookup by key (normal read ops) and ancestor queries are strongly consistent. However, operations that involve indexes are eventually consistent, because it takes awhile to update the indexes. We can get around this by being smart about how we handle consistency issues. For example, after creating an entity, we might want to display all entities of the same type to the user. Apart from using the index to retrieve all the entities we can also query the exact entity we just added in order to give the illusion of strong consistency.
References:
- https://www.youtube.com/watch?v=0EIqacNVuAo
- https://cloud.google.com/datastore/docs/concepts/indexes
- https://cloud.google.com/datastore/docs/articles/balancing-strong-and-eventual-consistency-with-google-cloud-datastore
- https://static.googleusercontent.com/media/research.google.com/en//archive/bigtable-osdi06.pdf
- https://cloud.google.com/datastore/docs/concepts/queries#restrictions_on_queries
- https://cloud.google.com/datastore/docs/concepts/storage-size#index_entry_size
Higher-Order RxJs Mapping Operators
RxJS is a library used in TEAMMATES for composing asynchronous and event-based programs using observable sequences. While the basic operators (map, filter, etc.) are relatively straighforward to use, operators that work on higher-order observables can be quite challenging to wrap one's head around.
Higher-order Observables are observables that operate on or emit other observables (analogous to the relationship between functions and higher-order functions). The three most common higher-order mapping operators (operators that work on higher-oder observables) are concatMap, mergeMap and switchMap.
Basics
Higher-order mapping operators maps an observable that emits multiple observables (inner observables) into a single observable. As a rule of thumb, if your code contains nested .subscribes, you probably want to use a higher-order mapping operator.
Differences between concatMap, mergeMap and switchMap
So what's the difference between the three operators mentioned? Well they solve the problem of how the inner observables should be mapped. Since the timing in which observables emit values are not fixed, the order in which they emit values may be random. Depending on our application, we need different strategies to combine the values emitted from these observables into one sequence of values.
concatMap: Use this when sequential ordering is desired.concatMapsubscribes to the first inner observable. It only subscribes to the second inner observable once the first one is complete.mergeMap: First come first serve! Subscribe to all observables and emit values in order in which they are emitted by the inner observables.switchMap: It's like concatMap, except we unsubscribe from the first observable as soon as the second observable starts to emit values. This captures the intent "I only care about the most recent request".
Refer to this excellent resource for a more comprehensive look at higher-order mapping operators including the motivations behind each operator.
References:
End-to-end Testing with Selenium
E2E testing is used in TEAMMATES to test that different components of the application work well as a whole. Selenium WebDriver is used in TEAMMATES to interact with elements in the UI.
How To
In general, most E2E tests in TEAMMATES follow the following steps:
- Navigate to page: which involved opening the browser via Selenium WebDriver, navigating to the page and ensuring that the correct page has loaded.
- Interact with UI element: locate the UI element and interact with it, simulating an actual user input.
- Verify state: get information about the state of the UI/Database and verify correctness. For example, verify the correct text is displayed and that the correct entity has been persisted into the database.
For more details on how to set up selenium and the available methods, refer to the selenium documentation.
Testing Methodology
Testing Methodology is influenced by the following factors:
- In general, the cost of E2E tests are much higher than lower level tests in TEAMMATES as data is persisted to the actual database. In addition, the time taken for each test is much higher, although this is a less important factor. This means that we have to be careful when choosing E2E testcases.
- Edge cases are already covered in lower level tests, where the costs of doing exhaustive testing is much lower. This means that we should not be too concered about covering edge cases in E2E tests.
Because of this, it is common when designing E2E tests to focus on testing that the components work well together on the happy path and leave comprehensive testing to lower level tests.
Page Object Pattern
The Page Object Pattern is used in TEAMMATES (and is one of the design patterns recommended by selenium) to reduce code duplication and seperate test and page specific code.
In essence, we encapsulate all page related code in a page object, for example, code that locates elements and interacts with it. Interaction with the page is exposed as methods in the page object. This way, any changes to the UI elements of the page only affects the page object. In addition, test related code do not have to concern themselves with the low level details of how to interact with the UI.
References:
- https://github.com/TEAMMATES/teammates/blob/master/docs/e2e-testing.md
- https://www.selenium.dev/documentation/webdriver/getting_started/
- https://www.selenium.dev/documentation/test_practices/encouraged/page_object_models/
Tips and Tricks
- When viewing a repository or pull request, press
.to bring up the built in vs-code based web editor. Especially handy if you need to view other parts of the codebase when reviewing a PR. - You can create a branch directly from an issue on GitHub. Yes, even if the branch is in a forked repo!
- Press
tto open file finder in github repos to easily find files!
JAY ALJELO SAEZ TING
Overall, I believe that because I was the least experienced (or at least I felt I was), I was also able to learn a whole lot from this module, especially front-end-wise.
Angular
While I used Angular to make a PR for TEAMMATES before the semester started, I think I still had a lot more to learn about it, like front-end unit testing (especially this because that initial PR had no tests at that point in time) which I was able to learn when I eventually actually made that PR in the real TEAMMATES repo. Due to the bindings, I had to pay especially close attention to the component testing scenarios of a component with inputs and outputs and a component inside a test host.
However, that was mostly component and snapshot testing. In order to also learn how to do testing for services, I also did testing for the feedback responses service. Though, I learned that testing services seemed largely similar to and yet much simpler than testing components.
Beyond testing, I also learned how to create services themselves in this onboarding task commit where I created the service to get feedback response statistics from the backend. I also learned how to integrate this service with the actual page component in order to actually obtain statistics to display using RxJS.
As for components or their templates, I learned about more about how to use Angular's HTML templates in order to direct inputs to and outputs from a component through property binding and event binding respectively. I also learned about how the custom structural directive tmIsLoading worked in this PR as I was debugging when I initially wrongly caused the loading spinner to always display when I was in fact trying to display something else (eventually found out it was because I used the same boolean variable used to display the spinner, so don't be like me; check the usages of any variable you reuse). I also learned how to use <ng-container> and <ng-template> in that same PR, particularly with structural directives like ngIf.
Resources:
- Component Testing Basics
- Component Testing Scenarios
- Service Testing
- Services (Dependency Injection)
- Property Binding
- Event Binding
- Structural Directives
- ng-container
- ng-template
RxJS
In order to integrate Angular services that used asynchronous requests with components, I had to learn about Observables and Subscriptions from RxJS. I also had to learn other things from RxJS like the operators pipe or first for the previously mentioned component testing I did due to the fact that EventEmitter objects used for event binding apparently functioned like RxJS Observable objects.
Resources:
HTML/Bootstrap/Web development in general
While I have taken some online web development courses in my free time before, I have actually never touched web development in a real project, only backend and mobile application development. Thus, doing some front-end work benefitted me a lot. For example, I was able to use my initially largely untested (and back then, slowly fading) knowledge of HTML and/or Bootstrap to some use such as in my onboarding task commits where I (re-)learned how to align everything nicely using the Bootstrap grid system (sorry if this is really basic) or in TEAMMATES PR #11628. Actually, after doing the front-end stuff in the onboarding task, I decided to go into the back-end for the deadline extensions feature so that I could learn TEAMMATES front to back, but perhaps I should have stayed in the front-end for the deadline extensions feature too to learn more. Still, virtually all my non-deadline extensions feature PRs were front-end related so maybe I was still able to learn as much as I could about the front-end.
Resources:
Jest/Jasmine
I learned how to use these to do front-end unit testing in Angular as previously mentioned, particularly things like expect to check values are as expected, spyOn to mock services, beforeEach for common test setup code, and related attributes/functions (toBeTruthy(), etc.).
Also, I learned about snapshot testing. I initially had no idea this existed before (sorry if this is basic), and yet it seems to be pretty widely used (?) so learning of its existence seemed important.
Resources:
D3.js
I learned how to use D3 to display charts. I used this to create the feedback responses statistics chart.
Resources:
Angular Material
I was looking into the issue Instructor: Edit rubric question: reorder options using drag and drop #8933; I initially wanted to do a PR before my exams started but I unfortunately had no time to do so. Regardless, I was able to look into how I could possibly do it after my exams when I have time.
I looked through the code base to see how drag and drop is implemented in other question types such as in multiple choice questions and I found out that we use the CDK Drag and Drop module from Angular Material. Angular Material allows Material Design components to be added into Angular. From what I understand, Material Design provides a sort of library or system with customizable front-end components to provide pre-made UI functionality. I have actually used it previously when I did my own side projects for Android, though this is my first time using the drag and drop component (or similar) because it is currently not available on Android. Besides, I have also never used Material Design within Angular at all before.
The nice thing about Angular Material is it hides all the underlying code away and all that is minimally necessary to add is the cdkDrag Angular directive. Unfortunately, from what I see, it seems that the drag and drop functionality provided by Angular Material does not work very well for table columns, which is the main focus of the issue. In general, it seems that tables are not well supported by Angular Material drag and drop, based on how tables are missing from the official documentation. Fortunately, there are workarounds like from this post from Stack Overflow and its linked StackBlitz project or from this blog post. However, these solutions do not produce satisfactory results, at least to me. When the columns are dragged along rows, the animations and "previews" do not show up for the rest of the rows, only for the row that was clicked on (such as the header). On the other hand, it does work well for dragging rows along columns. I suspect this has to do with how tables work in HTML, which is that they are essentially not really a single element but actually split into multiple table cell elements; this is unlike table rows which are single row elements. This means that Angular Material drag and drop probably works pretty well with rows, adding animations/previews. Unfortunately, this is not the case with columns. I believe that to enable this for table columns, it may be necessary after all to actually implement it from scratch after all, manually checking the location of the mouse and changing the columns appropriately to provide the animations/"previews" while dragging, or other similar implementations.
Still, this was interesting and I did learn things. I also believe that with this, adding drag and drop for the table rows would be pretty simple, if necessary. I could also look through how drag and drop is currrently done in Angular for inspiration on how to do it for the columns, or maybe it actually is possible to do it without implementing the functionality myself.
Resources:
- Drag and Drop | Angular Material
- Angular drag and drop intersection (e.g. rows and columns in a table) - Stack Overflow
- Draggable Table with Angular CDK
Google Cloud Datastore/Objectify
I have previously used Firebase Cloud Firestore, an NoSQL database. I remember how when I used Firestore, I also noticed Datastore, but I just told myself to look at it at another time, and it seems like the time was now. Overall, I found out more about Datastore and how it works, like how it is also a NoSQL database, and I found similarities between entities and documents, and between kinds and collections, which was how I was able to understand it quickly.
For the deadline extensions feature, we had to maintain maps from email addresses to deadlines within the feedback session entities. I learned that this was not a standard Datastore value type so a possible way of storing this would be to store it as a Blob. I also learned that to do this within Objectify, this can be done through the Serialize annotation.
In order to validate requests to update the deadline maps, we needed to check if the emails in the requests actually existed for the corresponding course. One way would be to load every single CourseStudent entity and every Instructor entity. However, I learned that this costs a certain amount and not only that, the cost scales for every read of every instance. I found out about projection queries, which only scales with the number of queries, not the number of entities read in that query. This was more economical and thus, I chose to do this instead. Strangely, I do not think projection queries are documented in Objectify, so I had to refer to StackOverflow to find out how to do projection queries within Objectify.
I also learned that projection queries needed indices, and I initially wrongly thought that this was only for the properties that were projected, not other properties within the same query that were, say, filtered for instance. I also previously read that every property of each entity kind already has a built-in index of its own, so I initially wrongly assumed that I did not need to write any more indices for my projection queries. However, Fergus (I believe?) pointed out to me that this was wrong and looking at it again, it does make more sense for all properties used in a query, so both projections and filters, to require a composite index altogether. However, this then came with a downside, as I also found out that indices cost money to maintain too due to their storage costs.
Resources:
- How data is stored in Datastore (Entities, Properties, and Keys)
- Datastore supported value types
- Serialization
- Datastore Pricing
- Projection queries
- Projection queries in Objectify
- Projection queries requires indexes
- Built-in indexes
- Composite indexes
Google Cloud App Engine
I have also only previously used Google Cloud Functions or Firebase Cloud Functions. I also remember how when I used either of them, I also noticed App Engine and then also told myself to look at it at another time, so getting to learn it by joining TEAMMATES, like Datastore, was such a great thing.
I think the main thing I learned was the task queues, though unfortunately, they are already phased out. I am at least hoping that this knowledge is transferable to what I believe is the new equivalent service of Google Cloud, which is Cloud Tasks. Regardless, I had to use task queues in order to run the workers created by Samuel which handle deadline extension entities for the deadline extensions feature.
Resources:
LIU ZHUOHAO
GCP: Billing Mechanism
I did a research on how Google Cloud's services are being billed, especially on the mechanism for Datastore and App Engine. This gives me better way to appreciate the importance of achieving balance between feature/performance over reallife contraints such as budget contraint.
Documents Referred:
GCP: Datastore Indexing
I learned how Datastore works and the importance of indexing. As by default only ascending order is indexed by Datastore, more compilcated queries involving sorting and ranging needs a custom index to be built before queries can be processed.
Documents Referred:
- https://cloud.google.com/datastore/docs/concepts/indexes
- https://cloud.google.com/appengine/docs/standard/java/datastore/indexes
GCP: Datastore, Objectify and Google Cloud GUI
Knowledge on how to manipulate datastore entities are gained along the way of working on onboarding tasks. This includes the use of Objectify API and the DatastoreClient framework.
Documents Referred:
- https://www.javadoc.io/doc/com.googlecode.objectify/objectify/latest/com/googlecode/objectify/Objectify.html
- https://github.com/GabiAxel/google-cloud-gui
- Codes in the teammates repo itself
Angular: Life-Cycle Hooks, View/ContentChild and ElementRef
Researches on these core APIs were done when I attempt to add event listeners for mouse scroll events.
Documents Referred:
- https://angular.io/guide/lifecycle-hooks
- https://angular.io/api/core/Directive
- https://angular.io/api/core/ViewChild
- https://angular.io/api/core/ContentChild
- https://angular.io/api/core/ElementRef
Angular: Attribute Directive and HostListener
This seems to be a more convenient way to change the behaviour of a component. It is also very convenient for code reuse. Directive can be declared once and easily imported to any other modules. It is more flexible than the ElementRef solution to add event listener.
Document Referred:
Angular: EventEmitter and Handlers
This is a way to synchronize and pass output data from a sub-component to its parent component. It is very convenient in use.
Document Referred:
Jest: Fixing Failed Test
During development, I encountered problem of failing tests. One issue is the missing dependencies. By default,
when generate Angular's component using ng generate, the jest test file does not import the module itself but
declares the component in the test file.
This leads to missing dependencies for rendering the component during the test. However, if I import the module in the test file, it will show an error saying the component is declared in multiple modules. The way to resolve this is to remove the declaration of component from the test.
The other issue encountered is the error of attempt to convert circular structure to json. This is mainly due to missing dependencies during the initialization of tests. The link below provides a easy way to check which module is missing for imports.
Document Referred:
- https://stackoverflow.com/questions/45764202/angular-test-fails-because-component-is-part-of-the-declarations-of-2-modules
- https://stackoverflow.com/questions/63895685/unhandledpromiserejectionwarning-typeerror-converting-circular-structure-to-js
RxJS: Observable, Pipe, Finalize()
Observable is runned asynchronously and if there is the other async function running within an observable (such as the other observable's subscription or setInterval()), the running sequence is not guaranteed. Therefore, the outside finalize() can actually run before codes inside finish execution.
Document Referred:
- https://rxjs.dev/api/operators/finalize
- https://rxjs.dev/guide/operators
- https://rxjs.dev/guide/observable
TestNG: @BeforeMethod and @AfterMethod
These two are runned before and after every Java unit test methods. So good to use it to set up common variables
and database entities. For example, for TEAMMATES, @BeforeMethod can be used to import all related entities from
typical data bundle. Then, @AfterMethod fetch all IDs and delete all entities to clear the database.
Document Referred:
- https://www.javatpoint.com/testng-beforemethod-annotation
- https://www.javadoc.io/doc/org.testng/testng/7.0.0/org/testng/annotations/BeforeMethod.html
Jest: SpyOn
This method can be useful for frontend testing as it can mock a certain function (i.e. injecting a mocked function). For example, it can be used to replace message service's toast functions to record the number of calls to them and the message used to present to the users.
Document Referred:
Snapshot testing methology
Snapshot tests are to be generated from a set state, not from a process. For example, component's state can be set directly and then take the snapshot. Process can be tested separately instead of combining it with the snapshot tests.
MOK KHENG SHENG FERGUS
Frontend
Angular
Angular is a frontend framework built on TypeScript. A majority of Angular's functions uses Typescript decorators, which are adds functionalities to functions and class.
Each Angular component uses a selector (for other components to reference this component), HTML template, and CSS file to decorate the HTML template.
Furthermore, within the HTML template, we are able to use Angular directives. Examples are *ngIf, *ngFor. The asterik is synthetic sugar that surrounds the HTML with a <ng-template>, and is useful for adding and removing tag elements. Another interesting feature is that Angular supports two-way data binding directly, where the HTML's value can affect the actual value and vice versa. Done with [(NgModel)]
See:
- https://angular.io/guidestructural-directives#what-are-structural-directives;
- https://angular.io/guide/two-way-binding#adding-two-way-data-binding
Angular's CLI is also extremely useful, and most basic features from building and testing are ready out of the box.
RxJS
RxJS is a library that helps with async and event-based functions in TEAMMATES through Observables and Subscriptions. RxJS can also be used with other frameworks, like React and Vue.
Common pattern of usage:
- Create a service class, with a function that calls the backend API. This function returns an Observable.
- We can call the service from our component, and add on operators to the Observable, such as pipe and subscribe.
- Pipe will chain observable operators, and subscribe will activate the observabe to listen for the emitted values.
Jasmine and Jest
Jasmine is a testing framework. It describes test cases, and can make use of spies, that can mock return values, track the status of the function. Furthermore, combined with using inspecting HTML elements, we can check the values of the components in different conditions.
Jest is another testing framework used for snapshots. We're able to take snapshots, save them, and compare them later when running the tests again. This is especially useful for regression testing.
Backend
Google Cloud Datastore
I learnt how Datastore's key-value works, it's strengths and limitations, and important conventions. These conventions are seemly counterintuitive for users with an SQL background for smaller applications, but makes sense when building applications at scale.
Counters
For example, as datastore's structure does not support aggregating functions, functions such as counting is an O(n) operation. The Datastore community's (counterintuitive) convention is to have multiple Counter class.
These counters may also face simultaneous write limitations, which is known as contention, when counters change at >5/s. This results in needing to implement 'sharding' counters.
Google's article: https://medium.com/@duhroach/datastore-sharded-counters-2ba6da7475b0
Hotspotting
Datastore's (counterintuitive) convention when writing a large amount of data is to avoid monotonically increasing IDs. This is because ranges of storage with similar IDs are stored on the same 'node'(known as tablets), and massive writes to a node will lead to a significant slowdown, called hotspotting. This is a significant pain point for time-series data.
Former Googler: https://ikaisays.com/2011/01/25/app-engine-datastore-tip-monotonically-increasing-values-are-bad/
The convention is to prepend with a known amount of random numbers/hash, or prepend the ID with other useful fields that can be used for querying later on.
Schema Design: https://cloud.google.com/bigtable/docs/schema-design
Indexes
Datastore is built in a way that requires indexes for every single field that requires that needs to be queried. This is because Datastore cannot reference the data of columns, and ONLY the key during the query. The (counterintuitive) convetion is to make indexes for most fields of an entity, and this can lead to 90% of the storage for an entity to be indexes alone. This leads to a trade-off for more performance at scale.
However, Google does not bill for storage, and only for writes and reads.
Google's tutorial: https://youtu.be/d4CiMWy0J70?t=75
Git ReReRe
While most people know the basics of git, git rerere is slightly more advanced. It stands for Reuse recorded resolution. This is useful when working in parallel with branches, and rebasing a long-lived branch that will give merge conflicts. The common problem is having to resolve the same conflict each time you rebase your branch. After toggling rerere on, you will no longer need to resolve the same conflict again after solving it once. This is because git will record your conflict merge results, and auto-solve them the next time around.
git config rerere.enabled true
Alternatively, if you are aware that many of your new commits will result in a conflict, it also be easier to squash them then rebase.
Git ReReRe: https://git-scm.com/docs/git-rerere
Additional Tips
- To pass additional flags to
npm run, you can use append-- --<flag>. E.gnpm run test -- --detect-open-handles
ZHAO JINGJING
Frontend
Angular
Angular is the framework used for the TEAMMATES frontend, and it has the following features:
- Components and services are organized into NgModules, according to their usage
- Decorators such as
@Component()and@Injectable()to define whether each class is a component or service - Component templates dictate how to render the component, with directives to apply application logic (e.g.
*ngIfto render a component conditionally,*ngForto iterate over a list) - Services shared across components are injected as dependencies
@Inputand@Outputare used to share data between parent and child components- Lifecycle hooks such as
ngOnInitare provided for use when there are changes made to the component - Availability of pipes to transform data displayed in templates
Other than the above features, some of the important things I learnt were:
- Understanding the usage of lifecycle hooks - Similar to the React
useEffecthook, the AngularngOnInitandngOnChangeshooks can be used to respond to any changes in the component. One important thing to note is the difference between the component constructor and thengOnInithook - the former is usually used to set up dependency injection, while the latter is called once the component has finished instantiation. One key difference is that variables passed using@Inputcan only be accessed inngOnInit. - Writing custom pipes that can be used throughout the application to display data such as dates in a specific format.
Resources:
Jasmine/Jest
The TEAMMATES frontend uses Jasmine/Jest for component testing. Its features include:
- Running setups shared across all tests in a test suite using
beforeEach() - Mocking services and methods using
spyOn()andcallFake() - Using expectations (
expect()) to ensure correct behaviour - Generating snapshot tests to check the display of the component once it has been rendered
Through TEAMMATES, I have learnt to use tests effectively in various scenarios, for example:
- Using snapshot tests to check that the display of the component is correct at different states (e.g. loading, loading failed, loaded with data)
- Designing tests that test the expected behaviour (success/failure) of the component (e.g. by checking the expected result, checking that a function has been called, etc)
Resources:
Backend
Google Cloud Datastore
TEAMMATES uses the Google Cloud Datastore as its database (now updated to Firestore in Datastore mode, making it strongly consistent). Each entity in the database has a unique key as well as one or more properties. One thing to note is that Datastore does not enforce the structure of entities, and therefore it is important for TEAMMATES to enforce checks on the database values, as it may cause issues where adding an attribute to an existing entity type causes null to be returned when accessing the value of the attribute for entities that are already in the database.
Though Datastore is fast and highly scalable, it comes with its limitations:
- All properties used in queries have to be indexed. Though this speeds up the query process, it uses up storage space and therefore may lead to higher costs.
- A query can only contain inequality filters on at most one property, so as to avoid scanning the entire index. To query for entities using inequality filters on multiple attributes, we need to make multiple queries and combine their results.
- Pricing is based on entity reads and writes, hence improper management of the database can lead to high costs. There are ways to reduce such costs, such as using key-only queries.
Resources:
Java Serialization
Objects in Java can be serialized into a stream of bytes so that it can be saved in a database. Java data structures such as HashMap are serializable by default, but any class can implement the Serializable interface, as long as all the fields in the class are serializable. If a field cannot or need not be serialized, the transient keyword can be used to exclude it from the serialization.
Resources:
End-to-End Testing
Selenium
TEAMMATES uses Selenium, which is a set of tools that enable the automation of web browsers, for end-to-end (E2E) testing. Its features include:
- Opening and navigating a web browser using
WebDriver - Finding web elements by id, class name, etc
- Clicking elements such as buttons
- Retrieving element attributes
By using the above features, the testing of various user flows from start to finish is automated, so as to ensure that the application is working as intended for all of the application's use cases.
In designing E2E tests, I learnt about the Page Object Model, where all code related to a certain page in the application is encapsulated in a Page Object, such as methods for interacting with the page or checking the page contents.
Resources:
Zhang Ziqing
Angular
Angular is a development platform built on TypeScript. There are three types of Angular directices in general:
- Components: directives with a template.
- Attribute directives such as
NgClassandNgStyle: directives that change the appearance or behaviour of an element. - Structural directives such as
NgIf,NgForandNgSwitch: directives that change the DOM layout by adding and removing DOM elements. - Some less obvious built-in directives:
a, form, input, script, select, textarea.
There are two types of forms in Angular:
- Reactive: Reusuable and synchronous data flow between the view and the data model.
- Template-driven: TEAMMATES generally uses this type of forms. It focuses on simple scenarios despite being not reusable.
Modules vs Directives vs Services:
- Modules provide a way to namespace services, directives and filters. It helps avoid global variables.
- Services are singletons. BUIlt in services start with
$. Dependency injection is required on the dependent. - Directives allow componetized HTML.
Pipes encapsulates custom transformations and could be used in template expressions. We can chain pipes using a series of pipe operator | in templates.
Binding:
- Property binding: sets a specific elemtn property. (e.g.
[disabled]="isNotificationEditFormExpanded") - Event binding: listens for an element change event. (e.g. `
- Two-way binding
- We can use
@Input()to receive data from parent and@Output()to send data to parent.
Resources:
Angular Developer Guide Overview , Tour of Heroes app and tutorial
Introduction to Service Worker, Service Worker and PWA in Angular
d3.js
D3.js is a JavaScript library for manipulating documents based on data using HTML, SVG, and CSS. It is flexible due to its low-level approach that focuses on composable primitives such as shapes and scales rather than configurable charts.
Resources:
OAuth2.0
TEAMMATES staging and production server uses OAuth 2.0 for authorization.
Resources:
Using OAuth 2.0 with the Google API Client Library for Java
Google Cloud Datastore and Objectify
TEAMMATES uses Google Cloud Datastore as database. Through the onboarding task, I learnt about keys-only query which is a subtype of projection queries. Such queries allow querying for specific properties with lower latency and cost. From project of notification feature, I got the chance to apply my knowledge of key-only queries on GET API to fetch the ids of all notifications such that it saves cost for checking whether a notification is in the database or not.
I also learnt about composite index which index multiple property value per index entity. It needs to be configured in an index configuration file.
I learnt that eventually consistent queries generally run faster but may return stale results compared to strongly consistent queries which guarantee the most updated result but take longer to run. As we move from Datastore to Firestore in Datastore mode, it becomes strongly consistent instead of eventually consistent.
Resources:
Documentation Guides on Datastore Queries
Data Consistency in Datastore Queries
Backend
Backend workflow:
- Request from users are forwarded to
WebAPIServlet, which usesActionFactoryto find the matchAction. ActionhascheckAccessControlandexecute.executegenerates anActionResultobject, which will be sent back to user viaWebAPIServlet. For notifications, the format of output isJsonResult.
Java keywords:
transient: Variable with this modifier will not be serialised. During serialisation, the original value is ignored and a default value of that variable would be saved. For example, iftypicalDataBundlestores a transient variable of an object, when the object instance is fetched, that field will not be saved. This is useful to protect sensitive information.volatile: Instead of writing to cache, all writes to a volatile variable will be written back to main memory immediately. Therefore all reads will be read directly from main memory. This guarantees the visibility for other threads of writes to that variable.
Resources:
Java Programming/Keywords/transient Java Volatile Keyword
Testing
Frontend - Jest:
jest.spyOn(object, methodName)allows tracking calls toobject[methodName]and creating a mock function. The spied methods are useful for mock implementation of services in frontend testing.- Snapshot testing renders a UI component, takes a snapshot and then compares it to a reference snapshot file stored together with the test. Snapshot testing is great when you want to validate the structure of something like a component or an object.
Resources:
Jest Snapshot Testing documentation
Backend:
- I learnt how to use
dataBundleto create different instance of testing objects. - Test Driven Development is helpful especially to catch bugs before fixing it.
E2E - Selenium, PageObject:
Selenium provides extensions for website test automation.
Selenium WebDriverAPIs identifies Web elements. WebDriver provides bindings which support classes. It has two-way communication with broswer through a driver (eg. ChromeDriver). WebDriver passes commands to Broswer through driver, while receives information back via the same route.Selenium helps identify web elements using locator strategies (e.g. class name, css selector, id, name or link text).
findElementmethod will return the first element found in the context.findElementsreturns all elements matching a locator.Selenium helps interact with web elements. Basic commands are
click,send keys,clear,submitandselect.selectcould be useful to selection an<option>in a<select>element.PageObject design pattern is useful to model UI as objects in test code, reducing duplicated code. The public method in page object represents serivices that the page offers with proper abstraction. They return page objects.
PageFactorypackage is used in TEAMMATES.
Resources:
Selenium Documenation PageObject by Martin Fowler
Non-technical knowledge
- It is important to communicate openly and professionally so that everyone could sync up with each other.
- When releasing a feature, we might need to think of how to get the MVP done ASAP, so instead of working on everything simultaneously (i.e. both user facing features and admin features), sometimes it might be better to focus on getting one done thoroughly first.
- PR review requires strategy of concise and respectful communication. Writing reviewer friendly code is important to help them review more efficiently. It is also more preferred to make smaller PRs logically.